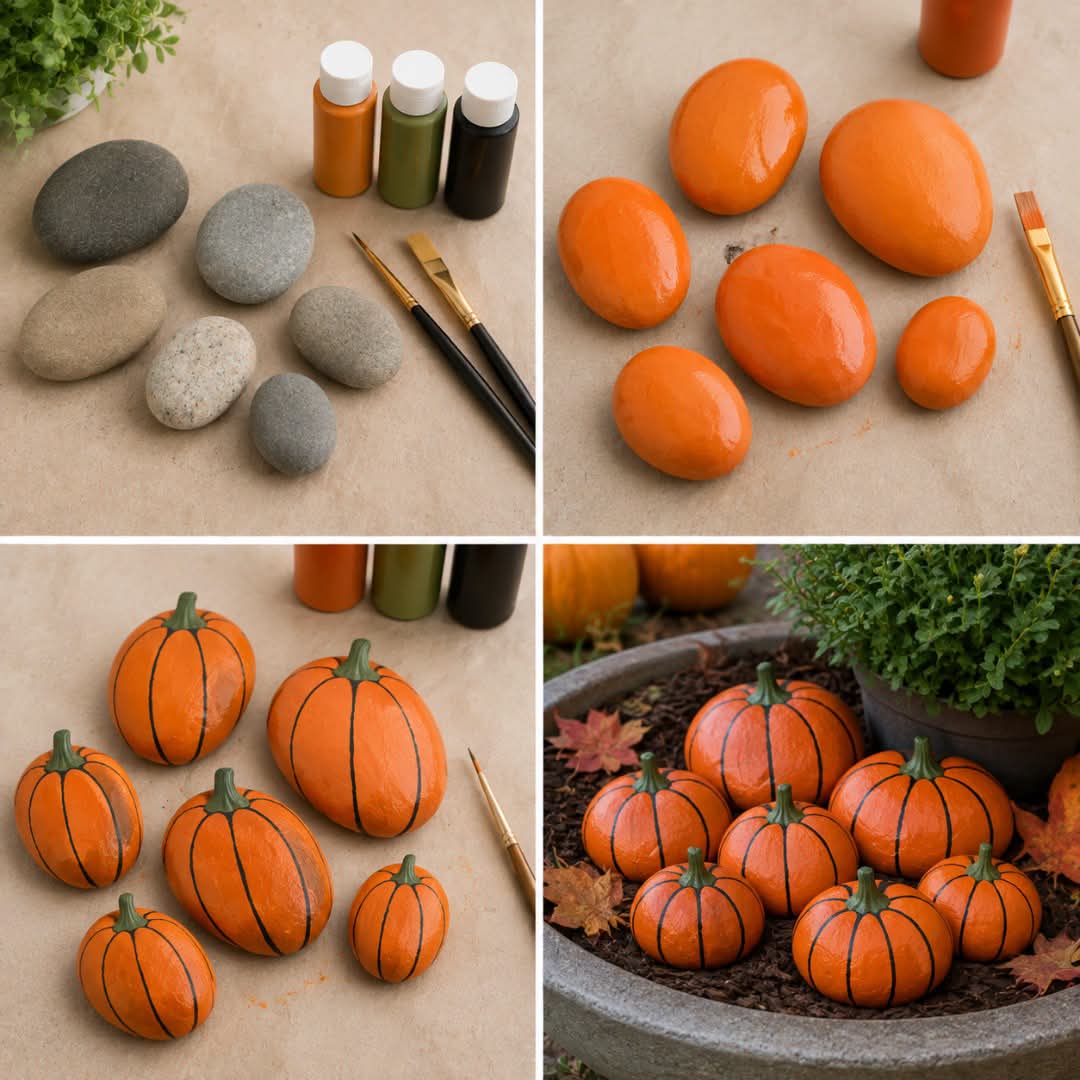
🍂 A Fall Take on Painted Rocks: Easy Autumn Rock Painting for Everyone
There is something wonderfully cozy about fall crafts. As the leaves begin changing colors, pumpkins appear on porches, and the air gets cooler, it’s the perfect time to bring a little autumn color into your home and garden.
One of the easiest fall crafts to try is painted rocks.
You don’t need to be an artist, and you don’t need a huge collection of expensive supplies. A few smooth rocks, some acrylic paint, and a little imagination can turn ordinary stones into adorable fall decorations.
You can paint pumpkins, colorful leaves, acorns, mushrooms, scarecrows, sunflowers, owls, or even simple words like “Hello Fall!”
And because every rock is a different shape, every finished piece has its own personality.
🍁 What You’ll Need
Basic Supplies
- Smooth, clean rocks
- Acrylic craft paint
- Small and medium paintbrushes
- Fine-tip paint marker, optional
- Pencil
- Paper towel
- Water cup for rinsing brushes
- Paint palette or paper plate
- Clear acrylic sealer
For outdoor decorations, choose a sealer appropriate for outdoor use and follow the manufacturer’s directions. A clear spray sealer is commonly used for painted rocks, and several light coats are preferable to one heavy coat. (Aleene’s)
Optional Supplies
- White acrylic paint
- Black paint
- Orange paint
- Yellow paint
- Red paint
- Brown paint
- Green paint
- Gold paint
- Paint pens
- Glitter
- Tiny brushes
- Sponge
- Stencils
You really don’t need everything on this list.
Start with what you already have.
🪨 Step 1: Choose Your Rocks
Look for rocks that have relatively smooth surfaces and interesting shapes.
Flat rocks are particularly easy to paint because they give you more room for your design.
Round rocks can be perfect for:
- Pumpkins
- Apples
- Acorns
- Owls
- Faces
Longer rocks can become:
- Leaves
- Corn
- Fall signs
- Little mushrooms
If you’re collecting rocks outdoors, make sure you’re allowed to take them from that location. You can also purchase smooth craft rocks.
🧼 Step 2: Clean the Rocks
This step is important.
Dirt and dust can prevent paint from adhering properly.
Wash the rocks with water and gently scrub away dirt.
Allow them to dry completely before painting.
Craft instructions from Michaels likewise recommend washing rocks to remove dirt or coatings and allowing them to dry completely before painting. (Michaels)
Don’t rush this part.
A completely dry rock gives you a much better surface to work with.
🎨 Step 3: Paint a Base Coat
You can paint directly onto the natural rock, but a base coat can make your fall colors stand out more.
Try:
White for bright colors
Cream for a softer farmhouse look
Black for dramatic designs
Light brown for rustic fall artwork
Orange for pumpkin designs
Apply a thin layer and allow it to dry.
If the rock still looks patchy, add another coat.
Let each layer dry before adding the next one. Multiple thin coats often give better coverage than trying to apply one very thick layer. (Michaels)
🎃 Step 4: Choose Your Fall Design
Now comes the fun part!
Here are some easy ideas.
🎃 Pumpkin Rocks
Paint the entire rock orange.
Once dry, add:
- Black or brown pumpkin lines
- A green stem
- A little leaf
- A funny face, if you want a jack-o’-lantern
You can also write:
BOO!
HELLO FALL
HAPPY HARVEST
THANKFUL
🍂 Fall Leaf Rocks
Leaves are one of the easiest autumn designs.
Draw a simple leaf outline with a pencil.
Fill it with yellow, orange, red, or brown.
Then add the central stem and several smaller veins.
For a more realistic look, blend orange into yellow or red into orange while the paint is still workable. A fall-leaf rock tutorial uses a yellow outline, orange blending, and painted leaf veins for this effect. (ilovepaintedrocks.com)
Don’t worry about making your leaf perfect.
Real leaves aren’t perfect either!
🌳 Step 5: Try an Autumn Tree
An autumn tree looks beautiful on a larger flat rock.
Start by drawing a tree trunk.
Paint the trunk brown.
Add several branches extending outward.
Then add little dots of:
- Red
- Orange
- Yellow
- Gold
around the branches.
You can also paint fallen leaves underneath the tree.
A similar autumn-tree rock technique creates leaves by making small pointed paint dots in different fall colors. (ilovepaintedrocks.com)
Easy Trick for Leaves
Dip the tip of a small brush into paint.
Touch it to the rock.
Pull slightly.
Lift.
You’ll create a tiny leaf-like shape.
Repeat with different colors.
🍄 Step 6: Paint Mushrooms
Fall is perfect for mushroom designs.
Paint a little mushroom cap in:
- Red
- Orange
- Brown
- Cream
Then add a white or cream stem.
Small dots on the mushroom cap make the design even cuter.
You can paint several mushrooms on one large rock or create a little collection of individual mushroom rocks.
🦉 Step 7: Make an Adorable Owl
A round rock is perfect for an owl.
Paint the body brown or gray.
Add two large eyes.
Then add:
- A small beak
- Wings
- Feet
- Little feather details
For an extra-fall look, place the owl on a branch surrounded by painted leaves.
🌻 Step 8: Paint Sunflowers
Sunflowers are another beautiful fall design.
Paint a yellow flower with a brown center.
Add green leaves and a stem.
You can make the design simple or add layers of yellow and orange to create more depth.
A sunflower rock looks especially nice displayed alongside pumpkins and leaf rocks.
✏️ Step 9: Add Words
You don’t have to paint complicated pictures.
Sometimes a simple message looks best.
Try:
Hello Fall 🍂
Give Thanks
Thankful
Grateful
Harvest
Welcome
Pumpkin Season
Gather
Cozy
Blessed
Lightly sketch your lettering with a pencil first.
Then trace over it with a fine paintbrush or paint marker.
🖌️ Step 10: Add the Details
Once the main design has dried, go back and add the little details.
This is where your rock really starts coming alive.
Add:
- Leaf veins
- Pumpkin lines
- Tiny dots
- Highlights
- Shadows
- Outlines
- Stems
- Little stars
- Fall-colored patterns
A fine-tip paint marker can make small details and outlines much easier.
⏳ Step 11: Let Everything Dry
Don’t rush to seal your masterpiece.
The paint should be completely dry before you apply a sealer.
For the most reliable results, allow the finished artwork plenty of drying time, particularly if you’ve used several layers of paint. Some rock-painting guides recommend letting finished rocks dry overnight before sealing. (ilovepaintedrocks.com)
✨ Step 12: Seal Your Painted Rock
If your rock is going outdoors, sealing it is especially important.
A clear acrylic spray sealer can help protect the artwork from weather, fading, and chipping. (Aleene’s)
How to Seal It
- Make sure the paint is completely dry.
- Place the rock on a protected surface.
- Work in the location and conditions recommended on your sealer.
- Apply a light first coat.
- Allow it to dry according to the product instructions.
- Apply another light coat if needed.
- Make sure the sides and back are protected if the rock will be outdoors.
Avoid soaking the rock with sealer.
Several light coats are generally better than one heavy coat because heavy application can cause drips, pooling, or other finish problems. (Aleene’s)
Always read the label and use spray sealers with the ventilation and safety precautions specified by the manufacturer.
🍂 Step 13: Create a Fall Rock Collection
Here’s where this craft becomes really fun.
Instead of painting just one rock, make an entire collection.
Imagine a little display with:
🎃 Three pumpkin rocks
🍂 Five colorful leaf rocks
🍄 Two mushroom rocks
🌻 A sunflower
🦉 One cute owl
🌳 An autumn tree
❤️ A “Thankful” rock
Arrange them together in a flower bed, on your porch, around a planter, or on an indoor shelf.
Suddenly, you have your own little fall garden.
🏡 Ways to Display Your Fall Rocks
Porch Decoration
Place painted pumpkins and leaves around your front-door display.
Garden
Scatter sealed fall rocks around flower beds.
Indoor Bowl
Fill a decorative bowl with small painted leaves and pumpkins.
Table Centerpiece
Arrange several rocks around a candle or vase.
Mantel Decoration
Line up seasonal rocks with pumpkins and other fall décor.
Gift Idea
Paint a personalized fall rock for a friend or family member.
👧 A Great Family Craft
Painted rocks can also be a wonderful family activity.
Everyone can choose a rock and create their own design.
One person might paint a pumpkin.
Someone else paints a leaf.
Another person makes an owl.
There doesn’t have to be a “right” way to do it.
That’s part of the fun.
And if you’re painting with children, choose age-appropriate materials and supervise them around small objects and craft supplies.
🍁 Beginner-Friendly Fall Rock Ideas
If you’re not confident with painting, start with these:
⭐ Level 1: Easy
- Polka dots
- Leaves
- Pumpkins
- Hearts
- Simple flowers
⭐⭐ Level 2: A Little More Detail
- Sunflowers
- Mushrooms
- Owls
- Acorns
- Fall trees
⭐⭐⭐ Level 3: More Detailed
- Autumn landscapes
- Realistic leaves
- Farmhouse signs
- Scarecrows
- Detailed woodland scenes
You don’t have to start with the most complicated design.
Your first rock is just practice.
💡 Tips for Better Painted Rocks
Don’t worry about perfection.
Your rock doesn’t need to look like it came from a professional artist.
Let layers dry.
Trying to paint wet paint over wet paint can muddy your colors.
Use a pencil first.
A very light sketch can make complicated designs much easier.
Use contrasting colors.
Dark lettering on a light background is easier to read.
Try paint pens.
They’re particularly useful for small lines, lettering, dots, and details.
Keep your first project simple.
A beautiful orange pumpkin with a green stem can look better than an overly complicated design.
♻️ Can You Hide or Leave Painted Rocks Outside?
Some painted-rock communities enjoy leaving decorated rocks for others to discover.
If you decide to do this, check the rules of the location first.
Don’t leave rocks in places where they could create a hazard, interfere with landscaping, damage natural areas, or violate local rules.
A safer option is to display your creations in your own garden or give them to friends and family.
🍂 Why Fall Is Perfect for Rock Painting
Fall gives you such a beautiful color palette:
Pumpkin orange.
Deep red.
Golden yellow.
Warm brown.
Cream.
Rust.
Forest green.
You don’t need dozens of colors.
Even just orange, yellow, red, brown, green, black, and white can create an entire collection of autumn designs.
And that’s what makes this such a great seasonal project.
You can take an ordinary rock and turn it into something cheerful, personal, and completely unique.
🍁 Final Thoughts
A fall painted-rock project doesn’t have to be complicated.
Find a rock.
Clean it.
Let it dry.
Choose a fall design.
Paint your base coat.
Add your details.
Let everything dry completely.
Seal it if appropriate.
Then display and enjoy it.
Whether you paint a simple pumpkin, a colorful autumn leaf, or an entire little fall scene, you’re creating something with your own hands.
And sometimes the simplest crafts are the ones that make a home feel the coziest.
So grab a few rocks, pull out those fall colors, and let the autumn creativity begin! 🍂🎃🧡
