🍁✨
There is something magical about fall evenings. The days get shorter, the air turns crisp, and suddenly we want everything in the house to feel a little warmer and cozier.
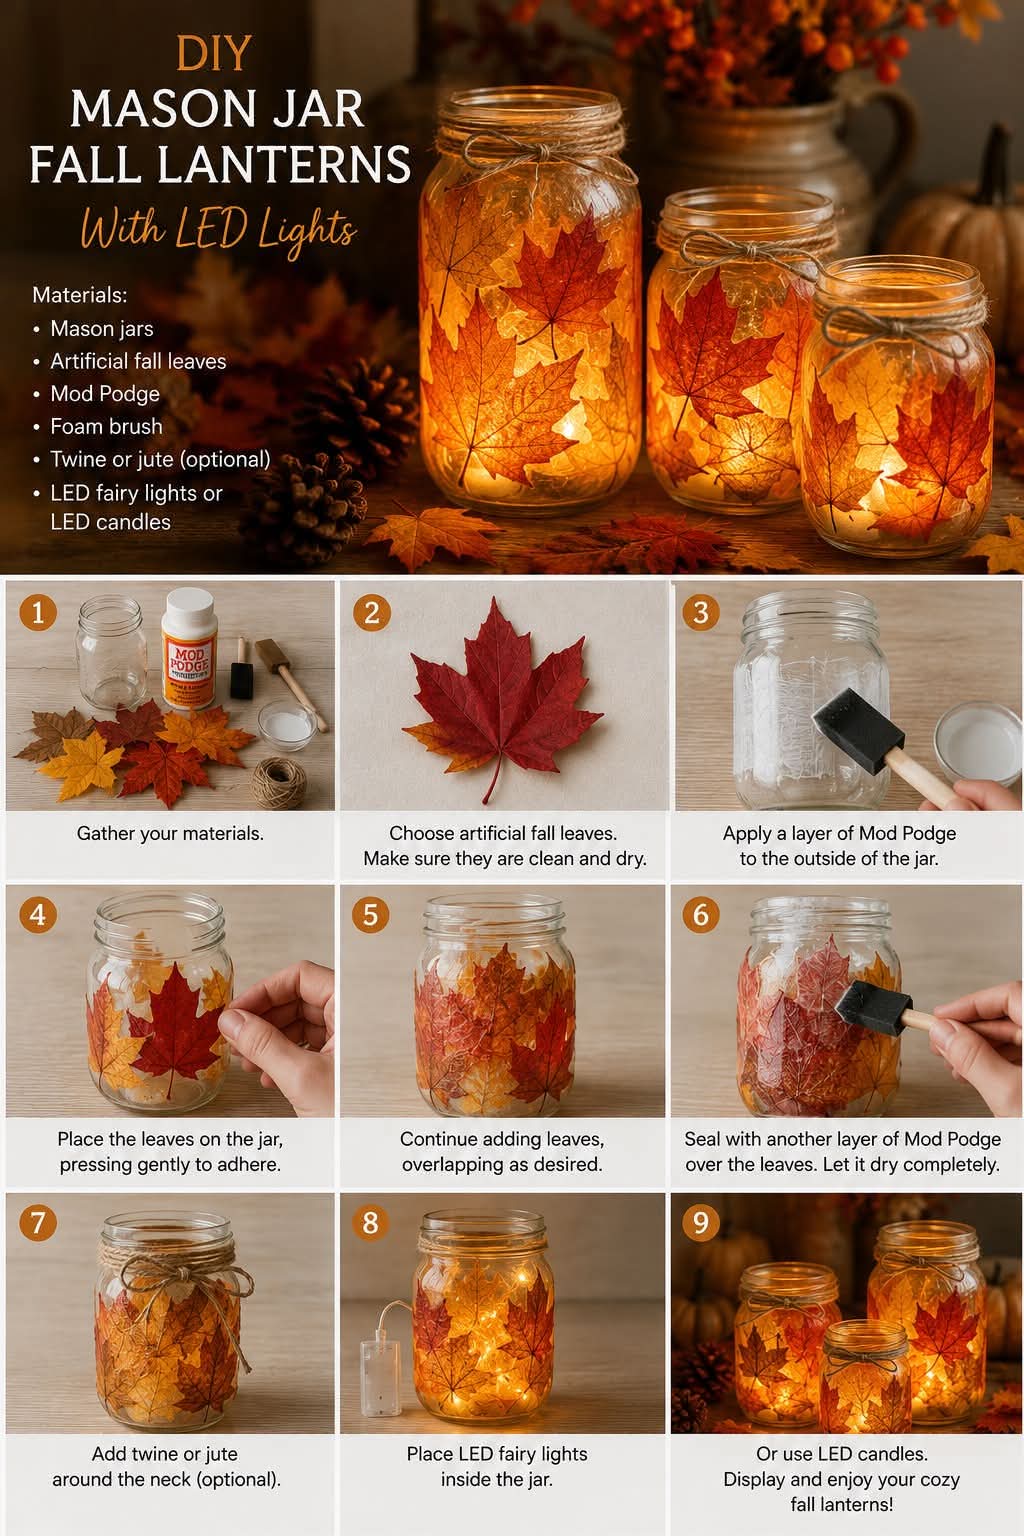
One of my favorite ways to bring that feeling indoors is with DIY Mason Jar Fall Lanterns.
With a simple glass jar, a few beautiful autumn leaves, Mod Podge, and a warm LED light, you can create a charming little lantern that looks beautiful on a mantel, dining table, entryway, porch, or cozy corner.
And the best part? You don’t need to be crafty or spend much money to make them.
Similar leaf-lantern projects use real or artificial leaves attached with Mod Podge and illuminated with battery-powered tea lights or fairy lights. (easycraftypattern.com)
🍂 Why You’ll Love This Fall DIY
These little lanterns are:
- Easy to make
- Budget-friendly
- Beautiful for fall
- Great for using recycled jars
- Customizable
- Perfect for Thanksgiving
- Wonderful for a fall centerpiece
- Fun to make with family
You can make one lantern or create an entire collection in different sizes.
The light shining through the spaces between the leaves creates a soft, warm glow that makes an ordinary Mason jar look completely different.
🛒 Supplies You’ll Need
For One Lantern
- 1 clean Mason jar or recycled glass jar
- 5–10 small autumn leaves, real or artificial
- Mod Podge
- Foam brush or small paintbrush
- Battery-operated LED tea light or fairy lights
- Twine, raffia, or ribbon
- Scissors, if needed
- Rubbing alcohol and cotton ball, optional
You can use real leaves from your yard, pressed leaves, or fabric/artificial leaves. Real leaves work especially well when they are flattened and dry. (Fox Farm Home)
Optional Decorations
- Small acorns
- Tiny pinecones
- Fall-colored ribbon
- Burlap
- Cinnamon sticks
- Small artificial berries
- Wooden beads
- Fall stickers
- Gold or copper paint
🍁 Step 1: Collect Your Leaves
This can actually be one of the most enjoyable parts of the project.
Go outside and look for leaves in beautiful autumn colors.
Look for:
🍂 Yellow leaves
🍁 Orange leaves
❤️ Red leaves
🤎 Brown leaves
💛 Golden leaves
Try collecting different shapes and sizes.
Small leaves are often easier to attach to a curved jar than very large ones.
If you’re collecting natural leaves, make sure they’re dry and flexible enough to work with.
📖 Step 2: Flatten the Leaves
Fresh leaves can curl and make decorating the jar difficult.
A simple solution is to press them.
Place the leaves between sheets of paper and put them underneath a heavy book for a day or two.
Pressed, dry leaves are commonly used for fall lantern projects because they lie flatter against the glass. (Fox Farm Home)
If you’re short on time, artificial fabric leaves are another easy option.
🫙 Step 3: Clean Your Mason Jar
Wash the jar thoroughly with warm soapy water.
Remove any labels and sticky residue.
Dry the jar completely.
For an especially clean surface, wipe the outside of the jar with a little rubbing alcohol and allow it to dry. This helps remove fingerprints and oils that can interfere with adhesion. (Ideas for the Home)
Try not to touch the areas you’re about to decorate once you’ve cleaned them.
🎨 Step 4: Start With the Mod Podge
Pour a small amount of Mod Podge onto a plate or disposable surface.
Use your foam brush to apply a thin layer to a section of the outside of the jar.
Don’t cover the entire jar with glue at once.
Working in small sections makes it much easier to position your leaves.
🍂 Step 5: Add Your First Leaf
Place a leaf onto the Mod Podge-covered area.
Gently press it against the glass with your fingertips.
Smooth it from the center toward the edges.
Try to flatten any wrinkles or air pockets.
If the leaf isn’t sticking immediately, give the Mod Podge a short time to become slightly tacky before placing the leaf. This technique is recommended in several leaf-lantern tutorials. (One Little Project)
🍁 Step 6: Add More Leaves
Continue working around the jar.
Add a little Mod Podge.
Place another leaf.
Smooth it down.
Repeat.
There’s no right or wrong pattern.
You can overlap some leaves or leave spaces between them.
For a beautiful lantern effect, don’t completely cover every inch of the glass. Leaving some clear areas allows more light to shine through. (Ideas for the Home)
Try Different Arrangements
Random:
Scatter leaves naturally around the jar.
Layered:
Overlap yellow, orange, and red leaves.
Symmetrical:
Place similar leaves opposite each other.
Bottom-heavy:
Cover mostly the lower half of the jar and leave the upper portion clear.
🖌️ Step 7: Add a Top Coat
Once your leaves are positioned where you want them, brush another thin layer of Mod Podge over the leaves.
Make sure the edges are covered.
This top coat helps hold the leaves in place and gives the finished lantern a more finished look. (easycraftypattern.com)
Don’t worry if the Mod Podge looks white at first.
It typically dries clear.
⏰ Step 8: Let It Dry Completely
Set the jar somewhere safe and let it dry.
Drying times vary depending on how much Mod Podge you’ve applied and the conditions in your room.
Some tutorials report that the surface can become dry to the touch in around an hour, while recommending leaving the project overnight for the best result. (One Little Project)
Don’t rush this step.
The jar will look much better once everything is completely dry.
🎀 Step 9: Add a Rustic Finishing Touch
Now you can decorate the top of your jar.
Tie a piece of:
- Twine
- Jute
- Raffia
- Burlap ribbon
- Orange ribbon
- Plaid ribbon
around the neck of the jar.
For an extra fall look, tuck a tiny artificial leaf, acorn, or berry sprig underneath the bow.
✨ Step 10: Add the Light
This is when the magic happens!
Place a battery-operated LED tea light inside the jar.
Or use a small battery-powered fairy-light string.
Turn off the room lights and watch the leaves glow.
The spaces between the leaves allow the light to shine through, creating a beautiful autumn effect. (easycraftypattern.com)
🕯️ Why LED Lights Are Best
For this particular craft, battery-operated LED lights are the easiest choice.
They don’t have an open flame, making them more suitable for decorative jars containing paper, fabric, dried leaves, ribbon, and Mod Podge.
If you use a real candle, follow the candle manufacturer’s safety instructions, never leave it unattended, and keep flammable decorations away from the flame. For the simplest and safest version of this project, stick with an LED tea light.
🍂 Three Easy Styles to Try
🧡 1. Classic Fall Lantern
Use red, orange, yellow, and brown leaves.
Add a piece of natural twine around the top.
This version looks beautiful on a rustic wooden table.
🤎 2. Farmhouse Fall Lantern
Use mostly cream, tan, brown, and muted orange colors.
Add burlap ribbon around the jar.
Place several lanterns together with white pumpkins and greenery.
🧡 3. Thanksgiving Lantern
Use warm gold, orange, and red leaves.
Add a small tag that says:
THANKFUL
GRATEFUL
GATHER
Place several jars down the center of your Thanksgiving table.
🌻 More Ideas to Try This Season
Once you’ve made one lantern, you’ll probably want to make more!
Here are some variations.
🍁 Use Paper Leaves
Don’t have access to beautiful fall leaves?
Cut leaf shapes from orange, red, yellow, and brown tissue paper or lightweight decorative paper.
Attach them with Mod Podge just as you would natural leaves. Fall-themed paper and napkins can also be used for Mason jar lantern designs. (The Reid Homestead)
🌸 Add Pressed Flowers
Pressed flowers can give your lantern a delicate, cottage-style appearance.
Try combining tiny flowers with colorful leaves.
This looks especially pretty with a soft white LED light.
🌿 Try Fern Leaves
Small fern pieces can create a completely different look.
Combine them with orange and yellow leaves for a woodland-inspired lantern.
🌰 Add Acorns
Paint or attach tiny acorn shapes around the jar.
You can even make a simple fall forest theme with leaves, acorns, and tiny branches.
🎃 Make a Pumpkin Lantern
Instead of leaves, decorate the outside with orange tissue paper.
Add black cutout eyes and a mouth.
Place an LED light inside.
Now you have a cute homemade pumpkin lantern for Halloween.
👻 Make Halloween Lanterns
Use orange tissue paper with black silhouettes.
Try:
- Bats
- Ghosts
- Cats
- Spiders
- Pumpkins
Turn the light on at night and watch the shapes glow.
🦃 Make a Thanksgiving Lantern
Decorate the jar with fall leaves and add a little paper turkey.
Write:
Give Thanks
or
Thankful & Blessed
These make lovely table decorations.
🪵 Make a Whole Fall Lantern Display
One lantern is cute.
Three or four together can make a beautiful centerpiece.
Use different jar sizes.
Place the tallest jar in the middle and smaller jars around it.
Add:
- Mini pumpkins
- Pinecones
- Acorns
- Fall leaves
- A wooden tray
- Twine
- Small gourds
Then turn on all the LED lights.
You have an inexpensive fall centerpiece that looks warm and inviting.
🏡 Where Can You Display Them?
These lanterns work in so many places.
🍂 Mantel
Arrange three different-sized jars along your fireplace mantel.
🍽️ Dining Table
Use them as a Thanksgiving centerpiece.
🚪 Entryway
Place one beside a fall wreath or basket.
🛋️ Living Room
Put one on a side table or shelf.
🪟 Windowsill
The glow looks especially pretty in the evening.
🌿 Covered Porch
Use battery-powered lights and keep the jars protected from harsh weather.
🎃 Halloween Display
Surround them with pumpkins and spooky decorations.
💰 A Budget-Friendly Fall Decoration
One of the best things about this project is that you can reuse things you already have.
Have an empty pasta sauce jar?
Use it.
Have an old jam jar?
Use it.
Have leftover ribbon from another project?
Use it.
Have leaves falling all over your yard?
Perfect!
You don’t need to spend a fortune decorating for every season.
Sometimes a little creativity can turn something ordinary into something beautiful.
🍁 Tips for the Best Results
Keep the Mod Podge Layer Thin
Too much glue can take longer to dry and may make the finished jar look cloudy until completely cured.
Don’t Cover Every Inch
Leaving clear glass between the leaves creates a prettier glow.
Press the Leaves Flat
Pay special attention to the edges so they don’t lift.
Let It Dry Completely
Overnight is a good option if you’ve used several layers.
Use Different Jar Sizes
A collection looks more interesting when every lantern isn’t identical.
Experiment With Colors
You don’t have to stick with traditional orange.
Try:
Burgundy + gold + cream
or
Rust + brown + olive green
or
Orange + yellow + deep red
❤️ A Simple Craft With a Big Cozy Effect
That’s what I love about these DIY fall lanterns.
The project itself is incredibly simple.
A jar.
Some leaves.
A little Mod Podge.
A brush.
A light.
That’s basically it.
But once the lights are turned on, those ordinary materials become something warm and beautiful.
And because you can customize every jar, you can make them completely your own.
So the next time you’re outside collecting pretty autumn leaves, don’t just rake them into a pile.
Save a few. 🍂
Press them, grab a Mason jar, and make yourself a little piece of fall that will glow all season long.
🍁✨ More Fall DIY Ideas to Try
If you’re in a crafting mood, try making:
🎃 Painted pumpkin Mason jars
🍂 Leaf-covered candle holders
🌻 Fall wreaths from natural materials
🧡 Pumpkin flower arrangements
🌰 Acorn garlands
🍁 Pressed-leaf artwork
🦃 Thanksgiving table cards
🎃 Halloween jar lanterns
🌾 Rustic fall centerpiece baskets
🤎 Burlap and plaid Mason jar décor
Which one would you make first—the classic leaf lantern, pumpkin lantern, or Thanksgiving version? 🍁✨
