Easy DIY Crafts That Are Budget-Friendly and Fun
If you have a few empty food cans sitting in your recycling bin, don’t throw them away just yet! With a little paint, some fabric, ribbon, and creativity, those ordinary cans can become adorable decorations and useful organizers.


With prices going up everywhere, inexpensive DIY projects are more appealing than ever. Instead of buying another seasonal decoration or storage container, why not turn something you already have into something cute?
These painted cans are especially fun for fall, Halloween, classrooms, craft rooms, kitchens, and kids’ projects.
Why Painted Can Crafts Are So Popular
There is something satisfying about taking an everyday item that would normally be thrown away and giving it a completely new purpose.
Empty cans are:
- Inexpensive
- Easy to find
- Perfect for decorating
- Useful for organizing small items
- Great for seasonal crafts
- Easy to customize
- A fun way to reduce household waste
And you don’t need expensive craft supplies. A little leftover paint and a few things from your craft drawer can go a long way.
What You Can Make With Empty Cans
The possibilities are practically endless.
Turn them into:
- 🎃 Pumpkin decorations
- 🐈 Black cat containers
- 🦉 Owl planters or organizers
- 👻 Mummy decorations
- 🌻 Scarecrow containers
- 🕯️ Decorative candle holders
- ✏️ Pencil holders
- 🌿 Small herb planters
- 🍴 Utensil holders
- 🖌️ Paintbrush organizers
- 🍬 Treat containers
- 🧸 Small-item storage
You can even create an entire seasonal display using several different designs.
Supplies You’ll Need
The exact supplies depend on the design, but here’s a basic list:
Materials
- Empty metal food cans
- Acrylic or craft paint
- Paintbrushes
- Primer, optional
- Hot glue or strong craft adhesive
- Googly eyes
- Ribbon or fabric scraps
- Burlap
- Decorative paper or felt
- Buttons or craft embellishments
- Markers or paint pens
- Scissors
You can substitute whatever you already have at home. That’s part of the fun!
Step 1: Prepare the Cans
Wash the cans thoroughly with warm, soapy water and allow them to dry completely.
Important: Make sure there are no sharp edges. If the can opener leaves a sharp rim, don’t use that can for a craft that will be handled frequently by children. Choose cans with a smooth safety-cut edge when possible, or have an adult carefully address any sharp edges before crafting.
Remove labels and adhesive residue.
Step 2: Add a Base Coat
Some cans have a shiny surface that doesn’t hold paint particularly well.
For the best results, apply a suitable metal primer first and let it dry according to the product instructions.
Then apply your base color.
For example:
- Orange for a pumpkin
- Black for a cat
- White for a mummy
- Brown or beige for a scarecrow
- Green for a garden-themed container
Two thin coats often look better than one thick coat.
Step 3: Let Your Imagination Take Over
Once the base coat is completely dry, start decorating.
This is where each can gets its own personality.
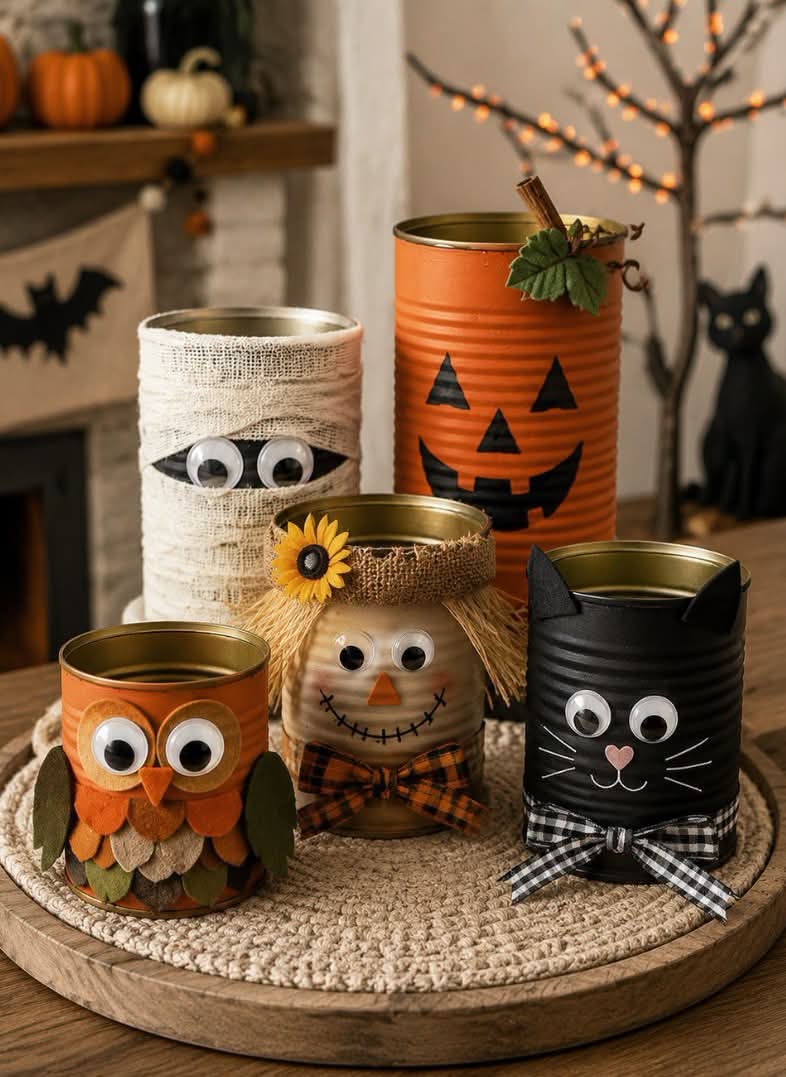
🎃 Pumpkin Can
Paint the entire can orange.
Add a simple black jack-o’-lantern face with paint or a paint marker. Finish it with a little green ribbon, faux leaves, or a small piece of cinnamon stick at the top.
🐈 Black Cat Can
Paint the can black.
Add googly eyes, small felt ears, whiskers, and a little ribbon around the bottom.
This makes an adorable Halloween decoration or pencil holder.
🦉 Owl Can
Paint the can a color you like and create layered feathers from scraps of felt or fabric.
Add large eyes and a small triangular beak.
This design is especially cute as a desk organizer.
👻 Mummy Can
Paint the can white or cover it with strips of gauze or cheesecloth.
Wrap the material loosely around the can and glue it in place.
Add two large googly eyes peeking through the layers.
🌾 Scarecrow Can
Use beige or tan paint for the base.
Add a few strips of burlap around the top, googly eyes, a small orange felt nose, and a painted smile.
A little plaid ribbon around the bottom makes the finished craft even cuter.
Make a Whole Seasonal Collection
One of the best things about this project is that you don’t have to stop with one can.
Make a little collection!
Imagine a display with:
Pumpkin + Mummy + Cat + Owl + Scarecrow
Arrange them together on a tray, shelf, porch table, or entryway.
You could even make different collections for different seasons.
Fall
🍂 Pumpkins
🌻 Scarecrows
🦉 Owls
🌾 Rustic containers
Halloween
🎃 Jack-o’-lanterns
👻 Mummies
🐈 Black cats
🕷️ Spooky designs
Christmas
🎅 Santa
⛄ Snowmen
🎄 Christmas trees
🎁 Gift-inspired containers
Turn Them Into Useful Organizers
These aren’t just decorations.
A decorated can can become a surprisingly useful organizer.
Use them for:
- Pens and pencils
- Kitchen utensils
- Makeup brushes
- Paintbrushes
- Craft supplies
- Hair accessories
- Small gardening tools
- Cooking utensils
- Markers and crayons
For a farmhouse-style look, try burlap, twine, neutral paint, and simple greenery.
For a colorful children’s craft, use bright paint and fun stickers.
A Simple Way to Save Money on Crafting
You don’t have to buy everything new.
Before heading to the craft store, look around your house.
You may already have:
- Empty cans
- Leftover paint
- Old ribbon
- Fabric scraps
- Buttons
- Broken jewelry
- Cardboard
- Twine
- Old wrapping paper
- Artificial flowers
- Craft sticks
One of the best parts of upcycling is figuring out how to use what you already have.
Safety Tips
Because you’re working with metal cans, take a few precautions.
- Make sure cans are thoroughly cleaned and completely dry.
- Check carefully for sharp edges.
- Adults should handle any cutting or modification of metal.
- Use hot glue carefully to avoid burns.
- Work in a well-ventilated area when using paints, primers, or adhesives.
- If children are participating, supervise them throughout the project.
- Don’t use decorated cans for food storage unless the materials and finish are specifically designed and labeled for food contact.
- For planters, remember that unprotected metal can eventually rust when constantly exposed to moisture.
The Best Part? You Don’t Have to Be “Crafty”
You don’t need perfect painting skills.
In fact, slightly imperfect handmade decorations often have more personality than expensive store-bought pieces.
A crooked smile on a pumpkin, mismatched googly eyes, or a little uneven burlap can make the project look even more charming.
That’s what makes these crafts so enjoyable: there’s no single right way to do them.
Final Thoughts
With a little paint and imagination, an ordinary empty can can become a pumpkin, cat, owl, mummy, scarecrow, organizer, planter, or seasonal decoration.
And when you’re trying to be more creative with your budget, projects like this make perfect sense. Instead of spending money on another decoration, look at what you already have and see what you can transform.
So before you toss that empty can into the recycling bin, ask yourself:
“Could I turn this into something cute?” 🎨♻️
You might be surprised by what you can make with something that was headed for the trash.
💬 YOUR TURN!
What would you make from an empty tin can?
🎃 Pumpkin
🐈 Black cat
👻 Mummy
🦉 Owl
🌻 Scarecrow
🌿 Planter
✏️ Organizer
Share your favorite idea—and if you’ve made one, show us your pictures! ❤️
