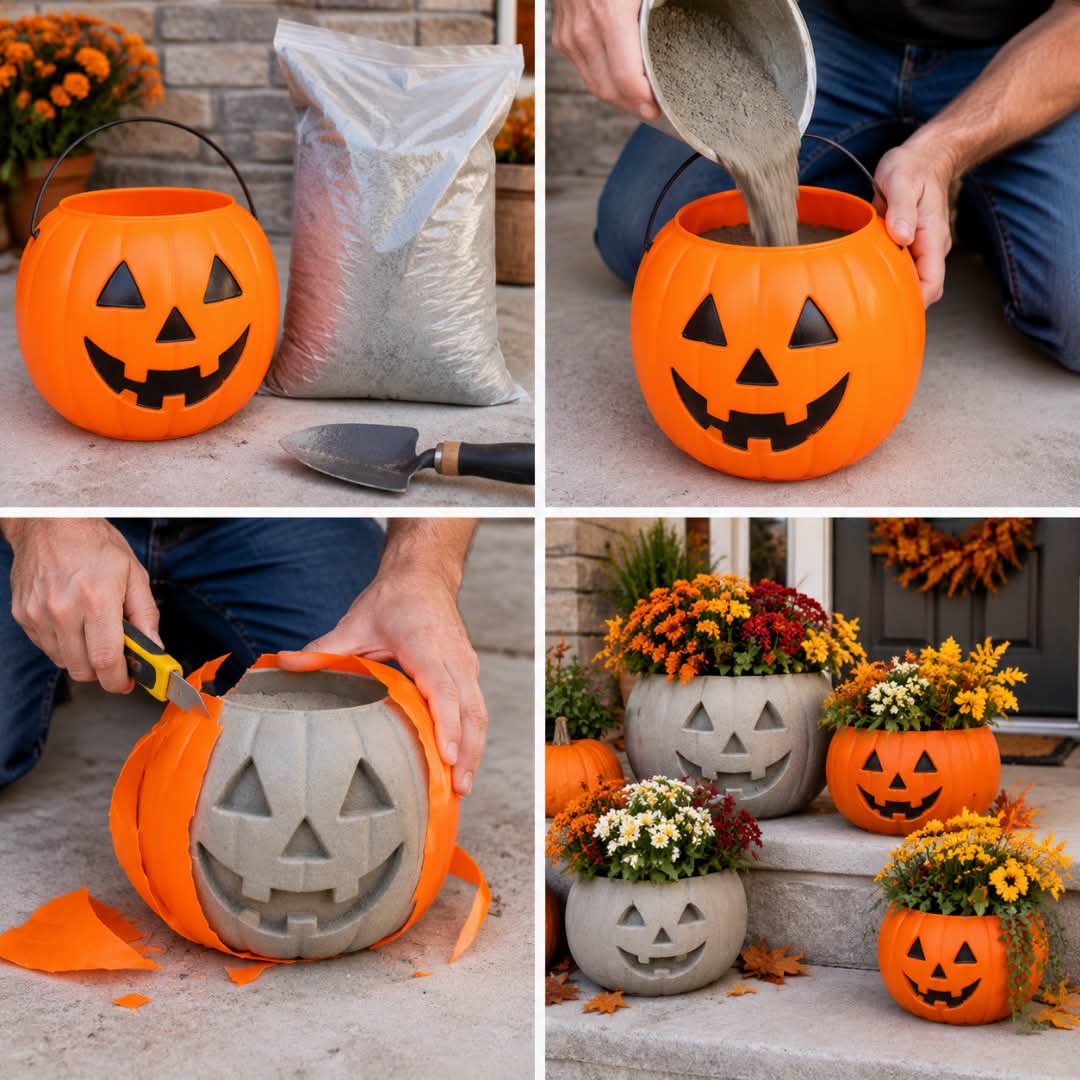
🎃🌼 Turn a Plastic Halloween Candy Bucket Into a Concrete Planter
Those inexpensive plastic Halloween candy buckets are usually destined for one thing: collecting candy.
But with a little concrete, you can turn one into something that lasts far beyond Halloween—a fun, sturdy pumpkin-shaped planter for your porch, garden, patio, or front steps.
The basic idea is simple: use the plastic pumpkin bucket as an outer mold, place a smaller container inside to create the hollow space for soil, pour concrete into the gap, let it cure, and then remove the plastic. Using recycled plastic containers as concrete molds is a well-established DIY technique. (hgtv.com)
And the finished result?
A pumpkin planter that looks like it came from a garden store! 🎃🌿
🧰 What You’ll Need
- 1 sturdy plastic Halloween candy bucket
- Concrete mix suitable for small castings
- A smaller plastic container to create the inside cavity
- Cooking spray or another suitable concrete-release agent
- Mixing bucket
- Water
- Trowel or sturdy spoon
- Small dowel, straw, or piece of tubing for a drainage hole
- Heavy rocks or other weights
- Rubber gloves
- Eye protection
- Dust mask/respirator when handling dry concrete mix
- Plastic sheet or plastic bag
Optional
- Sandpaper
- Exterior concrete sealer
- Potting soil
- Flowers, herbs, or ornamental plants
Choose an inner container that leaves enough concrete around it to create reasonably thick walls. Recycled plastic containers are commonly used as molds, although flexible, thinner plastic is generally easier to remove afterward. (hgtv.com)
🎃 Step 1: Choose Your Pumpkin Bucket
Look for a plastic Halloween candy bucket with a shape you love.
The classic jack-o’-lantern face makes an especially cute planter because the facial details will be transferred to the concrete.
Make sure the bucket is:
- Clean
- Free from cracks
- Sturdy enough to hold wet concrete
- Large enough to accommodate the plant you have in mind
Keep in mind that the bucket is the mold, not part of the finished planter.
🧴 Step 2: Prepare the Mold
Clean and dry the inside of the pumpkin bucket.
Apply a thin coating of cooking spray or another appropriate release agent to the inside surface.
You want enough to help the cured concrete release, but you don’t need to soak the bucket.
DIY concrete planter guides commonly recommend coating mold surfaces with a release agent before pouring. (hgtv.com)
🪴 Step 3: Prepare the Inner Mold
Now choose a smaller plastic container that will sit inside the pumpkin.
This creates the space where your soil and plant will eventually go.
The container should be:
- Smaller than the pumpkin bucket
- Tall enough to create the desired planter depth
- Narrow enough to leave a substantial concrete wall
- Easy to remove after curing
Coat the outside of this inner container with release agent too.
🕳️ Don’t Forget the Drainage Hole!
A planter needs somewhere for excess water to escape.
One easy method is to place a small dowel, straw, or piece of tubing vertically through the wet concrete at the bottom of the planter.
Commercial planter-mold instructions use a dowel to create the drainage opening during casting. (hgtv.com)
You can also carefully drill a drainage hole after the concrete has cured, although making the opening during the casting process can be easier.
🥣 Step 4: Mix the Concrete
Follow the water-to-mix ratio on the package you’re using.
Don’t add all the water at once.
Add it gradually and mix until you have a thick, workable concrete mixture.
You want it wet enough to pack into the mold but not so watery that it becomes difficult to support the inner container.
And remember:
Don’t rush the water.
Adding too much can make the finished casting weaker and more difficult to work with.
🎃 Step 5: Add the Concrete
Put the pumpkin bucket on a flat, stable surface.
Begin adding concrete to the bottom.
Build up enough concrete to create a solid base.
Then carefully place your smaller container in the center.
Press it down gently into the wet concrete.
🪨 Step 6: Keep the Inner Container From Floating
This is an important little trick.
Wet concrete can push a lightweight plastic container upward.
Place rocks, sand, or another suitable weight inside the inner container to keep it firmly in position while you finish filling the mold.
Then continue adding concrete around the sides.
Work slowly and make sure the concrete reaches all the way around the inner mold.
👋 Step 7: Get Rid of Air Pockets
Once the concrete is in place, gently tap the sides of the plastic bucket.
You can also lightly vibrate or shake the mold.
This helps trapped air bubbles rise to the surface and can produce a smoother finished casting. DIY concrete planter instructions commonly recommend tapping or vibrating molds after filling. (hgtv.com)
Don’t bang it aggressively.
You’re trying to settle the concrete—not destroy your mold! 😂
⏳ Step 8: Let It Cure
This is the hardest part:
WAIT.
Cover the project loosely with plastic and leave it somewhere protected from direct sun, extreme heat, and disturbance.
Many small concrete planter projects recommend waiting roughly 24–48 hours before attempting to remove the mold, depending on the concrete mix and conditions. (hgtv.com)
Don’t rush this step.
Trying to remove the mold too early can crack or damage your new planter.
🔨 Step 9: Remove the Inner Mold
Once the concrete has hardened sufficiently, remove the weight from the inner container.
Gently twist and wiggle the container.
Don’t force it.
If your inner mold is disposable plastic, you may find it easier to carefully cut it away rather than trying to pull it out in one piece.
🎃 Step 10: Remove the Pumpkin Bucket
Now comes the exciting part.
Flex the plastic pumpkin gently.
Work your way around the edges until the concrete begins separating from the plastic.
If the bucket is thin and flexible, you may be able to peel it away.
If it is too rigid, carefully cutting the plastic mold may be necessary.
DIY concrete planter projects specifically note that recycled plastic molds may need to be peeled, flexed, or cut away after curing. (hgtv.com)
And then…
🎉 The pumpkin appears!
That jack-o’-lantern face that was molded into the plastic is now part of your concrete planter.
🪵 Step 11: Smooth the Edges
Don’t worry if the planter isn’t absolutely perfect.
A few tiny air pockets and imperfections can actually give concrete planters character.
Use sandpaper to gently smooth:
- Sharp edges
- Rough spots around the rim
- Uneven concrete
- Small imperfections
If you sand concrete, wear appropriate respiratory protection and eye protection so you don’t breathe concrete dust. HGTV also recommends respiratory protection when sanding concrete planters. (hgtv.com)
🌧️ Step 12: Let It Continue Curing
Even after the planter has been removed from its mold, the concrete continues to cure.
Give it additional time before putting it outdoors or planting directly into it.
You can also rinse the finished planter and allow it to dry before planting.
Fresh concrete is highly alkaline, so allowing additional curing time before introducing sensitive plants is a sensible precaution. (inspiredreamer.com)
🎨 Should You Paint It?
You don’t have to!
Honestly, the natural gray concrete against colorful autumn flowers is beautiful.
But you could also paint the planter.
Try:
🧡 Orange for a traditional pumpkin
🤍 White for a farmhouse look
🖤 Black for Halloween
🎃 Orange and black for a classic jack-o’-lantern
🌿 Mossy green for an aged garden look
Or leave it completely natural for a more rustic, stone-like appearance.
🌼 What Should You Plant in It?
This is where the project gets really fun.
Fall flowers
- Mums
- Pansies
- Ornamental kale
- Violas
Herbs
- Thyme
- Rosemary
- Sage
Succulents
If the planter has good drainage and you use an appropriate potting mix, small succulents can look fantastic against the gray concrete.
Seasonal combinations
Imagine a concrete jack-o’-lantern overflowing with:
Orange mums + purple pansies + trailing greenery. 🎃🌼💜
Absolutely gorgeous for a front porch!
⚠️ A Few Important Tips
Wear gloves
Wet cement can irritate skin. Avoid prolonged contact and wash exposed skin thoroughly.
Protect your eyes
Concrete dust and splashes aren’t something you want in your eyes.
Be careful with dry concrete
Avoid breathing the dust while mixing.
Don’t use a flimsy bucket
If the plastic bends dramatically under the weight of wet concrete, your finished planter may come out misshapen.
Make sure you have drainage
Plants don’t want to sit in permanently waterlogged soil. Excess water needs somewhere to escape. (Bunnings)
Don’t make the walls paper-thin
Concrete needs enough thickness to create a durable planter. The exact thickness depends on the mix, planter size, and design.
🎃 From Candy Bucket to Garden Decor
This might be one of my favorite kinds of DIY projects because it takes something that costs very little and turns it into something that can be used year after year.
Instead of tossing that cheap plastic Halloween bucket back into storage—or eventually into the trash—you’ve used it as a mold for something completely different.
And the best part?
You can make several different designs.
Try:
🎃 Jack-o’-lantern buckets
👻 Ghost-shaped containers
🧙 Witch-themed buckets
🦇 Halloween designs
🍂 Fall-themed containers
Each one can become a completely different garden decoration.
❤️ The Finished Look
Picture several of these concrete pumpkin planters sitting on your front steps.
One filled with orange mums.
One overflowing with white flowers.
Another planted with trailing greenery.
And a smaller one filled with succulents.
They would look amazing all autumn long. 🍂🎃🌿
And nobody needs to know that the mold started out as a little plastic candy bucket!
🎃 Have You Ever Tried Making Concrete Planters?
This is definitely one of those DIY projects where the before and after is half the fun.
Would you turn one of your Halloween candy buckets into a planter?
🌼 YES — I’m saving this!
🎃 Absolutely — what a clever idea!
😂 I’ll just keep using mine for candy!
