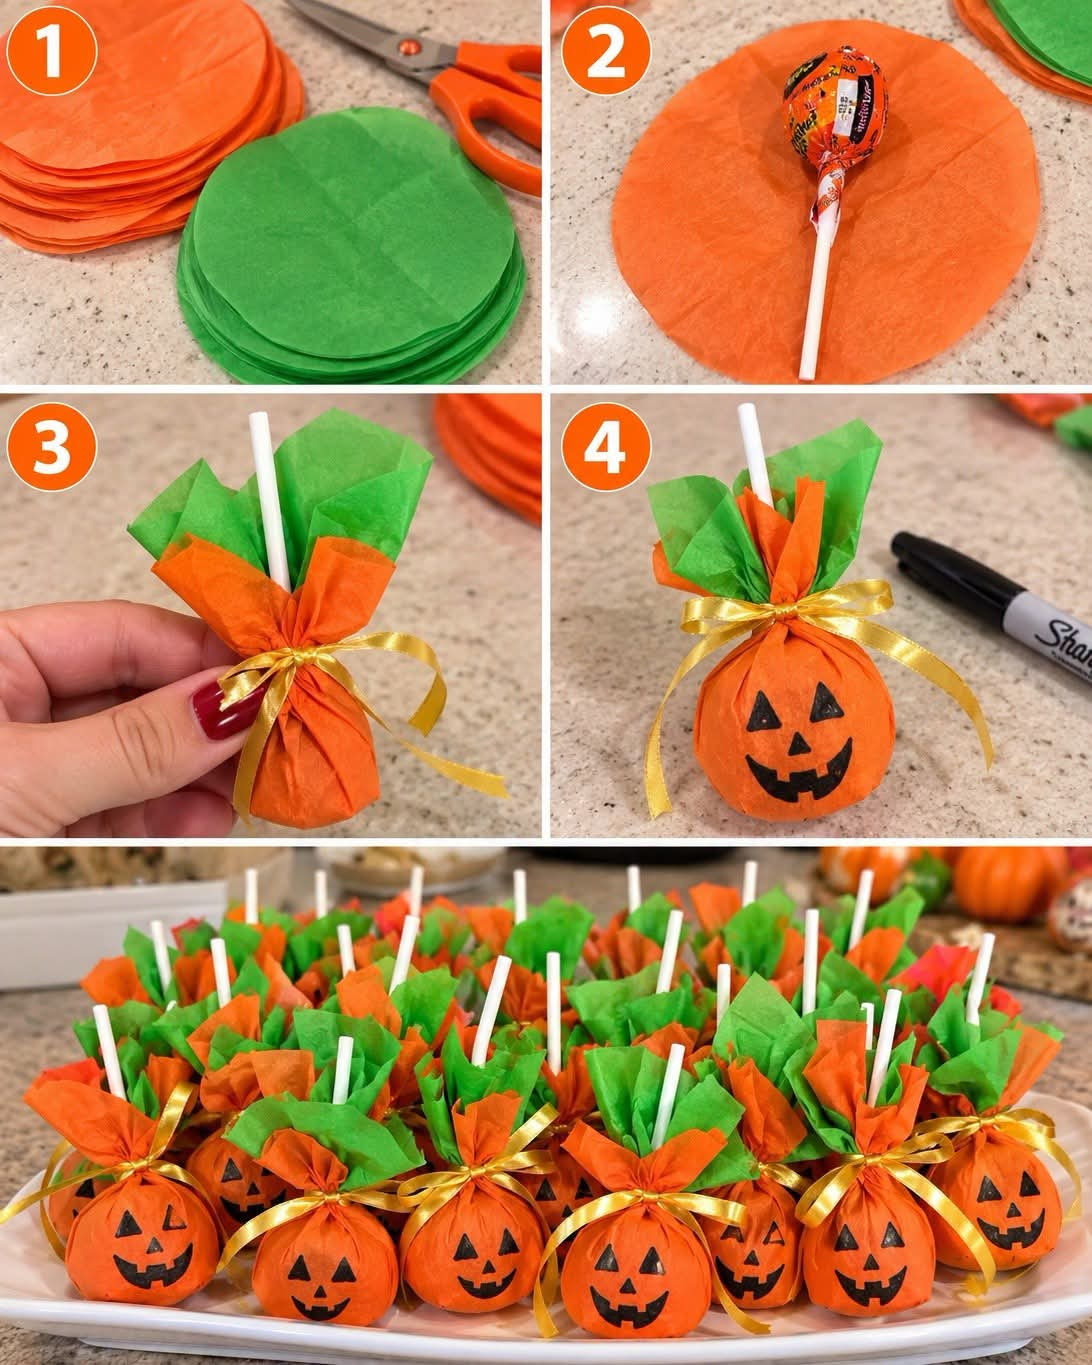
🎃 How to Make Halloween Lollipop Pumpkin Treats — Full Method
These cute Halloween pumpkin lollipops are perfect for Halloween parties, school treats, trick-or-treat gifts, or party favors. They are easy to make using orange and green tissue paper, lollipops, and ribbon.
🧡 Materials You Will Need
For approximately 10–20 lollipop pumpkins, prepare:
- 🍭 10–20 lollipops
- 🧡 Orange tissue paper
- 💚 Green tissue paper
- ✂️ Scissors
- 🎀 Gold ribbon (or any ribbon you like)
- 🖊️ Black permanent marker
- 📏 Ruler (optional)
- 📄 A round object to trace, such as a small plate or bowl
- 🧻 Tape (optional)
Step 1: Prepare the Tissue Paper
- Take your orange tissue paper and stack several sheets together.
- Using a small plate or bowl as a guide, draw circles on the tissue paper.
- Cut out the circles carefully.
Recommended size: Approximately 20–25 cm (8–10 inches) in diameter for each orange circle.
- Repeat the process with the green tissue paper. You can cut the green paper into circles of the same size or slightly smaller.
Tip: Prepare one orange circle per lollipop. You can use one or two layers of tissue paper for each pumpkin to make the wrapping stronger and more colorful.
Step 2: Wrap the Lollipop
- Place one orange tissue paper circle flat on a table.
- Put the lollipop in the center of the circle.
- Position the lollipop so that its candy head is in the middle and its stick points toward the bottom edge of the paper.
- Gently lift the tissue paper around the candy.
- Bring the paper upward around the lollipop, gathering it around the base of the candy where the stick begins.
Make sure the candy is completely covered by the orange tissue paper.
Important: Do not pull the tissue paper too tightly, because it can tear.
Step 3: Add the Green Tissue Paper
- Take a small piece of green tissue paper.
- Place it behind the top of the orange paper, around the lollipop’s stick.
- Arrange the green paper so that several corners stick upward.
- Gather the orange and green tissue paper together just below the lollipop stick.
- Hold the gathered paper firmly with one hand.
The green tissue paper will look like the leaves and stem of a pumpkin.
Tip: For a fuller appearance, use two or three small pieces of green tissue paper and arrange them in different directions.
Step 4: Tie the Ribbon
- Cut a piece of gold ribbon approximately 30–40 cm (12–16 inches) long.
- Wrap the ribbon around the gathered tissue paper just below the lollipop stick.
- Tie a tight knot to hold the paper in place.
- Make a pretty bow with the ribbon.
- Trim the ribbon ends diagonally for a neat finish.
Gently spread out the green tissue paper at the top to make it look like pumpkin leaves.
Your lollipop should now resemble a small orange pumpkin with green leaves.
Step 5: Draw the Halloween Pumpkin Face
Now it’s time to decorate your pumpkin! 🎃
- Hold the wrapped lollipop carefully.
- Use a black permanent marker to draw two triangular eyes on the front.
- Draw a small triangular nose.
- Draw a curved mouth.
- Add small square teeth inside the mouth to create a spooky jack-o’-lantern smile.
Allow the ink to dry completely before handling the face.
Important: Draw only on the outside tissue paper, not on the candy wrapper. Use a non-toxic marker suitable for the intended craft surface, and keep the ink away from the candy and any area that will be eaten.
Step 6: Make More Pumpkin Lollipops
Repeat the same steps for the remaining lollipops:
- Place the lollipop on the orange tissue paper.
- Wrap the candy.
- Add the green tissue paper.
- Gather the paper around the stick.
- Tie it with gold ribbon.
- Draw the Halloween face.
You can make each pumpkin’s expression different:
- 😄 A happy pumpkin
- 🎃 A traditional jack-o’-lantern
- 👻 A spooky pumpkin
- 😈 A mischievous pumpkin
This makes the finished treats more fun and attractive.
Step 7: Arrange and Display Your Halloween Treats
- Take a large white plate, tray, or Halloween basket.
- Arrange the finished pumpkin lollipops upright or slightly tilted.
- Spread out the green tissue paper so the leaves are visible.
- Arrange the pumpkins close together to create a colorful display.
Your Halloween lollipop pumpkin treats are ready!
🛒 Shopping List
If you want to buy everything at once, use this list:
| Material | Quantity for 20 treats |
|---|---|
| Lollipops | 20 |
| Orange tissue paper | 20 circles, 20–25 cm each |
| Green tissue paper | 20 small pieces or more |
| Gold ribbon | Approximately 8 metres |
| Black permanent marker | 1 |
| Scissors | 1 pair |
| Plate or tray | 1 |
💡 Extra Tips for the Best Results
- For fuller pumpkins: Use two layers of orange tissue paper.
- For prettier leaves: Cut the green paper into irregular, pointed shapes.
- For stronger wrapping: Use a small piece of clear tape underneath the ribbon if needed.
- For a festive look: Choose gold, black, or orange ribbon.
- For school parties: Prepare the pumpkins in advance and arrange them on a tray.
- For food safety: Keep the original lollipop wrapper intact beneath the decorative tissue paper. Make sure the marker ink and craft materials do not touch the candy.
Estimated time: About 3–5 minutes per pumpkin once your materials are prepared.
Best advice: Cut all your tissue paper circles and ribbon pieces before you start wrapping. This will make preparing a large batch much faster and easier! 🎃🍭
