🍂 ! 🍁
A Charming Upcycled Craft to Bring Cozy Autumn Magic to Your Home
Looking for a creative way to celebrate fall while reusing everyday materials? This adorable DIY Fall Gnome made from a plastic bottle and autumn leaves is the perfect seasonal craft! 🍂✨
With colorful fall leaves, a simple plastic bottle, soft burgundy fabric, and a few decorative details, you can transform ordinary household items into a charming little gnome that looks beautiful on a mantel, porch, entryway table, or autumn-themed centerpiece.
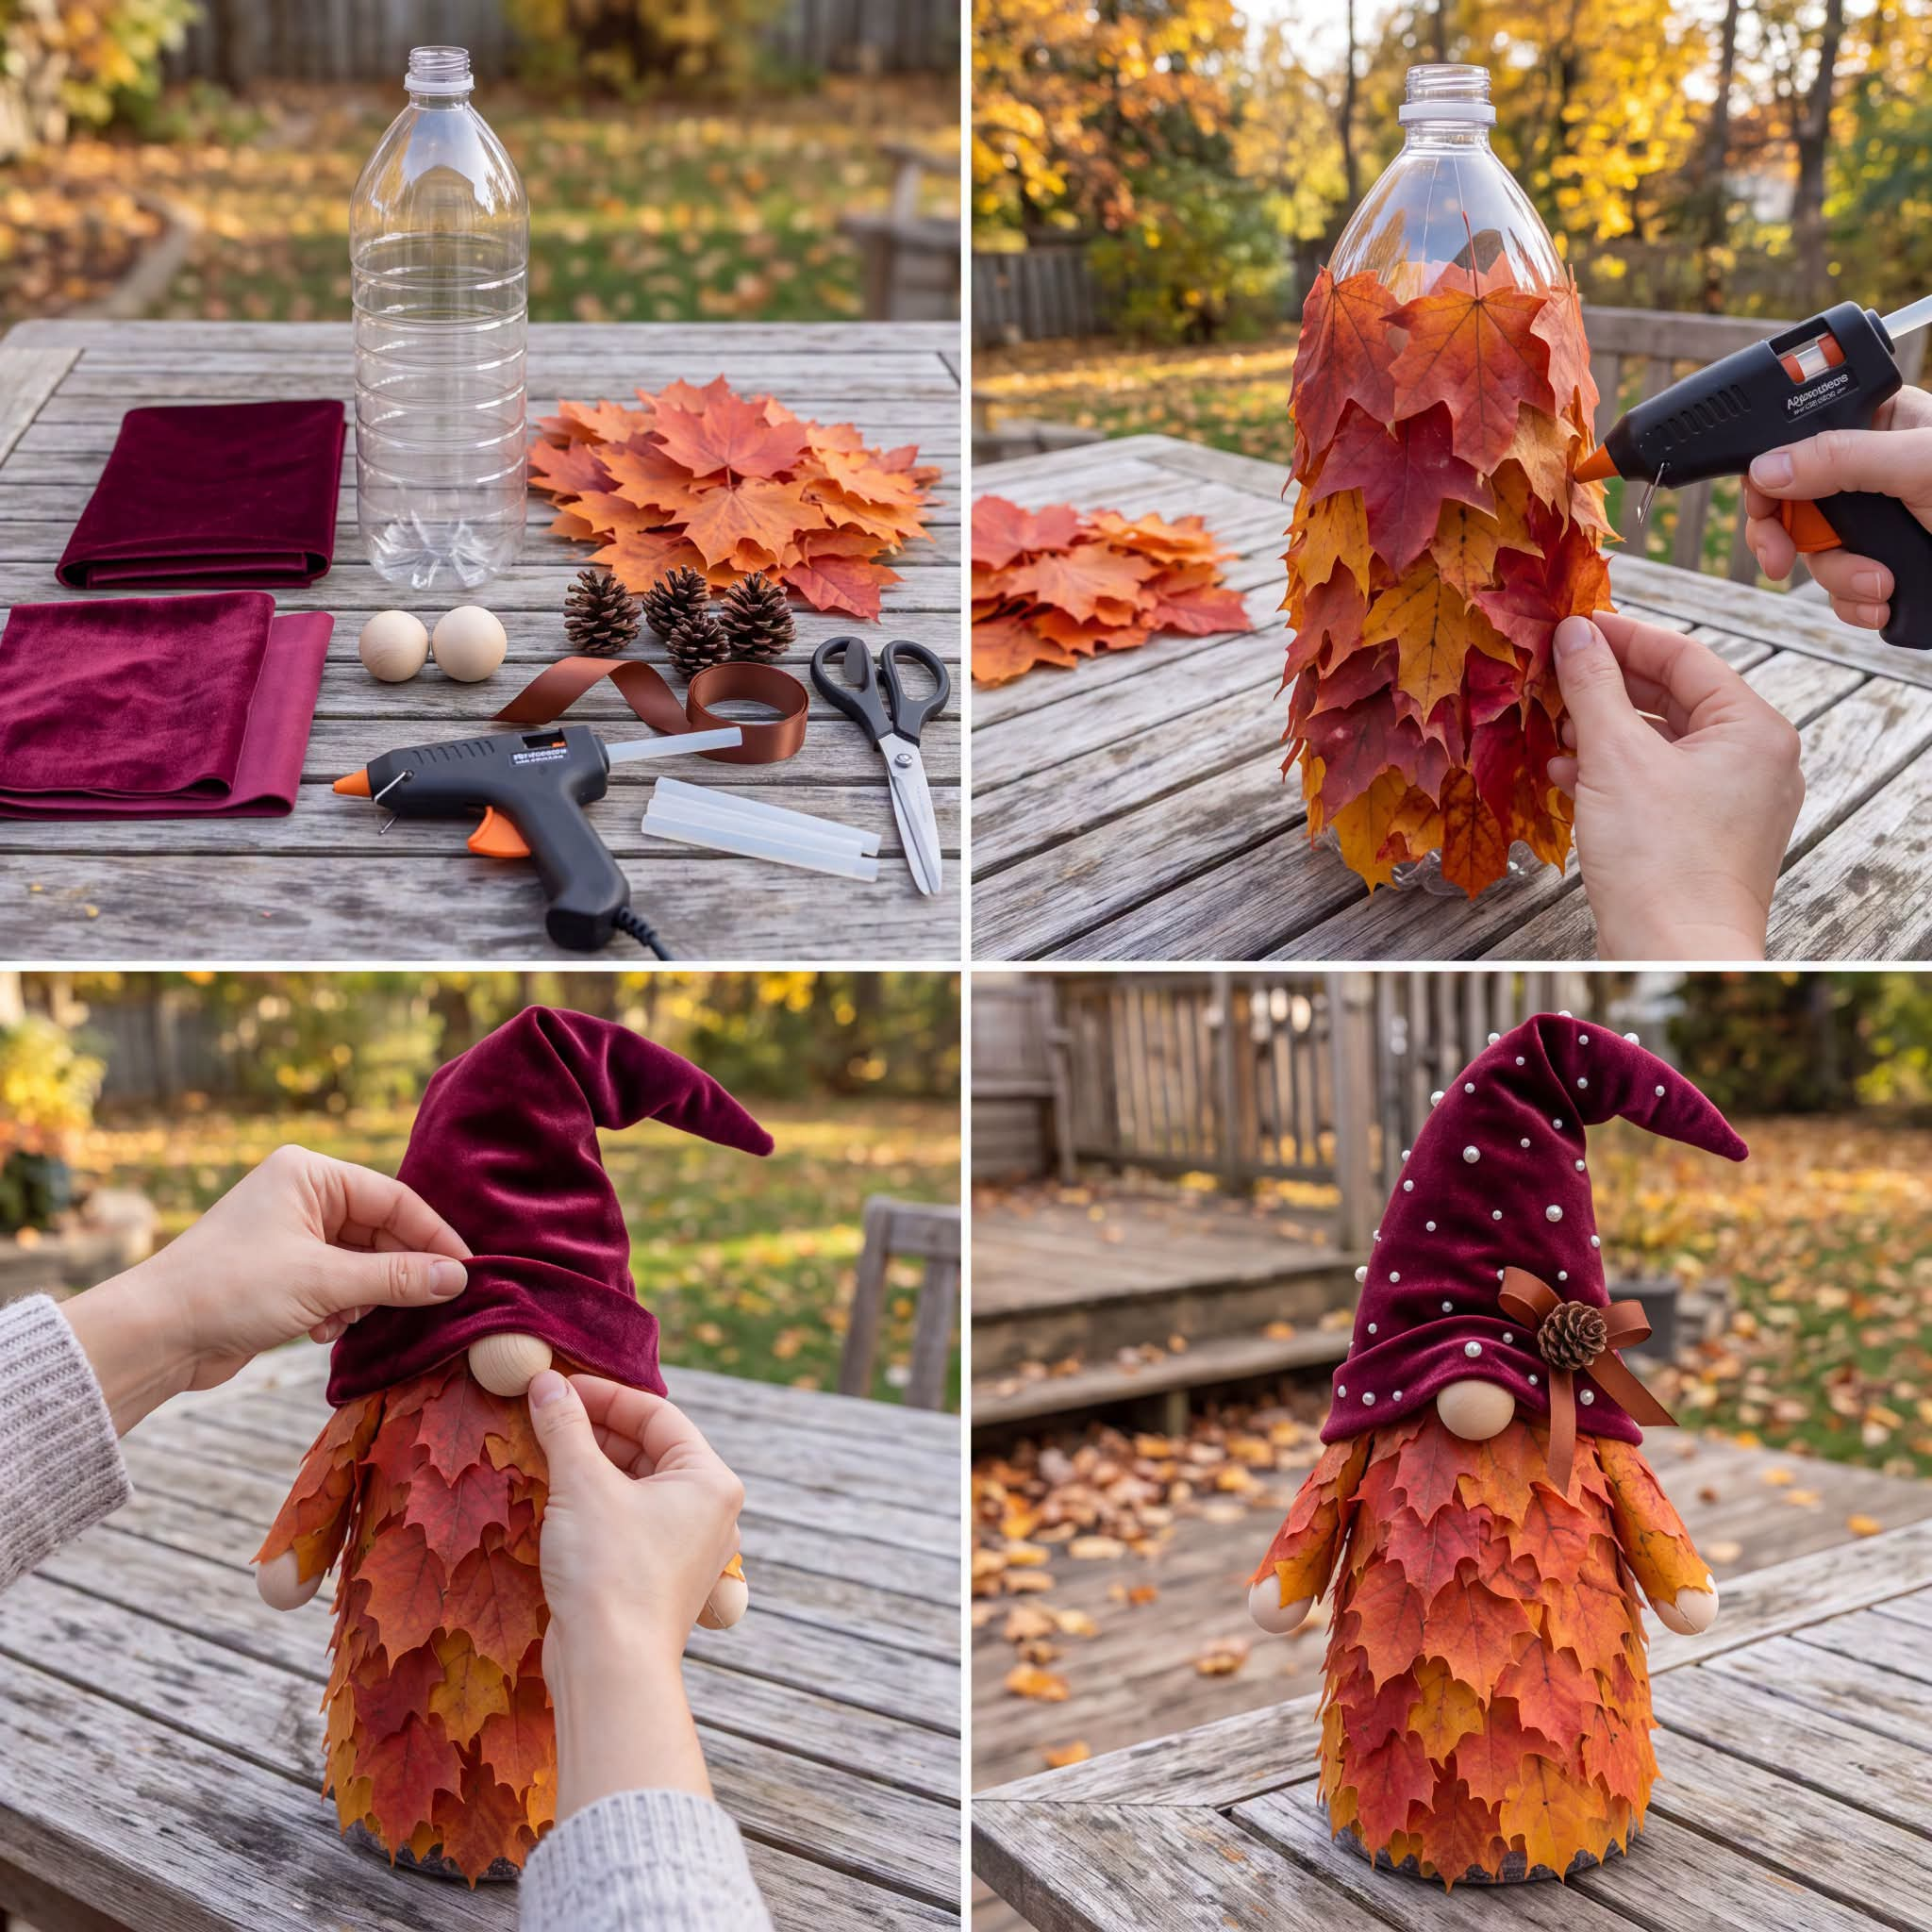
The finished gnome features a body covered in warm red, orange, and golden leaves, a floppy burgundy hat, a round wooden nose, and a tiny pinecone decoration. Its rustic appearance makes it a lovely addition to your fall decorations, and it’s a fun project for anyone who enjoys handmade seasonal crafts.
Best of all, you don’t need expensive supplies to create something special. With a little imagination and patience, you can turn a recycled bottle into a delightful autumn decoration!
Let’s make this cute fall gnome step by step. 🧙🍁
🍁 Why You’ll Love This DIY Fall Gnome
- Budget-friendly: Reuses a plastic bottle and materials you may already have at home.
- Eco-conscious crafting: Gives an everyday plastic container a new decorative purpose.
- Perfect for fall: The autumn leaves and rich burgundy hat create a warm seasonal look.
- Easy to personalize: Change the hat color, add ribbons, or use different natural decorations.
- A lovely handmade gift: Make one for a friend, family member, neighbor, or fellow fall enthusiast.
- Fun for the whole family: Adults can handle the hot glue while children help choose leaves and decorations.
Whether you love rustic farmhouse decor, woodland-inspired decorations, or cozy autumn displays, this little gnome is a wonderful way to add handmade charm to your home.
🧰 Materials You’ll Need
Gather these simple supplies before starting your fall gnome.
- 1 empty plastic water bottle, preferably 1–1.5 liters
- 30–50 artificial autumn leaves in red, orange, yellow, and brown
- Burgundy or deep-red velvet fabric for the hat
- 1 wooden bead or wooden ball for the nose
- 2 small wooden beads or balls for the hands, optional
- 1–2 pinecones for decoration
- Brown ribbon
- Small decorative pearls or craft beads
- Hot glue gun and glue sticks
- Sharp scissors
- Measuring tape or ruler
- Cardboard or felt for the hat’s base, optional
- A small amount of polyester stuffing, optional
- A few small stones or another suitable weight to stabilize the bottle, optional
Crafting tip: Artificial autumn leaves are ideal because they retain their color and shape. If you prefer real leaves, choose clean, dry leaves and handle them gently, as dried leaves can become brittle.
🍂 Step-by-Step Instructions
Step 1: Prepare the Plastic Bottle
Start by thoroughly washing the empty plastic bottle and removing its label.
Allow the bottle to dry completely before decorating it.
Remove the cap if necessary, and check that the bottle has no sharp edges or damaged areas.
Place the bottle upright on your work surface.
If the bottle is lightweight and tends to tip over, add a little weight to the bottom. Make sure the weight is secured so it cannot spill out.
The bottle will form the main structure of your gnome, giving it height and helping it stand upright.
Helpful tip: Choose a bottle with a relatively wide base. A stable base makes it easier to attach the leaves and keeps your finished gnome standing securely.
Step 2: Prepare the Autumn Leaves 🍁
Sort your leaves into color groups.
Keep the red, orange, golden-yellow, and brown leaves separate so you can create a beautiful autumn color pattern.
If you’re using artificial leaves, gently flatten them if they have been stored folded or crumpled.
Trim any long plastic stems that might prevent the leaves from lying neatly against the bottle.
For real leaves, select ones that are dry but still flexible enough to handle. Avoid damp leaves because they can deteriorate beneath the decorations.
Arrange a few leaves around the bottle before gluing anything. This lets you experiment with the colors and decide how you want your gnome to look.
Step 3: Cover the Bottle with Autumn Leaves
Now comes the fun part!
Starting near the bottom of the bottle, apply a small amount of hot glue to the back of a leaf.
Press the leaf gently against the bottle until it adheres.
Continue attaching leaves around the bottle, overlapping them slightly so the plastic underneath is hidden.
Work your way upward in horizontal rows.
For a natural autumn appearance, alternate the colors rather than placing every leaf in the same direction.
For example, you might create a bottom row of golden-yellow leaves, followed by orange, reddish-brown, and deep-red leaves.
You can also mix the colors throughout the body for a more natural, woodland-inspired effect.
Continue until the bottle is almost entirely covered.
Leave the upper portion of the bottle available for the gnome’s hat and face.
Pro tip: Point the tips of the leaves downward and allow their edges to overlap. This creates the appearance of a leafy beard or a flowing autumn robe.
If you’re using a hot glue gun, work carefully and keep your fingers away from the hot nozzle and melted glue. An adult should handle hot glue when children are helping.
Step 4: Make the Burgundy Gnome Hat 🎩
The burgundy hat is one of the most charming features of this decoration.
Lay your velvet fabric on a flat surface.
Measure the circumference of the bottle near its upper section and use that measurement to determine the width of the hat’s lower edge.
Cut a large fabric triangle or cone-shaped piece, making the bottom wide enough to fit around the top of the bottle.
For a floppy, whimsical hat, make the triangle tall and slightly curved.
Roll or fold the fabric into a cone, bringing the two sides together. Secure the seam with fabric glue or carefully applied hot glue.
Allow the adhesive to cool completely.
Gently bend the tip of the hat to one side to create the soft, floppy shape shown in the inspiration picture.
If you want the hat to hold its shape, you can add a lightweight felt or cardboard support inside it.
Make sure the support is covered by fabric and has no exposed sharp edges.
Alternative: If sewing is easier for you, stitch the two sides of the fabric together before turning the hat right side out.
Step 5: Attach the Hat to the Gnome
Place the hat over the top of the bottle.
Adjust it until the lower edge sits comfortably above the leafy body.
The hat should cover the bottle’s neck and create a natural transition between the upper and lower sections.
Once you’re happy with the position, carefully lift the edge and apply small dots of hot glue to secure it.
Press the fabric gently against the bottle and hold it in place until the glue sets.
Avoid using excessive glue, as it may create visible lumps beneath the fabric.
Make sure the hat is secure before moving on to the facial details.
Step 6: Add the Wooden Nose
Every cute gnome needs a nose!
Take your wooden bead or wooden ball and position it just beneath the front edge of the hat.
The hat should sit slightly over the top of the nose, giving the gnome its familiar, cozy appearance.
Once you’ve found the right position, secure the nose with a small amount of hot glue.
Hold it gently until the adhesive sets.
A natural wooden bead creates a rustic look that complements the autumn leaves and burgundy velvet.
You could also use a small painted wooden ball in a warm peach or tan shade.
Step 7: Make the Little Hands
This step is optional, but it adds an extra touch of personality.
If you’d like your gnome to have hands, use two small wooden beads or wooden balls.
Attach one to each side of the leafy body, approximately halfway down.
You can tuck the beads slightly beneath the outer leaves to make them look like tiny hands peeking out of the gnome’s robe.
Alternatively, cut two small mitten shapes from felt and attach them to the sides.
Choose cream, tan, or brown felt to complement the autumn colors.
For a more rustic look, you can leave the hands off entirely. The finished gnome will still look adorable!
Step 8: Decorate the Hat with Ribbon and a Pinecone 🌰
Now it’s time to give your gnome its finishing touches.
Cut a length of brown ribbon and wrap it around the lower portion of the hat.
Secure the ribbon with a small amount of glue at the back.
Tie a small bow at the front or side of the hat.
Next, choose a small pinecone and attach it near the bow.
You can also add a few decorative pearls or small craft beads across the velvet fabric.
Arrange them randomly for a playful appearance or place them in a simple pattern.
For a more natural design, use miniature acorns, tiny faux berries, or a small artificial leaf instead of decorative pearls.
Remember: Less can be more. The rich burgundy fabric and colorful leaves already create a beautiful design, so choose decorations that complement rather than overwhelm the gnome.
Step 9: Make the Gnome Stand Securely
Place the finished gnome on a flat surface.
Check that it stands upright without wobbling.
If necessary, adjust the base or add a little more weight inside the bottle.
Examine the leaves and gently secure any loose edges with small dots of glue.
Check that the hat is firmly attached and that the nose and decorative details are secure.
Remove any visible glue strings with care once the adhesive has cooled.
Give the finished gnome a final inspection, and your handmade autumn decoration is ready!
🏡 Where to Display Your Fall Gnome
Your finished gnome can bring autumn charm to almost any corner of your home.
Here are a few decorating ideas:
1. On the fireplace mantel
Place your gnome beside miniature pumpkins, pinecones, and autumn garlands for a cozy seasonal display.
2. On an entryway table
Welcome guests with your handmade gnome, a small basket of pinecones, and a few colorful fall leaves.
3. As part of a Thanksgiving centerpiece
Arrange the gnome alongside pumpkins, candles in sturdy holders, and other autumn decorations. Keep fabric and artificial leaves away from open flames.
4. On a bookshelf
Give your bookshelf a seasonal update by placing the gnome among books, small decorative pumpkins, and warm-colored accessories.
5. On a covered porch
Your gnome can look lovely beside potted mums and pumpkins. However, because it contains fabric, glue, and possibly paper-based materials, keep it protected from rain, wind, and excessive moisture.
6. As part of a fall craft display
If you enjoy making seasonal decorations, create several gnomes in different colors. Burgundy, mustard yellow, forest green, and burnt orange make a beautiful autumn collection.
✨ Creative Ways to Customize Your Gnome
One of the best things about this project is how easy it is to personalize.
Make a Rustic Farmhouse Gnome
Use brown burlap or neutral linen for the hat, natural pinecones for decoration, and warm brown leaves for the body.
Make a Colorful Autumn Gnome
Combine bright red, orange, and golden-yellow leaves for a vibrant look.
Add a dark-red velvet hat and a contrasting ribbon.
Make a Woodland Gnome
Use shades of brown, moss green, and rust.
Decorate the hat with faux acorns, miniature pinecones, and small artificial berries.
Make a Halloween Gnome
Replace the burgundy hat with black or dark purple fabric.
Add orange ribbon and a small felt pumpkin for a spooky seasonal variation.
Make a Winter Gnome
Keep the bottle structure but replace the autumn leaves with white, silver, or evergreen-colored decorations.
Use a soft gray or cream hat to create a winter-inspired character.
💡 Helpful Tips for a Beautiful Finish
- Use artificial leaves for durability. They tend to hold their color and shape longer than natural leaves.
- Overlap the leaves. This helps hide the bottle and gives the body a fuller appearance.
- Choose a stable bottle. A wider base makes the gnome easier to display.
- Keep the hat lightweight. Heavy decorations may cause the top to bend or pull away from the bottle.
- Use contrasting colors. Burgundy, orange, and yellow create a classic autumn palette.
- Allow the glue to cool. This helps prevent loose decorations and accidental burns.
- Save leftover materials. Extra leaves, ribbon, and fabric can be used for matching autumn crafts.
🧹 How to Store Your Fall Gnome
When autumn is over, you can save your gnome for next year.
Gently dust it with a soft brush or dry cloth.
Avoid soaking the decoration or using large amounts of water, as moisture may damage the fabric, glue, and leaves.
Store the gnome upright in a dry place, away from direct sunlight and excessive heat.
If possible, place it in a box with enough room around the hat and leaves to prevent them from becoming crushed.
Keep it away from candles, heaters, and other heat sources because the plastic bottle, fabric, artificial leaves, and hot glue can be damaged by heat.
With proper care, your handmade gnome can become part of your autumn decorating collection for years to come.
🍂 Final Thoughts
This DIY Fall Gnome made from a plastic bottle and autumn leaves is a wonderful way to combine creativity, recycling, and seasonal decorating.
With a few simple supplies, you can transform an ordinary bottle into a charming little character wearing a burgundy hat and a colorful leafy robe.
The project is easy to customize, making it perfect for anyone who enjoys handmade decorations and cozy autumn crafts.
Whether you display it on your mantel, welcome guests with it in your entryway, or give it as a thoughtful handmade gift, this little gnome is sure to bring warmth and personality to your fall decor.
And remember, your gnome doesn’t have to look exactly like the inspiration picture. Experiment with different leaf colors, fabrics, ribbons, and decorations to create a design that feels uniquely yours.
Sometimes the simplest materials can become the most charming decorations! 🍁❤️
Would you make this adorable fall gnome for your home? What color would you choose for its hat—burgundy, orange, or forest green? 🍂🎩
