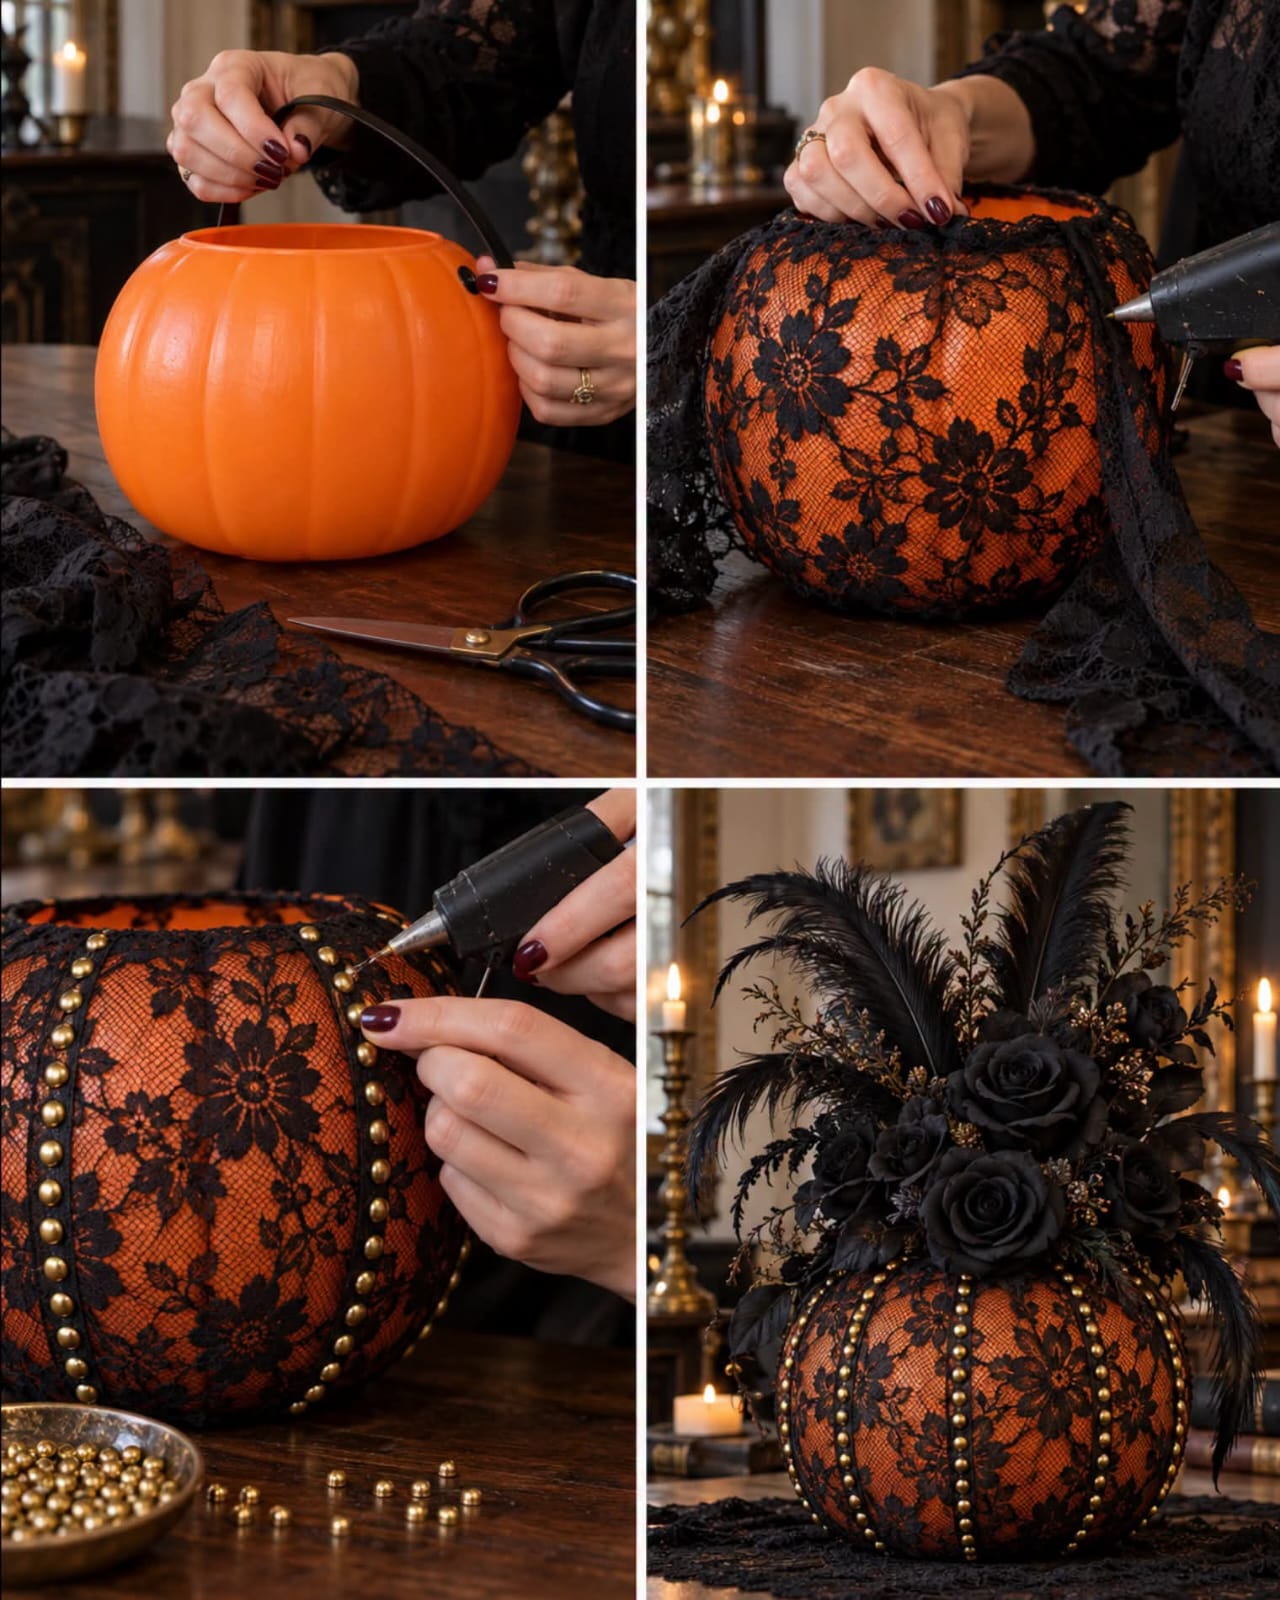
🖤 DIY Halloween Centerpiece: Elegant Black Lace Pumpkin with Roses and Feathers 🎃
Create a stunning, gothic-inspired Halloween centerpiece with this easy DIY project! This elegant pumpkin combines black floral lace, antique gold accents, black roses, and dramatic feathers to create a luxurious decoration perfect for Halloween parties, fall gatherings, or an elegant autumn tablescape.
The best part? You can transform an inexpensive plastic pumpkin into a sophisticated statement piece using just a few craft supplies.
✨ Materials You’ll Need
- 1 large orange plastic pumpkin bucket
- Black floral lace fabric
- Black artificial roses
- Black decorative feathers
- Gold flatback studs or decorative upholstery nailheads
- Hot glue gun and glue sticks
- Floral foam to fit inside the pumpkin
- Scissors
- Wire cutters (optional, for trimming artificial flowers)
- Black artificial foliage or decorative branches (optional)
- Black ribbon or additional lace for finishing touches
Optional additions: Gold-painted leaves, black berries, metallic branches, or small decorative skulls can give your centerpiece an even more dramatic Halloween look.
🎃 Step-by-Step Instructions
Step 1: Prepare the Pumpkin
Start with a large orange plastic pumpkin bucket.
- Remove the plastic handle carefully.
- Turn the pumpkin so that any face, lettering, or unwanted design faces the back.
- Clean the surface with a dry cloth to remove dust and dirt.
- Make sure the pumpkin is completely dry before decorating.
Tip: Choose a pumpkin with clearly defined vertical ridges. These ridges help guide the lace and gold studs, creating a beautiful, symmetrical design.
Step 2: Cover the Pumpkin with Black Lace
Lay your black floral lace over the pumpkin and adjust it until the pattern is evenly distributed.
- Begin at the top of the pumpkin.
- Gently stretch the lace over the curved surface.
- Smooth the fabric along the pumpkin’s ridges.
- Apply small amounts of hot glue to secure the lace around the top and underneath the pumpkin.
- Trim away excess fabric with scissors.
Keep the lace pattern visible so the orange pumpkin shows through the floral openings. This contrast creates the distinctive black-and-orange gothic appearance.
Important: Work in small sections when gluing. This helps prevent wrinkles and keeps the lace pattern looking neat.
If your lace is particularly delicate, test the hot glue on a small, inconspicuous area first.
Step 3: Add Gold Decorative Studs
Gold studs provide an elegant contrast against the black lace and orange background.
- Identify the pumpkin’s vertical ridges.
- Arrange the gold studs in straight lines along the ridges.
- Begin at the top and work downward.
- Space the studs evenly for a polished, symmetrical appearance.
- Secure each stud with a small dab of hot glue if it is not self-adhesive.
Continue until you have decorated several or all of the pumpkin’s vertical sections.
For the most luxurious look, use antique-gold or brass-colored studs rather than bright, shiny gold.
Design tip: Before gluing, lay out the studs along each ridge to check the spacing. Consistent placement makes the finished pumpkin look professionally decorated.
Step 4: Insert the Floral Foam
Now it’s time to create the dramatic floral arrangement.
- Cut the floral foam to fit securely inside the pumpkin.
- Place it inside the opening.
- Add a little hot glue to the bottom of the foam if necessary to keep it stable.
Make sure the foam sits firmly without forcing the pumpkin’s opening out of shape.
If the pumpkin has a narrow opening, trim the foam into smaller pieces and fit them together inside.
For a lightweight arrangement, dry floral foam is suitable for artificial flowers. There is no need to add water.
Step 5: Arrange the Black Roses
Black roses give this centerpiece its dramatic, romantic appearance.
- Begin by placing one or two of the largest roses near the center.
- Add more roses around them to create a full, rounded arrangement.
- Vary the heights slightly so the flowers look natural.
- Secure the stems in the floral foam.
- Fill empty spaces with black artificial leaves or foliage.
Use roses with different bloom sizes to create depth and visual interest.
For a more elaborate centerpiece, combine velvet-textured roses with black leaves and dark decorative branches.
Tip: Arrange the roses before adding the feathers. This makes it easier to achieve a balanced floral design.
Step 6: Add Black Feathers and Decorative Foliage
The feathers are what transform this simple pumpkin into a dramatic gothic centerpiece.
- Insert several tall black feathers toward the back of the arrangement.
- Place additional feathers along the sides.
- Bend the stems gently to create flowing curves.
- Add decorative branches or dark foliage between the roses.
- Adjust the arrangement until it looks balanced from every angle.
Allow some feathers to extend upward and outward. This creates height and gives the arrangement a luxurious, theatrical appearance.
For additional texture, incorporate black glitter branches, bronze-colored foliage, or a few dark metallic accents.
Avoid overcrowding the roses. They should remain the focal point of the arrangement.
Step 7: Add the Finishing Touches
Once all the flowers and feathers are in place, inspect the pumpkin from the front and sides.
- Check that the gold studs form neat vertical lines.
- Adjust any lace that has shifted.
- Fill visible gaps around the flowers with foliage.
- Trim stray threads from the lace.
- Make sure all decorative elements are firmly secured.
Place the finished pumpkin on a wooden tray, a dark table runner, or a decorative pedestal.
For an especially elegant presentation, surround it with small LED candles, black fabric, antique brass accessories, or miniature pumpkins.
Safety note: Because this project uses artificial flowers, fabric, plastic, and hot glue, LED candles are preferable to open flames.
🖤 Styling Ideas for Your Halloween Centerpiece
Here are three ways to incorporate your finished pumpkin into your Halloween decorations.
1. Gothic Glamour
Create a dramatic, luxurious look by combining the pumpkin with:
- Black roses and feathers
- Gold candlesticks
- Black lace table runners
- Dark glass vases
- Warm LED candlelight
This style works beautifully for Halloween dinner parties and elegant seasonal displays.
2. Elegant Halloween Tablescape
Place the centerpiece in the middle of a dining table and surround it with:
- Black or charcoal table linens
- Gold-rimmed plates
- Black napkins
- Brass or gold cutlery
- Small decorative pumpkins
Keep the surrounding decorations relatively simple so the centerpiece remains the star of the table.
3. Gothic Entryway Display
Use the pumpkin as a statement decoration on an entryway console, mantel, or side table.
Pair it with black roses in a tall vase, antique-style picture frames, dark branches, and battery-operated candles to create an atmospheric Halloween display.
💡 Helpful Tips for the Best Results
Choose the right lace. Floral lace with open spaces allows the orange pumpkin to show through, creating a beautiful contrast.
Keep the design symmetrical. Evenly spaced gold studs make the pumpkin look polished and expensive.
Build the floral arrangement in layers. Place the roses first, followed by foliage and feathers. This creates depth without making the arrangement look cluttered.
Use artificial flowers. They last for years and can be reused in future Halloween decorations.
Save your centerpiece after Halloween. Store it in a sturdy box and wrap the feathers loosely to prevent them from bending.
Personalize the design. For a softer gothic look, add dark burgundy roses. For a more glamorous finish, incorporate extra gold foliage or metallic branches.
⏱️ Estimated Time and Cost
Your exact budget will depend on the size of the pumpkin and the supplies you already have.
- Preparation: 10–15 minutes
- Lace application: 20–30 minutes
- Adding gold studs: 20–40 minutes
- Floral arrangement: 20–30 minutes
- Estimated total time: 1–2 hours
- Skill level: Beginner-friendly
- Estimated cost: Approximately $15–$40 USD, depending on materials and local prices
You can reduce the cost by reusing an old pumpkin bucket, repurposing artificial flowers, and purchasing lace and decorative studs from craft stores.
Frequently Asked Questions
Can I use a real pumpkin instead of a plastic one?
Yes! A real pumpkin can create a beautiful natural variation. However, it may deteriorate more quickly, especially if the lace traps moisture against the surface. A plastic pumpkin is generally more durable and can be reused year after year.
What can I use instead of hot glue?
Strong fabric glue or an adhesive suitable for plastic and textiles may work. Check the manufacturer’s instructions and allow adequate drying time before handling the centerpiece.
Can I make this centerpiece without gold studs?
Absolutely. You can use gold ribbon, metallic cord, decorative trim, or small gold beads to create similar vertical accents.
How do I keep the feathers in place?
Insert the feather stems firmly into the floral foam. If necessary, secure the stems with a small amount of hot glue where appropriate for the materials.
Can I change the colors?
Definitely! Try black lace with a white pumpkin for a monochromatic gothic look, burgundy lace with gold accents for a rich autumn display, or ivory lace with champagne-colored embellishments for a softer, elegant centerpiece.
🕸️ Final Thoughts
This DIY black lace Halloween pumpkin centerpiece is a creative way to turn a simple plastic pumpkin into an elegant seasonal decoration. The combination of orange, black lace, gold studs, black roses, and dramatic feathers creates a striking gothic look without requiring advanced crafting skills.
Whether you display it on your dining table, mantel, entryway console, or Halloween party table, this centerpiece is sure to attract attention.
Best of all, you can customize the colors, flowers, and embellishments to match your own Halloween style.
Happy Halloween crafting! 🖤🎃
Note: This is an original, expanded tutorial based on the image and steps you provided, rather than a transcription of a separately published article.
