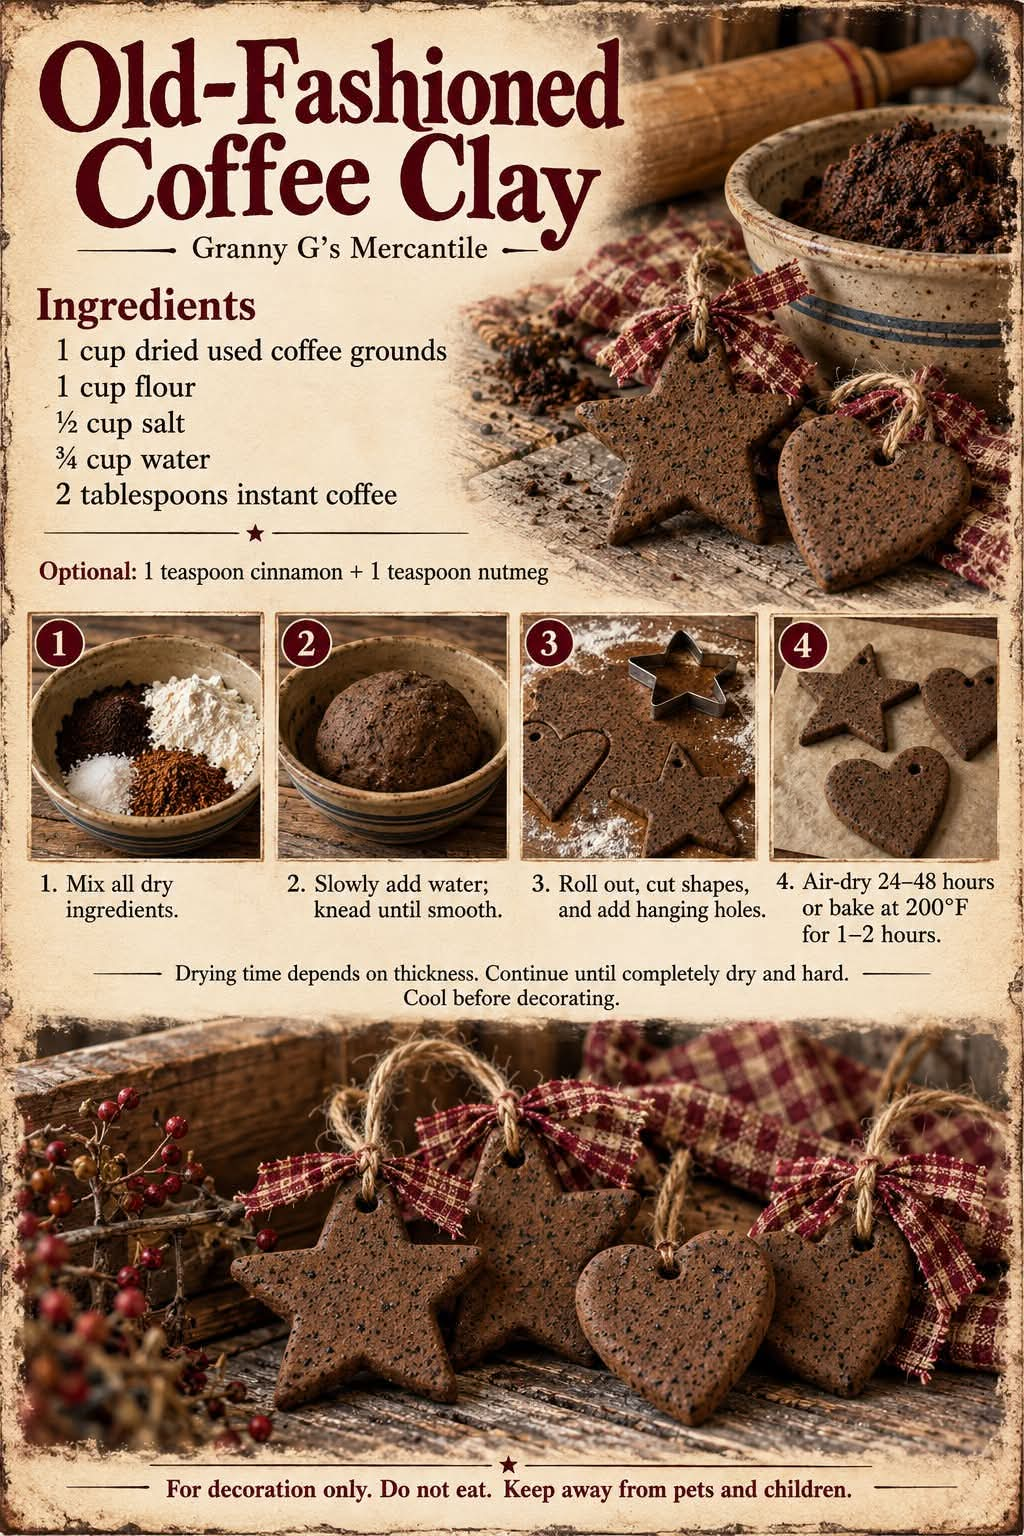
Old-Fashioned Coffee Clay Ornaments ☕🍂
A Rustic DIY Recipe Using Recycled Coffee Grounds
Give your home a cozy, old-fashioned touch with these beautiful homemade coffee clay ornaments! Made with used coffee grounds, flour, salt, water, and instant coffee, these rustic decorations have a lovely brown color and a charming, textured appearance.
This simple DIY project is a wonderful way to reuse leftover coffee grounds instead of throwing them away. You can shape the dough into stars, hearts, leaves, Christmas ornaments, gift tags, or other decorative designs.
Once dried, the ornaments can be decorated with ribbons, twine, and other embellishments to create beautiful farmhouse-style decorations for your home or handmade gifts for friends and family.
Important: These ornaments are for decoration only. They are not edible, and they should be kept away from pets and young children who might put them in their mouths.
Old-Fashioned Coffee Clay Recipe
Preparation Time: 20 minutes
Drying Time: 24–48 hours
Oven-Drying Time: Approximately 1–3 hours, depending on thickness
Difficulty: Easy
Yield: Approximately 10–20 ornaments, depending on size and thickness
Ingredients
- 1 cup dried, used coffee grounds
- 1 cup all-purpose flour
- ½ cup table salt
- ¾ cup water, added gradually
- 2 tablespoons instant coffee granules or powder
Optional spices for a warm, rustic appearance:
- 1 teaspoon ground cinnamon
- 1 teaspoon ground nutmeg
Equipment Needed
- Large mixing bowl
- Measuring cups and spoons
- Wooden spoon or spatula
- Rolling pin
- Baking parchment
- Cookie cutters in your favorite shapes
- Drinking straw or skewer for making hanging holes
- Baking sheet
- Twine, ribbon, or string for hanging
Instructions
Step 1: Prepare the Used Coffee Grounds
Start by collecting your used coffee grounds.
Spread them out on a tray and allow them to dry completely. You can also dry them in a low-temperature oven, stirring occasionally to help moisture escape.
The grounds should feel dry rather than damp or clumpy.
Why is this important?
Excess moisture can make the dough difficult to handle and increase the risk of mold developing during air-drying. Using completely dry grounds also helps you achieve a more consistent dough.
Allow the grounds to cool completely if you dried them in the oven.
Step 2: Mix the Dry Ingredients
In a large mixing bowl, combine:
- 1 cup dried coffee grounds
- 1 cup all-purpose flour
- ½ cup salt
- 2 tablespoons instant coffee
- 1 teaspoon cinnamon, if desired
- 1 teaspoon nutmeg, if desired
Stir everything together until the ingredients are evenly distributed.
The coffee grounds create the speckled texture, while the instant coffee deepens the brown color.
The optional spices add a warm fragrance while you work with the dough.
Step 3: Gradually Add the Water
Pour the water into the dry mixture a little at a time, stirring as you go.
Although the recipe calls for ¾ cup of water, you may not need all of it. The amount required depends on how finely the coffee grounds are ground and how absorbent your flour is.
Begin with approximately ½ cup of water, then add more gradually until the mixture starts coming together.
The dough should be firm, moist, and easy to shape without sticking excessively to your hands.
If the mixture is too dry and crumbly, add a little more water.
If it becomes too sticky, sprinkle in a small amount of flour.
Tip: Avoid adding all the water at once. It is much easier to correct a slightly dry dough than one that has become too wet.
Step 4: Knead the Coffee Clay
Transfer the mixture to a clean work surface.
Knead it gently for approximately 3–5 minutes, until the ingredients form a relatively smooth, workable dough.
The finished dough will not look like traditional white modeling clay. Instead, it will have a rich brown color with small coffee particles throughout.
This texture gives the finished ornaments their distinctive rustic appearance.
If the dough feels sticky, dust your work surface lightly with flour. If it cracks excessively while kneading, work in a few drops of water.
Step 5: Roll Out the Dough
Place the dough between two sheets of baking parchment or roll it out on a lightly floured surface.
Use a rolling pin to flatten it to approximately ¼ inch (6 mm) thick.
Try to keep the thickness as even as possible.
Thicker ornaments take longer to dry and may crack if the outside dries much faster than the inside. Very thin ornaments can become fragile and break easily.
A thickness of approximately ¼ inch provides a good balance between durability and drying time.
Step 6: Cut Out Decorative Shapes
Choose your favorite cookie cutters and begin cutting shapes from the dough.
Here are some lovely ideas:
- Stars
- Hearts
- Christmas trees
- Snowflakes
- Leaves
- Bells
- Gingerbread-person silhouettes
- Circles for rustic gift tags
Carefully remove the excess dough around each shape.
Gather the scraps, knead them together, and roll them out again to make additional ornaments.
For a more traditional farmhouse look, you can leave the edges slightly imperfect.
Step 7: Make Holes for Hanging
If you plan to hang the ornaments, make a small hole near the top of each shape before drying.
A drinking straw works well for this. Press it gently through the dough and remove the small circle of clay.
Make sure the hole is large enough for your chosen twine or ribbon to pass through.
Keep the hole far enough from the edge to prevent the ornament from breaking when you hang it.
If you want to make decorative impressions, gently press a leaf, a textured fabric, or a patterned object into the surface before drying.
Be careful not to press so deeply that the ornament becomes too thin in certain areas.
Step 8: Dry the Ornaments
You can dry your coffee clay ornaments using either of the following methods.
Method A: Air-Drying
Arrange the ornaments on a flat surface lined with parchment paper.
Place them in a dry, well-ventilated area away from direct moisture.
Allow them to dry for approximately 24–48 hours, turning them occasionally so both sides can dry.
Thicker ornaments or humid conditions may require several additional days.
Air-drying is gentle and requires no electricity, but it takes longer and is more vulnerable to humidity.
Because the dough contains flour and used coffee grounds, inspect the ornaments regularly during drying. Do not leave them in a damp environment.
Method B: Oven-Drying
For faster drying, preheat your oven to 200°F (95°C).
Place the ornaments on a parchment-lined baking sheet, leaving a little space between them.
Dry them for approximately 1–3 hours, depending on their thickness and moisture content.
Turn them carefully halfway through drying if they are firm enough to handle.
Check them periodically and remove any pieces that are already completely dry.
If the ornaments begin browning excessively, cracking, or developing dark spots from overheating, reduce the oven temperature.
Important: The drying time is only an estimate. Thick ornaments may require longer, while thinner pieces may dry sooner.
Step 9: Let Them Cool Completely
Once the ornaments are dry and hard, remove them from the oven and allow them to cool completely on a rack.
Check both sides to ensure they are fully dry.
The ornaments should feel hard rather than soft or cool and damp in the center.
If they still feel moist, return them to the oven at a low temperature for additional drying.
Allowing the ornaments to cool completely before decorating helps prevent moisture from becoming trapped beneath paint or other finishes.
Step 10: Decorate Your Coffee Clay Ornaments
Now comes the creative part!
The natural brown color looks beautiful on its own, but you can personalize the ornaments in several ways.
For a farmhouse style:
- Tie a piece of rustic jute twine through the hanging hole.
- Add a small red-and-cream fabric bow.
- Leave the coffee-speckled surface natural.
- Attach a tiny wooden bead to the hanging string.
For Christmas decorations:
- Add a red plaid ribbon.
- Use white paint to create simple snowflakes or dots.
- Write a short message or the year on the back.
- Hang the finished ornaments on a Christmas tree.
For gift tags:
- Cut small circles or rectangles.
- Write names or short messages on the surface after it has dried.
- Tie them to wrapped presents with natural twine.
If you use paint, glue, varnish, or other decorative products, follow their manufacturers’ instructions and allow the finish to cure completely.
For decorations that may be handled frequently, a suitable clear craft sealer can help protect the surface. However, no ordinary craft sealer should be assumed to make these ornaments waterproof or safe to eat.
Tips for Making Stronger Coffee Clay Ornaments
1. Dry the Coffee Grounds Thoroughly
This is one of the most important steps. Damp coffee grounds can introduce excess moisture and encourage mold during drying.
2. Keep the Dough an Even Thickness
Uniform thickness helps the ornaments dry more evenly and reduces the risk of cracking.
3. Add Water Slowly
Different brands of flour and different coffee grounds absorb different amounts of water. Add the liquid gradually rather than relying entirely on the stated measurement.
4. Avoid Rushing the Drying Process
A very hot oven can dry the outside quickly while moisture remains inside. Use a low temperature and allow enough time for the ornaments to dry throughout.
5. Store Them in a Dry Place
After the ornaments have cooled and dried completely, store them in a dry container away from moisture.
Avoid storing them in humid rooms, damp basements, or airtight containers if there is any remaining moisture.
Because these are homemade decorations made from organic materials, their long-term durability cannot be guaranteed.
Can You Make Coffee Clay Without Instant Coffee?
Yes! The instant coffee helps deepen the color, but you can omit it if you don’t have any.
The finished ornaments may have a lighter brown color.
If you want a darker shade, you can experiment with a small amount of additional dried coffee grounds, but keep the overall proportions balanced to prevent the dough from becoming crumbly.
Can You Paint Coffee Clay Ornaments?
Yes. Once the ornaments are completely dry and cool, you can decorate them with acrylic craft paint, paint pens, or other suitable craft materials.
Allow each layer to dry according to the product instructions.
For a natural look, consider leaving the surface unpainted and adding only twine or a small fabric bow.
How Long Do Homemade Coffee Clay Ornaments Last?
Their lifespan depends on how thoroughly they are dried, their thickness, storage conditions, and how they are handled.
When kept dry and handled gently, they may last through a holiday season or longer. However, they can crack, chip, or deteriorate if exposed to moisture.
Inspect stored ornaments before reusing them. Discard any that develop mold, an unusual odor, or signs of deterioration.
Keep these decorations away from pets and young children. The high salt content can be dangerous if eaten, especially by pets. These ornaments are not food, treats, or pet toys.
Final Thoughts
These old-fashioned coffee clay ornaments are a creative way to turn everyday kitchen leftovers into charming handmade decorations.
With just a few inexpensive ingredients, you can create rustic stars, hearts, Christmas decorations, and personalized gift tags that bring warmth and character to your home.
The best part is that each ornament has its own unique texture and appearance. Add a little twine, a fabric bow, or a handwritten message, and you have a simple handmade decoration ready to display or give as a gift.
Have you ever made decorations using recycled coffee grounds? ☕🍂
Would you make these rustic ornaments for Christmas, use them as gift tags, or decorate your home with them all year long?
Share your favorite idea in the comments!
Safety reminder: These ornaments are for decoration only. Do not eat them, and keep them away from pets and children who might mistake them for food.
