🌱 DIY Mason Jar Soil Test: Discover What’s Really in Your Garden Soil
Not everybody is blessed with perfect garden soil—and that’s completely normal.
Some soils drain too quickly. Others hold too much water. Some are packed with nutrients, while others need a little help to support healthy plant growth.
The good news is that improving your soil is often easier than people think. But before you can make improvements, you need to understand what kind of soil you’re working with.
Fortunately, there’s a simple test you can do at home using nothing more than a mason jar, water, and a sample of soil from your backyard.
Why Soil Matters
Healthy soil is the foundation of every successful garden.
Whether you’re growing vegetables, flowers, herbs, or fruit trees, the quality of your soil affects:
- Water retention
- Drainage
- Root development
- Nutrient availability
- Overall plant health
Understanding your soil composition helps you make smarter decisions about compost, fertilizers, mulch, and other soil improvements.
What You’ll Need
The mason jar soil test is simple and inexpensive.
Gather the following:
- A clean mason jar or clear glass jar with a lid
- Soil from your garden
- Water
- A marker (optional)
That’s it!
Step 1: Collect a Soil Sample
Using a small shovel or trowel, collect soil from the area where you plan to garden.
Remove rocks, sticks, roots, and large pieces of organic matter.
For the most accurate results, take samples from several spots and mix them together.
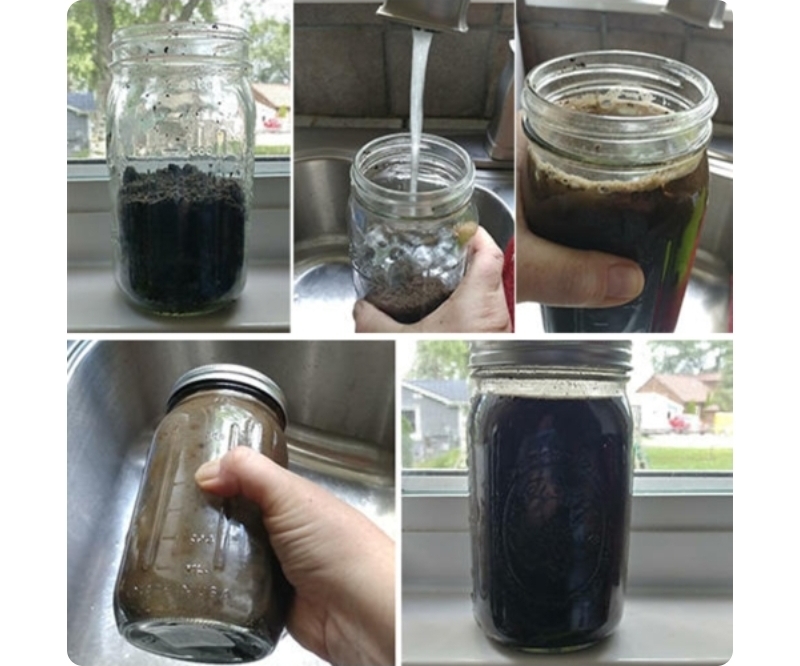
Step 2: Fill the Jar
Fill the mason jar about halfway with the soil sample.
Leave enough space for water and shaking.
Step 3: Add Water
Fill the remainder of the jar with water, leaving a little space at the top.
Some gardeners add a drop of dish soap to help separate soil particles, although this step is optional.
Step 4: Shake Thoroughly
Secure the lid tightly and shake the jar vigorously for several minutes.
The goal is to break apart soil clumps and suspend all particles in the water.
The mixture should look muddy and well blended.
Step 5: Let It Settle
Place the jar on a flat surface where it won’t be disturbed.
Now comes the hardest part: waiting.
As the mixture settles, the soil particles will separate according to size and weight.
What You’ll See
After several hours—or up to 24 hours—you should begin to see distinct layers forming inside the jar.
Bottom Layer: Sand
Sand particles are the largest and heaviest, so they settle first.
A thick sand layer indicates soil that drains quickly but may struggle to retain water and nutrients.
Middle Layer: Silt
Silt particles are smaller than sand and settle next.
Silt helps soil retain moisture while still allowing adequate drainage.
Top Layer: Clay
Clay particles are the smallest and lightest, taking the longest to settle.
Clay-rich soils hold water and nutrients well but may become compacted and drain slowly.
Organic Matter
You may also notice bits of organic material floating near the surface.
This includes decomposed plant material that contributes to soil fertility.
Understanding Your Results
The thickness of each layer helps reveal your soil type.
Sandy Soil
If the sand layer dominates the jar, your soil is sandy.
Benefits:
- Excellent drainage
- Easy root growth
Challenges:
- Dries out quickly
- Nutrients may wash away faster
Clay Soil
If the clay layer is thick, your soil contains a high percentage of clay.
Benefits:
- Holds nutrients well
- Retains moisture
Challenges:
- Poor drainage
- Can become compacted
Silty Soil
Silt-rich soils often feel smooth and fertile.
Benefits:
- Good moisture retention
- Generally productive
Challenges:
- Can compact over time
Loamy Soil
If you have a balanced mix of sand, silt, and clay, congratulations!
This is called loam, often considered ideal garden soil because it combines drainage, moisture retention, and fertility.
Improving Any Soil Type
The great thing about gardening is that most soils can be improved.
Adding organic matter such as:
- Compost
- Aged manure
- Leaf mold
- Mulch
can help improve structure, drainage, and nutrient content regardless of your starting soil type.
Healthy soil becomes better over time with consistent care.
The Bottom Line
The DIY mason jar soil test is one of the easiest ways to learn what’s happening beneath your feet.
In just a day, you can gain valuable insight into your soil’s composition and make more informed gardening decisions.
You don’t need expensive equipment or laboratory testing to get started.
Sometimes all it takes is a jar, a little water, and a bit of curiosity.
🌱 Have you ever tested your garden soil? What did you discover hiding in your backyard?
