🖤🎃
An Elegant Gothic Halloween Decoration You Can Make at Home
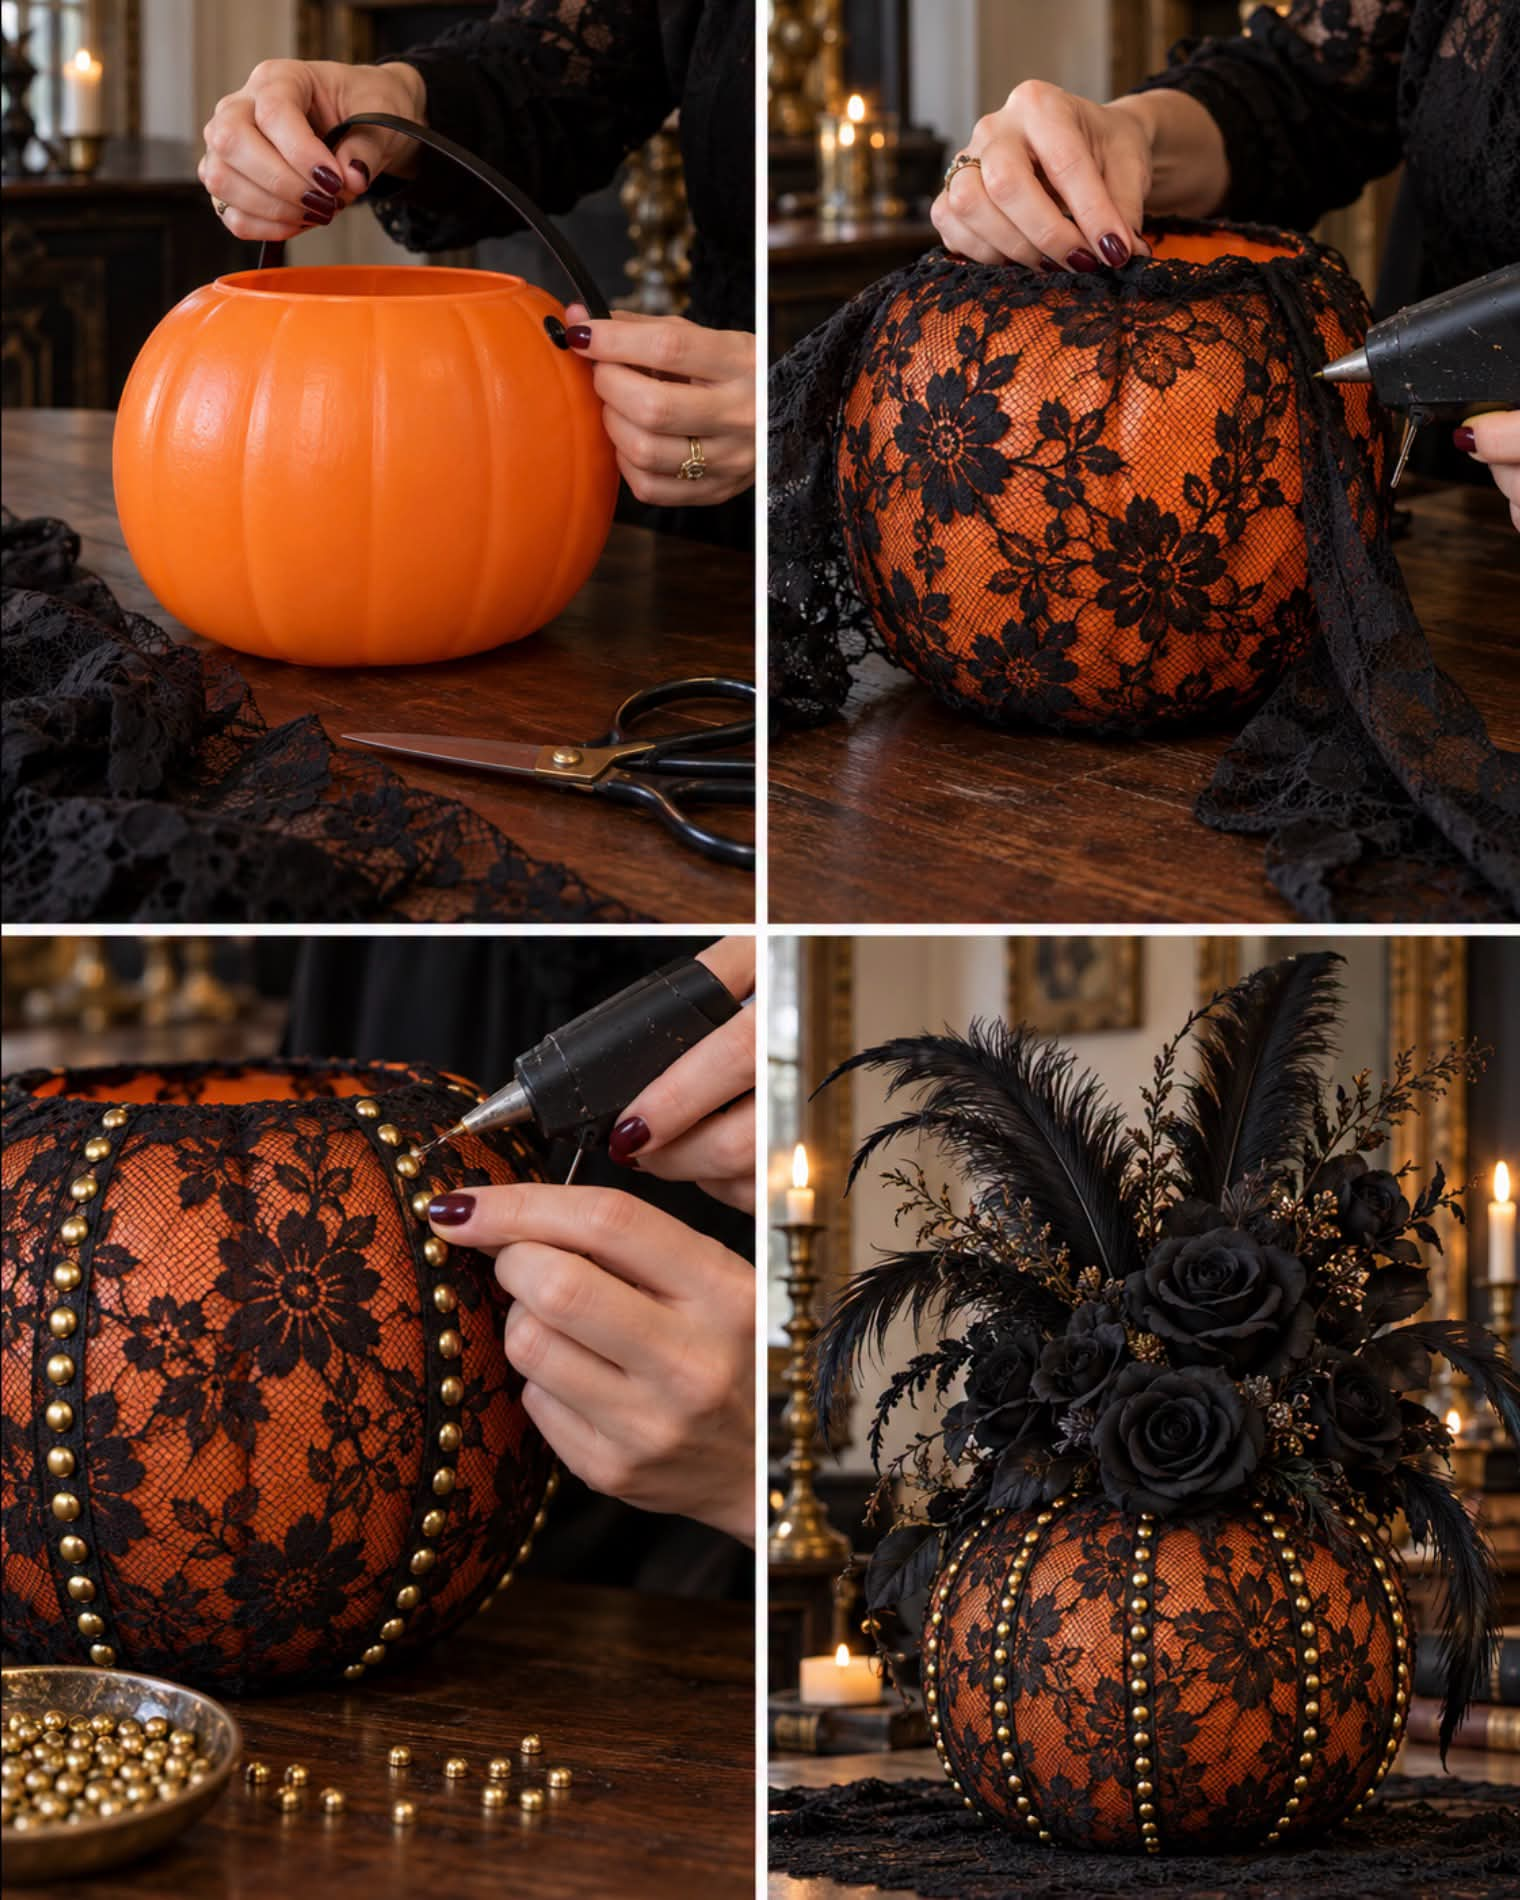
Looking for a Halloween decoration that’s a little spooky, a little glamorous, and absolutely beautiful? This DIY black lace pumpkin centerpiece is the perfect project!
With black lace, gold studs, artificial black roses, and dramatic feathers, you can transform an ordinary pumpkin into an elegant Gothic decoration that looks stunning on a dining table, fireplace mantel, entryway table, or Halloween party display.
The best part? You don’t need expensive supplies or advanced crafting skills. A few inexpensive materials and a little creativity are all it takes to create a centerpiece that looks like something straight out of a Gothic Halloween celebration.
Whether you’re decorating for a Halloween dinner party, creating a spooky centerpiece for your autumn table, or simply love dark and elegant seasonal decorations, this project is a wonderful way to make something unique.
Let’s get crafting! 🖤
Why You’ll Love This DIY Halloween Centerpiece
Traditional Halloween decorations often feature bright orange pumpkins, friendly jack-o’-lantern faces, and playful ghosts. But if you prefer something darker and more sophisticated, this black lace pumpkin offers a beautiful alternative.
Here’s why this project is worth trying:
- Budget-friendly: You can use an inexpensive pumpkin and artificial flowers from a craft store.
- Beginner-friendly: The steps are straightforward and easy to follow.
- Customizable: Change the lace, embellishments, and flowers to suit your decorating style.
- Reusable: With a suitable artificial pumpkin and proper storage, you can enjoy your creation for many Halloweens.
- Perfect for fall entertaining: It makes a dramatic centerpiece for a Halloween dinner or seasonal gathering.
The combination of black lace and gold accents creates a luxurious appearance, while the black roses and feathers add a mysterious, slightly Victorian touch.
Materials You’ll Need
Gather the following supplies before starting your project.
Main Supplies
- 1 artificial pumpkin with a removable handle, if possible
- Black lace fabric
- Artificial black roses
- Black decorative feathers
- Gold flatback studs or decorative embellishments
- Floral foam suitable for artificial arrangements
- Strong craft adhesive compatible with your materials
- Hot glue gun and glue sticks, if appropriate for the materials
Optional Supplies
- Black ribbon
- Gold decorative trim
- Artificial dark purple roses
- Black glitter
- Small decorative spiders
- Gold-painted leaves
- Black beads or rhinestones
Helpful tip: An artificial pumpkin is usually the best choice if you want to reuse the centerpiece every year. A real pumpkin can also work, but it may deteriorate during the season, especially if the surface is damaged or the pumpkin is stored in warm conditions.
Step-by-Step Instructions
Step 1: Prepare the Pumpkin
Start with a clean, dry pumpkin.
If you’re using a pumpkin with a handle, remove it carefully if the design allows. If the handle is attached permanently, you can leave it in place and incorporate it into the decoration.
Turn the pumpkin so its original jack-o’-lantern face points toward the back.
This allows the smoother side of the pumpkin to become the front of your new centerpiece.
If you’re using a real pumpkin, make sure the surface is dry before adding fabric or adhesive.
Tip: Choose a pumpkin with a relatively smooth surface so the lace can sit neatly against it.
Step 2: Wrap the Pumpkin in Black Lace
Lay the black lace over the pumpkin and position it so the fabric covers the visible surface.
Adjust the material until you achieve the look you want.
You can use a fine, delicate lace for a romantic Gothic appearance or a thicker lace with dramatic patterns for a bolder design.
Trim away excess fabric, leaving enough material to fold neatly around the edges.
Apply small amounts of suitable craft adhesive to secure the lace.
Work slowly, smoothing the fabric as you go to minimize wrinkles and uneven areas.
If you’re using a hot glue gun, be careful around your fingers and avoid applying hot glue directly to materials that could melt or become damaged.
Allow the adhesive to dry according to the manufacturer’s instructions.
Step 3: Add Rows of Gold Studs
Now it’s time to add the glamorous details!
Arrange the gold flatback studs in neat rows across the lace-covered pumpkin.
You can create horizontal bands, vertical lines, or a geometric pattern.
For a symmetrical look, mark the placement lightly before attaching the studs.
Apply a small amount of suitable adhesive to each embellishment and press it into place.
If your studs are self-adhesive, check that their adhesive is appropriate for the fabric and intended use.
The gold details contrast beautifully with the black lace, creating a rich, decorative finish.
Design tip: Keep the rows evenly spaced for a polished look, or arrange the studs in a more irregular pattern for a dramatic, vintage-inspired style.
Step 4: Add Floral Foam Inside the Pumpkin
Place a piece of floral foam inside the pumpkin opening.
Choose foam designed for artificial flowers rather than wet floral foam intended for fresh arrangements.
Trim the foam carefully so it fits securely inside the pumpkin.
The foam provides a stable base for arranging the artificial roses and feathers.
If necessary, secure the foam with an appropriate adhesive or another suitable method.
Make sure the pumpkin is stable before proceeding.
Important: If you’re using a real pumpkin, remember that its interior can retain moisture and eventually deteriorate. Keep the foam and decorations dry, and inspect the pumpkin regularly.
Step 5: Arrange the Artificial Black Roses
Begin arranging the artificial black roses inside the pumpkin.
Start with the largest flowers to establish the main shape of the arrangement.
Position the roses at different heights to create depth and dimension.
You can arrange them tightly for a full, dramatic look or leave small spaces between the blooms for a more airy appearance.
Insert the flower stems into the floral foam, trimming them if necessary.
If your roses don’t have long enough stems, attach them to suitable floral picks before arranging them.
Rotate the pumpkin as you work to make sure the arrangement looks attractive from the front and sides.
Step 6: Add Feathers for a Dramatic Finish
Once the roses are in place, add black feathers around the flowers.
Position a few feathers near the back to create height, then place others along the sides to soften the outline.
The feathers add movement and texture, making the centerpiece feel more elaborate without requiring many additional supplies.
For an especially dramatic Halloween display, choose long black feathers that extend above the roses.
You can also mix in a few dark purple feathers if you want a subtle variation in color.
Make sure the feathers are securely attached and keep them away from candles, fireplaces, and other sources of heat.
Step 7: Make the Final Adjustments
Step back and examine your centerpiece from several angles.
Check that the lace is secure, the gold studs are evenly arranged, and the flowers are distributed attractively.
Adjust any roses or feathers that appear out of place.
If you want to add extra sparkle, incorporate a few black rhinestones or gold accents.
Allow all adhesives to cure completely before moving the centerpiece to its final location.
And that’s it! Your elegant black lace Halloween pumpkin is ready to display. 🖤🎃
How to Style Your Black Lace Pumpkin Centerpiece
Once your creation is complete, there are several ways to incorporate it into your Halloween decorations.
1. Create a Gothic Halloween Tablescape
Place the centerpiece in the middle of a dining table covered with a black or charcoal tablecloth.
Add black napkins, gold cutlery, and a few small decorative pumpkins for a coordinated look.
For a softer contrast, use a cream-colored table runner beneath the arrangement.
2. Decorate Your Fireplace Mantel
Place the pumpkin on a mantel surrounded by black candlesticks, artificial cobwebs, dark foliage, and small gold decorations.
Keep the arrangement away from flames and heat sources.
Battery-operated candles are an excellent option if you want a warm glow without an open flame.
3. Dress Up an Entryway Table
Welcome guests with this striking centerpiece on an entryway console.
Pair it with a dark-framed mirror, a few miniature pumpkins, and a decorative bowl filled with black and gold ornaments.
The combination creates a sophisticated Halloween display without requiring an entire room makeover.
4. Use It as a Halloween Party Decoration
This centerpiece can become the focal point of a Halloween buffet or dessert table.
Surround it with black tableware, gold accents, and themed decorations to create a cohesive look.
Just ensure that feathers, artificial flowers, and craft materials are kept away from food and serving surfaces.
Creative Variations to Try
One of the best things about DIY decorations is that you can adapt them to suit your personal style.
Here are a few ideas for your next project.
Black and gold glamour: Use gold lace, black roses, and gold embellishments for a more luxurious appearance.
Purple Gothic pumpkin: Combine black lace with deep purple roses and black feathers for a mysterious, dramatic arrangement.
Black and silver centerpiece: Replace the gold studs with silver rhinestones or metallic beads for a cooler color palette.
Romantic Victorian pumpkin: Choose lace with an intricate floral pattern and add burgundy roses for an antique-inspired look.
Minimalist black pumpkin: Skip the feathers and use only black lace, a few gold studs, and a small cluster of artificial roses.
Each variation creates a different look while using the same basic technique.
Tips for Making Your Centerpiece Last
If you want to enjoy your creation for several seasons, a few simple precautions can help.
- Choose an artificial pumpkin: It is generally more durable than a fresh pumpkin for reusable decorations.
- Use compatible adhesives: Test the glue on a small, inconspicuous area before applying it to the entire project.
- Keep it dry: Moisture can damage the fabric, loosen embellishments, and encourage deterioration if you use a real pumpkin.
- Store it carefully: Place the centerpiece in a sturdy box and protect the roses and feathers from crushing.
- Avoid direct sunlight: Prolonged exposure can fade fabrics and artificial flowers.
- Keep it away from heat: Artificial flowers, feathers, lace, and craft adhesives may be flammable or heat-sensitive.
For storage, wrap the centerpiece loosely in clean tissue paper and place it in a dry location.
When Halloween returns next year, you can bring it out and enjoy your handmade decoration all over again.
Frequently Asked Questions
Can I use a real pumpkin instead of an artificial one?
Yes! A real pumpkin can work for a temporary Halloween decoration. Choose one with a firm, undamaged surface, and keep it in a cool, dry location.
However, a real pumpkin will eventually deteriorate, so it isn’t the best choice if you want to reuse the centerpiece every year.
What kind of lace works best?
Black floral lace is an excellent option because its pattern adds texture without overwhelming the pumpkin.
Stretch lace may be easier to fit around curved surfaces, while stiffer lace can create a more structured appearance.
Can I use fresh flowers?
You can, but fresh flowers require additional care and usually need a suitable water source. Artificial roses are easier to maintain and work particularly well for a reusable centerpiece.
How can I make the centerpiece more affordable?
Look for artificial pumpkins, lace remnants, discounted seasonal decorations, and artificial flowers at craft stores.
You can also reuse decorations you already own, such as feathers, ribbons, and metallic embellishments.
Can I make this project with children?
Older children can help select the lace, arrange the decorations, and position the artificial flowers under adult supervision.
Adults should handle sharp tools, hot glue guns, and any materials that could cause burns or injuries.
Final Thoughts: A Little Lace, a Little Gold, and a Lot of Halloween Magic! 🖤🎃
This DIY black lace pumpkin centerpiece proves that Halloween decorations don’t have to be complicated or expensive to look impressive.
With a simple pumpkin, black lace, gold studs, artificial roses, and feathers, you can create a dramatic decoration that brings Gothic elegance to your seasonal display.
Whether you place it on your dining table, mantel, entryway console, or Halloween party table, it’s a wonderful way to add personality to your home.
And the best part? You can customize the colors, embellishments, and flowers to create a design that’s entirely your own.
Now it’s your turn! 🖤
Would you decorate your Halloween pumpkin with black lace and gold studs, or would you choose purple roses, silver embellishments, or another color combination?
Tell us your favorite idea in the comments, and share this DIY project with someone who loves making beautiful Halloween decorations! 👻
