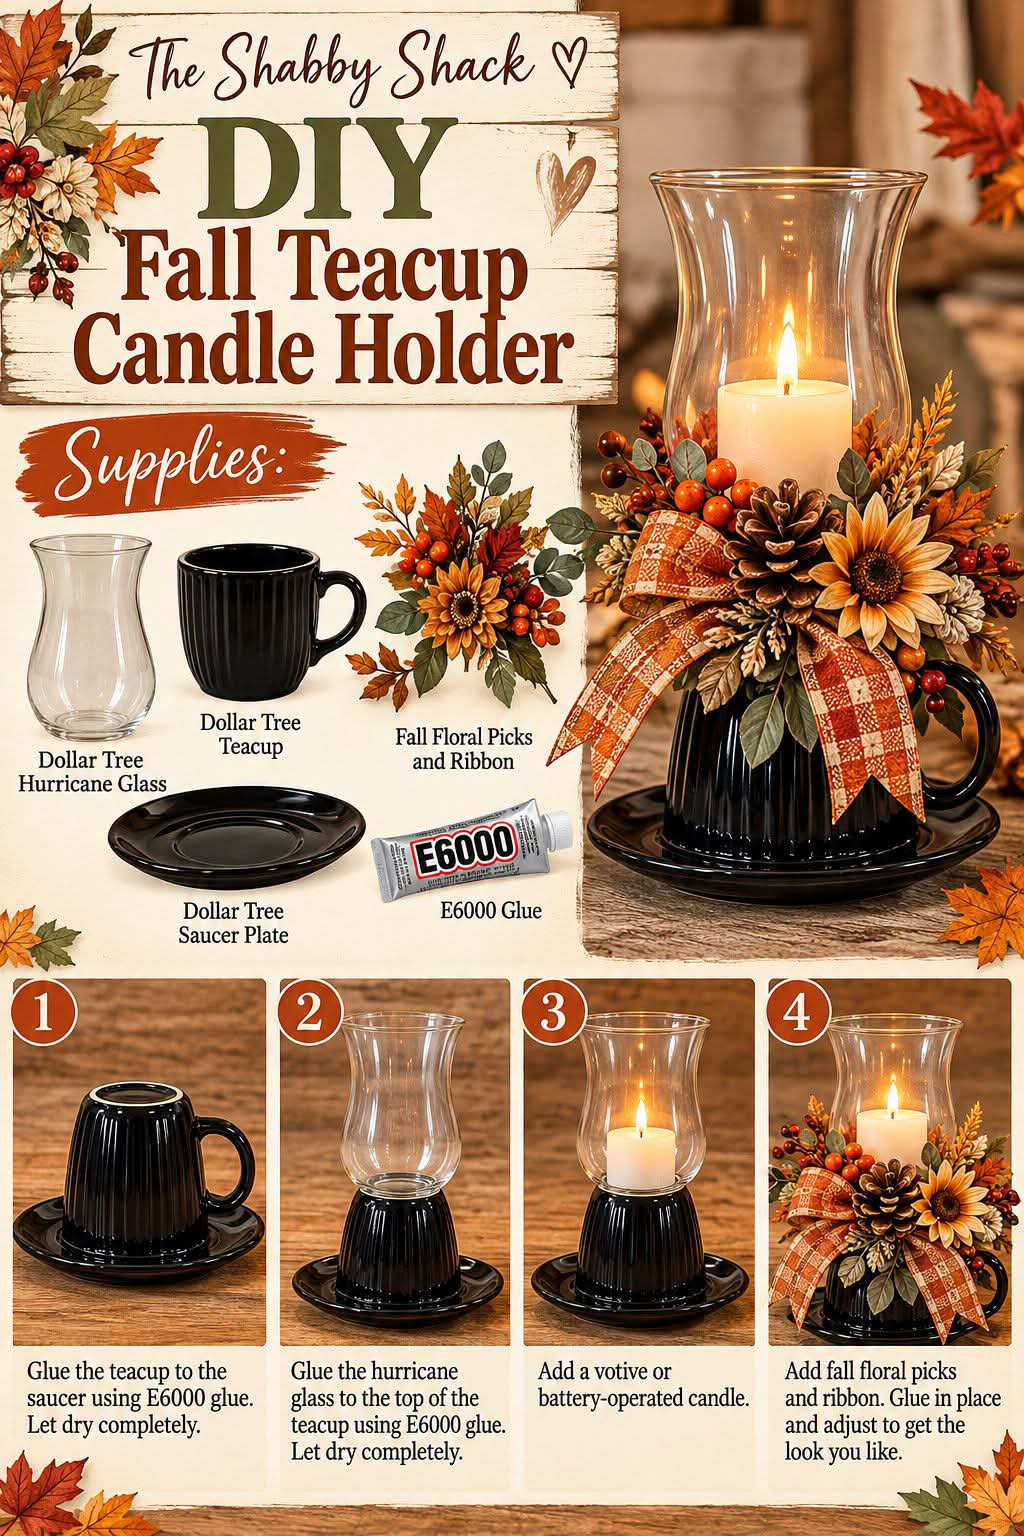
DIY Fall Teacup Candle Holder: A Beautiful Autumn Decoration
Introduction
Bring the warmth and beauty of autumn into your home with this charming DIY Fall Teacup Candle Holder! This creative craft transforms an ordinary teacup, a matching saucer, and a glass hurricane vase into a beautiful seasonal centerpiece decorated with fall flowers, pinecones, berries, and rustic ribbon.
Inspired by farmhouse and shabby-chic decor, this project is perfect for decorating your dining table, coffee table, fireplace mantel, or entryway. The combination of a classic teacup, a glass candle holder, and rich autumn colors creates an elegant decoration that looks like something you might find in a boutique home decor store.
The best part? You can create your own version using affordable supplies from a dollar store, thrift shop, or craft store. Choose a black teacup for a dramatic look, a white teacup for a farmhouse style, or a vintage floral teacup for a more traditional autumn display.
Follow this simple step-by-step tutorial to make your own beautiful fall candle holder.
Materials and Supplies
Before you begin, gather the following materials:
- 1 teacup or coffee mug: Choose a sturdy ceramic cup in a color that complements your autumn decor.
- 1 matching saucer: The saucer creates a decorative base for the candle holder.
- 1 glass hurricane vase: Choose a clear glass vase that can sit securely on the inverted teacup, with enough room inside for a candle.
- E6000 adhesive or another suitable glass-and-ceramic adhesive: Use an adhesive compatible with both materials and follow the manufacturer’s instructions.
- 1 battery-operated candle: A flameless votive or LED candle is the safest choice for this decorative arrangement.
- Fall floral picks: Choose artificial sunflowers, autumn leaves, small pumpkins, berries, pinecones, or other seasonal accents.
- Decorative autumn ribbon: Plaid, burlap-style, rust-colored, or orange-and-brown ribbon works beautifully.
- Scissors or wire cutters: Use these to trim ribbon and artificial floral stems.
- Protective work surface: Cover your table with paper or a craft mat before gluing.
Optional Decorative Supplies
You can personalize your candle holder with additional materials, such as:
- Miniature pinecones
- Artificial acorns
- Faux eucalyptus leaves
- Small decorative pumpkins
- Twine or raffia
- A large seasonal bow
- Gold or bronze decorative accents
Choose decorations that complement one another without overcrowding the design.
Important safety note: Although the inspiration design shows a lit candle, a real flame should not be used inside this craft. Artificial flowers, ribbon, pinecones, and other decorations are combustible, and the glass-and-ceramic assembly may not be designed to withstand candle heat. Use a battery-operated candle instead.
Step-by-Step Instructions
Step 1: Glue the Teacup to the Saucer
Begin by placing the saucer on a flat, protected work surface.
Turn the teacup upside down so that its opening faces the saucer and its base faces upward. Position the inverted teacup in the center of the saucer.
Before applying any adhesive, check that the cup sits securely and that the handle does not prevent the saucer from resting flat.
Once you are happy with the position, apply a small amount of suitable adhesive to the contact area between the rim of the inverted teacup and the saucer.
Carefully press the cup into place, keeping it centered.
Follow the adhesive manufacturer’s instructions for application and curing time. Leave the assembly undisturbed until the adhesive has fully cured.
Tip: A sturdy, flat saucer and a cup with a broad rim will help create a more stable base for the finished decoration.
Step 2: Attach the Glass Hurricane Vase
Once the teacup and saucer are firmly bonded, prepare the glass hurricane vase.
Turn the vase upside down so its open end faces downward and its closed base faces upward. Position the vase over the upward-facing base of the inverted teacup.
Center the vase carefully so that the finished decoration looks balanced.
Before gluing, check that the vase’s rim makes stable contact with the teacup and that the glass is not wobbling. If the surfaces do not fit together securely, choose a different vase rather than forcing the pieces into position.
Apply a suitable adhesive to the contact area, following the manufacturer’s directions for use with glass and ceramic.
Carefully position the vase and hold it in place as directed by the adhesive instructions.
Allow the adhesive to cure completely before moving or decorating the assembly.
Important: Glass can crack under pressure or if the assembly becomes unstable. Handle the vase gently, and do not lift the finished decoration by the glass. If the vase does not sit securely on the cup, use a different design that does not require bonding the two pieces together.
Step 3: Add the Candle
Once the adhesive has fully cured, place a battery-operated votive candle inside the glass hurricane vase.
Position the candle in the center of the vase’s base so that it is visible through the clear glass.
Choose a flameless candle that fits comfortably inside the vase without touching the sides.
If the candle has a timer or remote control, test it before completing the decoration. This makes it easy to illuminate your centerpiece whenever you want.
A warm-white LED candle creates a soft, cozy glow that complements the orange, gold, brown, and rust-colored accents of autumn.
Safety tip: Use only a battery-operated candle with this decorative arrangement. Do not substitute a real flame, even if the candle appears to fit comfortably inside the glass.
Step 4: Decorate with Fall Floral Picks and Ribbon
Now it is time to transform your simple candle holder into a beautiful autumn centerpiece!
Gather your artificial fall flowers, leaves, berries, pinecones, and decorative ribbon.
Start by arranging the larger floral pieces around the outside of the teacup and saucer area. Add artificial sunflowers, maple leaves, and small berry branches to create a full, layered appearance.
Next, tuck smaller leaves and decorative accents between the larger flowers to fill any empty spaces.
Choose a color palette that reflects the season. Traditional autumn colors include:
- Burnt orange
- Rust red
- Golden yellow
- Deep burgundy
- Warm brown
- Muted olive green
Once you are satisfied with the floral arrangement, prepare a decorative ribbon bow.
Cut a length of ribbon and form several loops, securing the center with floral wire or another suitable fastener. Leave two long ribbon tails for a cascading effect.
Attach the bow to the front of the arrangement using a suitable craft adhesive or floral wire, ensuring it is secure and does not interfere with the stability of the candle holder.
Adjust the flowers, leaves, and ribbon until the arrangement looks balanced from the front and sides.
Design tip: Use one large sunflower or another statement flower as the focal point, then surround it with smaller flowers, berries, and foliage. This creates a professional-looking arrangement without making the design appear too crowded.
Keep all decorative materials away from the candle’s light source and any area where they might interfere with its operation.
Step 5: Make the Final Adjustments
Before displaying your finished creation, inspect the entire arrangement.
Check that the saucer rests flat on the surface, the teacup is firmly attached, and the glass vase is securely positioned.
Gently adjust any loose artificial leaves or floral stems.
Make sure the ribbon is neatly arranged and the bow faces forward.
Clean fingerprints from the glass using a soft, dry cloth. Remove any visible adhesive residue according to the manufacturer’s cleaning recommendations.
Finally, switch on the battery-operated candle and admire the warm glow shining through the glass.
Your DIY fall teacup candle holder is now ready to display!
Decorating Ideas for Your Fall Teacup Candle Holder
One of the best things about this craft is how easily you can customize it to suit your home.
Farmhouse Style
Choose a white or cream-colored teacup and saucer. Add faux eucalyptus, small white pumpkins, natural-looking pinecones, and burlap ribbon.
This neutral color scheme creates a soft, rustic appearance that works beautifully with farmhouse decor.
Classic Autumn Style
Use a black or dark-brown teacup with orange sunflowers, red berries, golden leaves, and a plaid ribbon bow.
This combination creates a rich autumn display that looks especially attractive on a wooden dining table or mantel.
Vintage Shabby-Chic Style
Choose a vintage teacup with delicate floral patterns. Decorate it with muted pink, cream, and dusty-orange flowers, along with soft beige ribbon.
This romantic design is ideal for a side table, bedroom dresser, or elegant autumn centerpiece.
Thanksgiving Centerpiece
Use warm gold, rust, and burgundy accents. Surround the finished decoration with additional artificial leaves, miniature pumpkins, and pinecones.
Place it in the center of a dining table as part of your Thanksgiving decor, making sure it does not obstruct guests’ views or interfere with serving dishes.
Tips for the Best Results
- Choose matching materials: Select a teacup, saucer, and hurricane vase that complement one another in size and style.
- Test the arrangement first: Position all the pieces before gluing to ensure that the finished structure will be balanced.
- Use the correct adhesive: Check that your adhesive is suitable for both glass and ceramic and follow the manufacturer’s instructions.
- Allow adequate curing time: Do not rush the assembly. Moving the pieces before the adhesive has cured may weaken the bond.
- Keep decorations lightweight: Heavy flowers or large decorative picks can make the structure unstable.
- Create a balanced arrangement: Distribute flowers and foliage around the base instead of placing all the weight on one side.
- Choose seasonal ribbon: Plaid, burlap-style, or autumn-print ribbon adds texture and color.
- Use flameless lighting: Battery-operated candles provide the cozy appearance of candlelight without introducing an open flame near artificial flowers and ribbon.
Frequently Asked Questions
Can I use a regular coffee mug instead of a teacup?
Yes! A coffee mug works well for this project. Choose one with a sturdy base and a shape that allows it to sit securely upside down on the saucer.
Black, white, cream, and brown mugs are particularly suitable for autumn decorations.
Where can I find the supplies?
You can look for teacups, saucers, glass hurricane vases, artificial flowers, and seasonal ribbon at dollar stores, craft stores, thrift shops, or home decor retailers.
Thrift stores are especially useful for finding inexpensive vintage teacups and saucers.
Can I use hot glue instead of E6000?
Hot glue may work for attaching some lightweight decorative elements, depending on the materials involved. However, it may not provide a sufficiently strong or durable bond for a glass-and-ceramic assembly.
For the main structure, choose an adhesive specifically suitable for the materials being joined and follow its application and curing instructions.
Can I change the decorations for other seasons?
Absolutely! This design can be adapted for many occasions.
- Christmas: Use evergreen-style foliage, red berries, pinecones, and festive ribbon.
- Spring: Add pastel flowers, greenery, and soft pink or yellow ribbon.
- Summer: Choose bright flowers, green leaves, and cheerful seasonal colors.
- Winter: Use white flowers, silver accents, and frosted-looking artificial foliage.
You can change the decorative elements without rebuilding the entire structure, provided the existing assembly remains secure.
How should I clean the finished decoration?
Use a soft, dry cloth to remove dust from the glass and ceramic surfaces. Clean artificial flowers gently with a soft brush or according to the manufacturer’s care instructions.
Avoid soaking the assembled decoration or exposing the adhesive joints to excessive moisture.
Can I use a real candle inside the hurricane glass?
No. A battery-operated candle is the recommended choice for this project. The artificial flowers, ribbon, and other decorative materials can catch fire if exposed to a flame or excessive heat. The glass and ceramic components may also crack under unsuitable thermal conditions.
A flameless candle gives you the same cozy decorative effect without introducing an open flame.
Conclusion
This DIY Fall Teacup Candle Holder is a lovely way to bring the colors and textures of autumn into your home. By combining a simple teacup, a matching saucer, a clear glass hurricane vase, and beautiful seasonal decorations, you can create a unique centerpiece that looks elegant without requiring expensive materials.
The project is also easy to personalize. Choose classic orange and gold flowers for a traditional autumn look, neutral tones for farmhouse decor, or vintage-inspired details for a shabby-chic finish.
Whether you display it on your dining table, mantel, entryway console, or coffee table, your handmade decoration will add a warm seasonal touch to your space.
Gather your supplies, choose your favorite fall colors, and enjoy creating a beautiful piece of handmade autumn decor!
These projects offer additional ideas for creating attractive seasonal candle decorations using simple materials.
