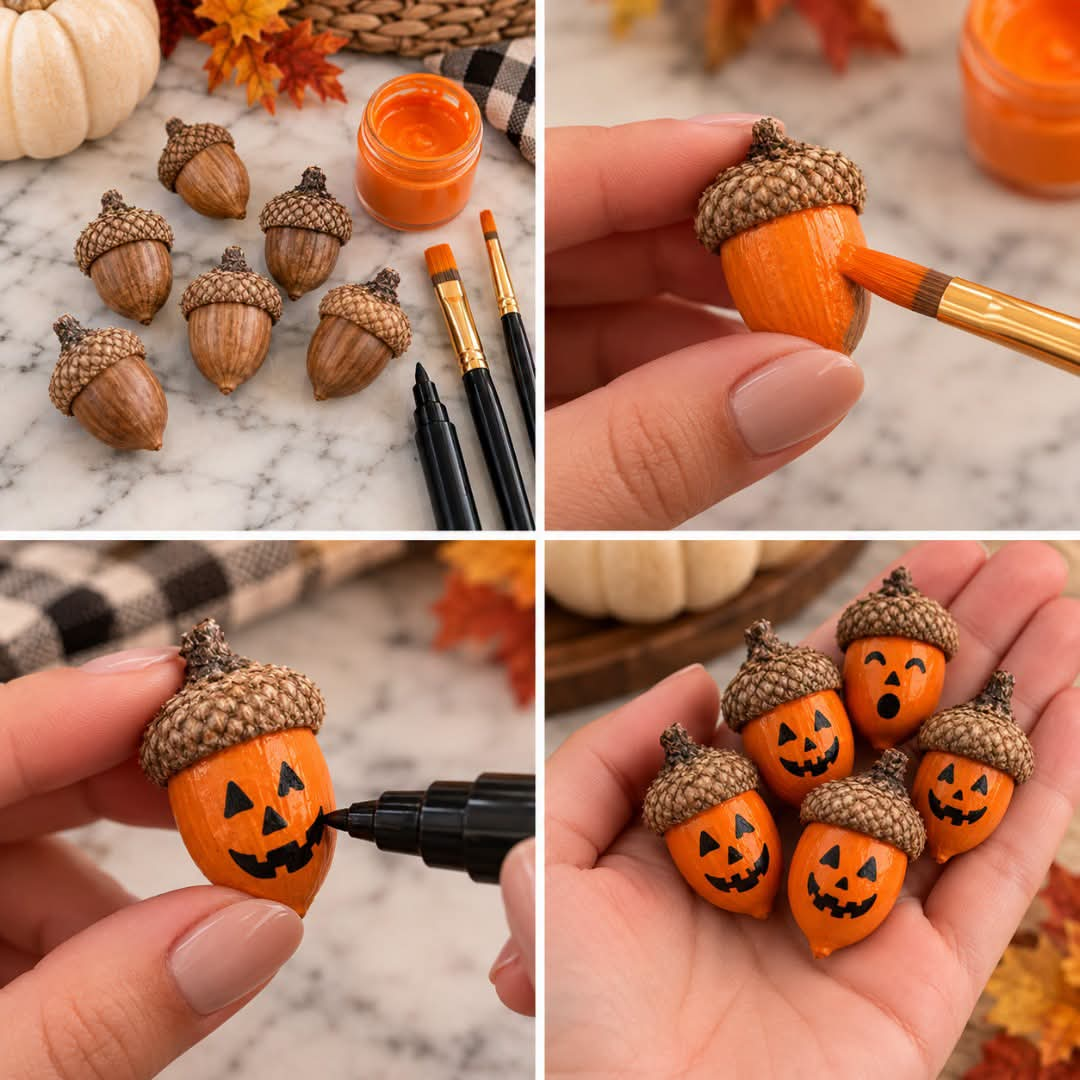
: How to Paint Acorns to Look Like Jack-o’-Lanterns
Introduction
Looking for a fun, easy, and inexpensive Halloween craft? These adorable acorn jack-o’-lanterns are the perfect way to add a festive touch to your home this autumn! Made with real acorns, bright orange paint, and a black marker, these miniature pumpkins are simple to create and look absolutely charming.
Whether you want to decorate your home for Halloween, make a fun seasonal project with your children, or create handmade decorations for your fall table, painted acorns are a wonderful choice. Their natural caps look just like little pumpkin stems, making them perfect for this creative craft.
Materials You’ll Need
To make your own acorn jack-o’-lanterns, gather the following supplies:
- Large acorns with their caps still attached
- Orange acrylic craft paint
- A small paintbrush
- A black permanent marker or fine-tip paint pen
- A paper towel or newspaper to protect your work surface
- A small container of water for cleaning your brush
- Clear acrylic sealer (optional)
Choose acorns that are intact, dry, and free from cracks. Acorns with rounded bodies work especially well because they resemble tiny pumpkins.
Step 1: Collect and Prepare the Acorns
Begin by collecting acorns from your garden, a nearby park, or another suitable outdoor area. Look for acorns with attractive caps that are firmly attached to their bodies.
Before painting, inspect each acorn carefully and remove any dirt or debris. Gently brush away loose particles with a dry brush or cloth.
If the acorns are freshly collected, allow them to dry thoroughly. For better results, you can place them on a baking sheet and warm them in an oven at a low temperature, around 200°F (93°C), for approximately 1–2 hours, checking frequently to prevent scorching. Let them cool completely before painting.
Safety tip: Never leave acorns unattended in the oven. Discard any acorns that show signs of mold or insect damage.
If the caps are loose, you can carefully remove them and reattach them later with a small amount of craft glue.
Step 2: Paint the Acorns Orange
Place the prepared acorns on a protected work surface.
Using a small paintbrush, apply orange acrylic paint to the body of each acorn. Leave the textured cap unpainted to preserve its natural brown color and create the appearance of a pumpkin with a rustic stem.
Apply the paint in thin, even coats, turning each acorn as needed to cover the entire body.
Allow the first coat to dry completely before applying a second coat if necessary. Two thin coats usually provide better coverage than one thick coat.
Be sure to cover the pointed end and the area directly beneath the cap.
Once the acorns are completely orange, set them aside until the paint is fully dry.
Step 3: Draw the Jack-o’-Lantern Faces
Now comes the most fun part: giving each little pumpkin its own personality!
Using a black permanent marker or fine-tip paint pen, draw classic jack-o’-lantern faces on the orange acorns.
Start with two triangular eyes. You can make them small and simple or slightly uneven for a playful expression.
Next, draw a small triangular nose if you like. Finish with a curved mouth, adding little square teeth to create the traditional Halloween pumpkin grin.
You can experiment with different expressions for each acorn:
- Happy pumpkins: Draw smiling mouths with small square teeth.
- Spooky pumpkins: Create slanted eyes and wide, jagged mouths.
- Silly pumpkins: Give them uneven eyes and oversized grins.
- Surprised pumpkins: Draw round eyes and a large, open mouth.
- Cute pumpkins: Use small eyes and a gentle smile.
Allow the marker or paint pen to dry completely before handling the finished decorations.
Step 4: Seal and Protect Your Decorations (Optional)
If you want your acorn jack-o’-lanterns to last longer, consider applying a clear acrylic sealer.
Choose a finish that suits your style. A glossy sealer gives the orange bodies a shiny, polished appearance, while a matte finish creates a more natural look.
Follow the product instructions and allow the sealer to dry completely in a well-ventilated area.
This step is optional, especially if you plan to use the acorns as short-term indoor decorations.
Step 5: Display Your Miniature Jack-o’-Lanterns
Once everything is dry, your adorable acorn pumpkins are ready to display!
Here are a few creative ways to use them:
Decorate your fall table. Arrange the painted acorns in a small wooden bowl alongside pinecones, autumn leaves, and miniature pumpkins.
Create a Halloween centerpiece. Place them on a decorative tray with orange candles, dried leaves, and other seasonal decorations.
Add them to a mantel display. Scatter the acorn pumpkins among larger pumpkins and fall foliage for a charming autumn arrangement.
Use them as party decorations. Place a few beside each guest’s plate or arrange them around a Halloween snack table.
Decorate your workspace. Set one or two miniature jack-o’-lanterns on your desk for a simple seasonal touch.
Make handmade gifts. Place several finished acorns in a small gift box or decorative jar to create a thoughtful autumn gift.
For the best results, keep the decorations indoors and away from moisture.
Helpful Tips for the Best Results
- Choose the right acorns: Larger acorns provide more room for drawing faces, making them easier to decorate.
- Use bright orange paint: A vivid orange color gives the acorns a traditional Halloween pumpkin appearance.
- Keep the caps natural: The brown, textured caps provide a beautiful contrast against the orange paint.
- Use thin paint layers: Thin coats dry more evenly and help preserve the acorns’ natural shape.
- Let everything dry: Make sure the paint is completely dry before drawing the faces.
- Practice your designs: Try sketching a few expressions on paper before decorating your acorns.
- Make every pumpkin unique: Different facial expressions give your collection a playful, handmade look.
If you are making this craft with children, an adult should handle the preparation of the acorns and any oven-related steps. Wash hands after handling collected natural materials, and supervise the use of permanent markers and small craft supplies.
Frequently Asked Questions
Can I use markers instead of paint?
Yes! Orange paint markers can be used to color the acorns, although acrylic craft paint applied with a brush often provides more even coverage. A black permanent marker or fine-tip paint pen works well for the facial details.
Do I need to remove the acorn caps before painting?
No. You can leave the caps attached and carefully paint only the bodies. If a cap is loose, remove it temporarily and reattach it with craft glue after the paint dries.
How long does this craft take?
The hands-on work usually takes about 20–40 minutes for a small batch, depending on the number of acorns and the complexity of the faces. Additional drying time is required between paint coats and before applying any sealer.
Can I make these decorations with children?
Yes! This is a fun autumn craft for children with adult supervision. Children can paint the acorns and create simple faces using age-appropriate craft supplies. Because acorns are small, keep them away from young children who may put objects in their mouths.
How should I store the finished acorns?
Once completely dry, store them in a clean, dry container in a cool place. Avoid damp environments, which can encourage mold or damage the natural acorns.
Can I use other colors?
Absolutely! Although orange is perfect for traditional jack-o’-lanterns, you can also paint acorns white, purple, green, or black to create a collection of spooky Halloween characters.
Conclusion
Painting acorns to look like jack-o’-lanterns is a simple, affordable, and creative way to celebrate Halloween and the beauty of autumn. With just a few natural acorns, orange acrylic paint, and a black marker, you can transform ordinary nature finds into adorable miniature pumpkins.
The best part is that every acorn can have its own unique expression, making each one a little work of art. Display them in a bowl, add them to your seasonal centerpiece, or give them as handmade gifts to friends and family.
So gather some acorns, grab your paintbrush, and get creative! These tiny jack-o’-lanterns are sure to bring a little Halloween magic to your autumn decorations.
