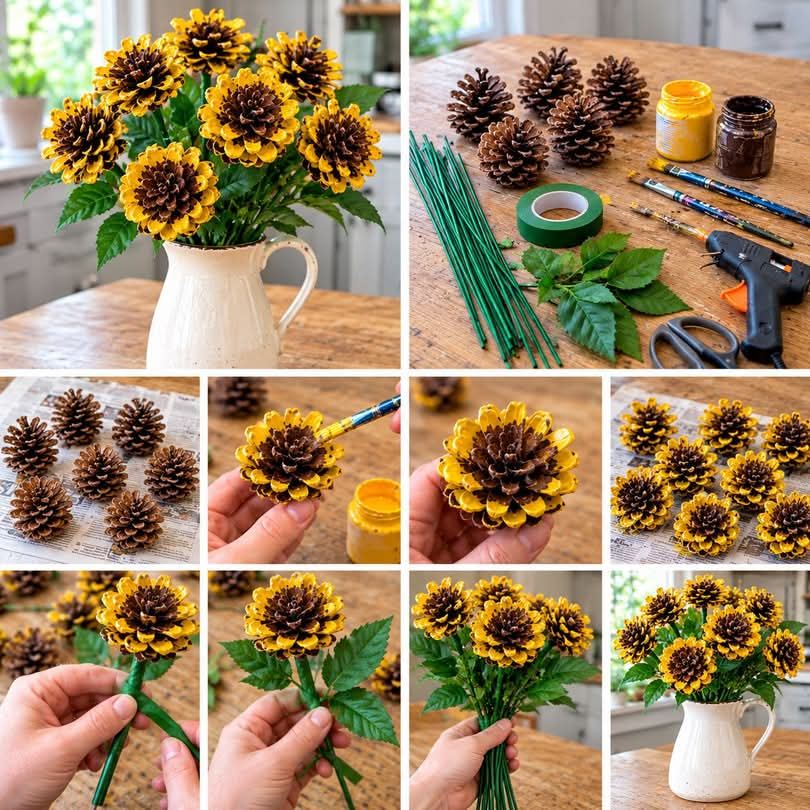
DIY Pinecone Flowers: How to Turn Ordinary Pinecones Into Beautiful Rustic Decor
Looking for a creative, budget-friendly craft that brings a touch of nature into your home? These beautiful DIY pinecone flowers are a wonderful way to transform ordinary pinecones into cheerful floral decorations!
With a little yellow and brown paint, some green floral stems, and a few artificial leaves, you can turn pinecones into flowers that resemble colorful zinnias or cheerful autumn blooms. Arrange them in a rustic vase, display them on a mantel, or use them as part of your seasonal home decor.
The best part? You can collect pinecones outdoors, reuse craft supplies you already have, and customize the colors to match your home.
Whether you enjoy nature-inspired crafts, autumn decorating, or handmade gifts, this simple project is a lovely way to get creative.
Why You’ll Love This Pinecone Flower Craft
These handmade flowers offer several advantages:
- Budget-friendly: Pinecones can often be collected for free where gathering them is permitted.
- Nature-inspired: They bring natural textures into your home.
- Customizable: Choose yellow, orange, red, white, pink, or any color you love.
- Long-lasting: Unlike fresh flowers, painted pinecones can be displayed for years with proper care.
- Beginner-friendly: You don’t need advanced crafting skills to create a beautiful arrangement.
- Perfect for gifting: A handmade bouquet makes a thoughtful gift for friends, family, teachers, or neighbors.
Each pinecone has a different shape, so every flower will have its own personality.
Materials You’ll Need
Gather the following supplies before getting started.
For the Pinecone Flowers
- 6–10 clean, dry pinecones
- Yellow acrylic craft paint
- Dark brown acrylic craft paint
- Small paintbrushes
- Green floral wire, wooden dowels, or sturdy floral stems
- Green floral tape
- Artificial green leaves
- Hot glue gun and glue sticks
- Scissors or wire cutters, depending on your chosen stems
Optional Supplies
- Newspaper or a disposable table covering
- Disposable gloves
- Small paint palette or paper plate
- Clear protective craft sealer
- A rustic vase, pitcher, or decorative container
- Floral foam or another suitable arrangement support
Helpful tip: Choose pinecones that are relatively open and sturdy. Medium-sized pinecones are often easier to paint and attach to stems than very small or tightly closed ones.
Step 1: Collect and Prepare the Pinecones
Begin by selecting pinecones in different sizes. A mixture of shapes can give your finished bouquet a more natural appearance.
Remove loose dirt, needles, and debris with a dry brush. If necessary, gently shake the pinecones outdoors to remove anything trapped between their scales.
If the pinecones are damp or dirty, clean them carefully and allow them to dry completely before painting.
You can also use a commercially prepared craft pinecone if you prefer not to collect natural materials.
An Important Preparation Tip
Wild pinecones may contain insects, debris, or moisture. If you choose to heat-treat them, use a reliable method appropriate for pinecones and follow reputable craft-safety guidance. Do not leave them unattended in an oven, and never use pinecones that have been treated with unknown chemicals.
For a simple project, clean, dry craft-store pinecones are an easy alternative.
Step 2: Paint the Tips Yellow
Now comes the fun part!
Place the pinecones on newspaper or a protected work surface. Using a small paintbrush, apply yellow acrylic paint to the outer tips of the pinecone scales.
Work slowly, painting the exposed edges while allowing some of the natural brown color to remain visible.
This contrast creates the appearance of flower petals surrounding a darker center.
You don’t need to paint every part of the pinecone. Leaving the inner scales brown gives the finished flower a more realistic, textured look.
Tips for Better Results
- Use a small brush to reach individual scale tips.
- Apply thin coats rather than one thick layer.
- Rotate the pinecone as you work.
- Allow the first coat to dry before adding more paint.
- Avoid filling the spaces between the scales with excessive paint.
Depending on the pinecone and the paint, a second coat may be needed to achieve a bright yellow finish.
Allow the paint to dry according to the manufacturer’s instructions.
Step 3: Add Brown to the Center
Once the yellow paint has dried, use a small brush to add a little dark brown paint near the center of the pinecone.
The natural brown scales already provide much of the appearance you want, so you may need only a few small touches.
The darker center creates contrast with the yellow tips and makes the pinecone look more like a flower.
You can also experiment with a small amount of dark orange or golden brown if you want a warmer appearance.
Let all the paint dry completely before handling the pinecones further.
Step 4: Attach the Green Stems
Next, transform each painted pinecone into a flower by attaching a green stem.
There are several ways to do this, depending on the materials you have available.
Option A: Use Floral Wire
Choose sturdy floral wire that can support the weight of your pinecone.
Carefully attach the wire to the base of the pinecone. If the pinecone has a suitable natural opening, you may be able to secure the wire there.
Add a small amount of hot glue to reinforce the attachment if appropriate.
Allow the glue to cool and set completely before lifting the flower.
Option B: Use Wooden Dowels
Thin wooden dowels can make sturdy stems for lighter pinecones.
Apply a small amount of hot glue to the base of the pinecone and position the dowel securely. Hold it in place until the glue sets.
If the pinecone is heavy, reinforce the attachment rather than relying on a small glue spot alone.
Option C: Use Ready-Made Floral Stems
Ready-made craft stems are another convenient choice. Follow the manufacturer’s instructions to attach them securely to each pinecone.
Important: Hot glue can cause burns. Adults should handle the glue gun carefully, and children should have appropriate adult supervision. Allow the glue to cool completely before touching the attachment.
Step 5: Wrap the Stems With Green Floral Tape
If your stems or attachment points are visible, green floral tape can give the flowers a more finished appearance.
Begin near the base of the pinecone and wrap the tape around the stem, overlapping each layer slightly.
Continue down the stem until the attachment looks neat.
Stretch and apply floral tape according to its instructions so that it adheres properly.
If you are using green floral wire or already-green craft stems, this step may be unnecessary.
Step 6: Add Artificial Leaves
Green leaves help the pinecone flowers look more like a traditional bouquet.
Choose small artificial leaves that complement the size of your pinecones.
Position one or two leaves along each stem, then attach them using floral tape or a small amount of suitable craft adhesive.
For a fuller look, place the leaves at slightly different heights rather than arranging every stem identically.
You can use several shades of green to create additional depth.
If you prefer a rustic style, consider leaves with visible veins or slightly textured surfaces.
Step 7: Make the Bouquet
Once all the flowers are finished, gather them into a bouquet.
Start with a few taller stems in the middle and place shorter stems around the outside.
Rotate the arrangement as you work to make sure the flowers can be seen from different angles.
You can vary the heights and angles to create a natural, garden-inspired appearance.
If some pinecones are larger than others, use the largest blooms as focal points and position the smaller flowers around them.
Secure the stems together with floral tape or a suitable tie if needed.
For a fuller arrangement, add extra artificial leaves or decorative greenery.
Step 8: Arrange the Flowers in a Rustic Vase
Choose a vase that complements the natural texture of the pinecones.
A ceramic pitcher, farmhouse-style jug, glass vase, or simple decorative container can work beautifully.
Place the stems inside the container and adjust their positions until the arrangement looks balanced.
If the bouquet feels unstable, use a suitable support inside the vase, such as floral foam intended for artificial arrangements.
You can also add decorative stones or other stable filler material if appropriate for your container.
For a rustic look, keep the arrangement slightly loose rather than forcing every flower into a perfectly symmetrical shape.
The combination of yellow petals, brown pinecone centers, and green leaves creates a warm, nature-inspired display.
Creative Ways to Customize Your Pinecone Flowers
One of the best things about this craft is how easily you can change the design.
Make an Autumn Bouquet
Replace bright yellow with shades of burnt orange, golden yellow, burgundy, and rust.
Arrange the flowers in a rustic pitcher and pair them with seasonal leaves for an autumn display.
Create a Spring-Inspired Arrangement
Use soft pink, pale yellow, lavender, or white paint for a lighter look.
Combine the pinecone flowers with delicate artificial greenery.
Try a Sunflower-Inspired Style
Paint the tips golden yellow and use a darker brown center.
Add broad green leaves and longer stems for a bouquet inspired by sunflowers.
The result will be decorative rather than botanically realistic, but it can still make a cheerful statement.
Make a Handmade Gift
Arrange several flowers in a small vase and finish with a ribbon around the container.
A handmade bouquet can make a thoughtful housewarming gift, birthday present, or seasonal decoration.
Decorate a Covered Porch
If you want to display the flowers on a covered porch, use suitable craft materials and a protective finish designed for the intended conditions.
Keep in mind that moisture, direct sunlight, and temperature changes can damage paint, glue, and artificial leaves.
These flowers are best protected from rain and prolonged exposure to the elements.
How to Make Your Pinecone Flowers Last Longer
With a little care, your handmade bouquet can remain attractive for a long time.
Keep the flowers dry. Natural pinecones can absorb moisture, so avoid placing the arrangement in damp areas.
Dust them gently. Use a soft brush to remove dust from the scales and leaves.
Keep them away from direct heat. Avoid placing the bouquet near candles, fireplaces, heaters, or other heat sources.
Store them carefully. When the season changes, place the flowers in a sturdy box with enough room to prevent the painted scales from being crushed.
Protect the paint. If desired, apply a clear craft sealer compatible with your paint and follow its label instructions. Test it on one pinecone first to make sure it does not alter the finish.
Common Mistakes to Avoid
Applying Too Much Paint
Heavy paint can hide the pinecone’s natural texture and cause the scales to stick together.
Use thin coats and concentrate the yellow paint on the tips.
Attaching Stems Without Enough Support
Pinecones can be heavier than they appear. A weak attachment may cause the flower to fall off the stem.
Choose a stem strong enough for the pinecone and reinforce the attachment as needed.
Arranging the Flowers Before the Glue Dries
Moving the stems too early can weaken the attachment.
Allow all glue and paint to dry fully before assembling the bouquet.
Using Damp Pinecones
Moisture can interfere with painting and may contribute to mold during storage.
Make sure the pinecones are completely dry before beginning the project.
Making Every Flower Exactly the Same
Natural materials look beautiful because they vary in shape and size.
Use those differences to create a more interesting bouquet rather than trying to make every flower identical.
Frequently Asked Questions
1. Can I use pinecones collected from my backyard?
Yes, provided collecting them is permitted where you live. Choose sturdy pinecones, remove loose debris, and make sure they are clean and completely dry before painting.
2. What kind of paint works best?
Acrylic craft paint is a convenient option for decorative pinecones. It is available in many colors and works well for painting the tips of the scales.
Always follow the paint manufacturer’s instructions.
3. Do I need to paint the entire pinecone?
No. Painting only the outer tips yellow while leaving the center and inner scales brown creates the layered floral effect shown in this project.
4. Can I make these flowers without a hot glue gun?
Yes. Depending on the pinecone and stem, you may be able to use a suitable craft adhesive or floral wire. Choose a method that creates a secure attachment and follow the product’s safety instructions.
5. How many pinecones do I need for a bouquet?
A small arrangement may need around six to eight pinecones, while a fuller bouquet may require ten or more. The number depends on their size and the shape of your vase.
6. Can I put pinecone flowers outside?
They can be displayed in a sheltered outdoor area if the materials are suitable, but prolonged exposure to rain, moisture, and sunlight may damage the paint and glue. For the longest-lasting results, keep them indoors.
7. Are these flowers suitable for children to make?
Yes, with age-appropriate supervision. Children can help choose colors and paint the pinecone tips. Adults should handle hot glue guns, wire cutters, and any sharp tools.
Keep small pieces away from young children who may put them in their mouths.
Final Thoughts
Turning ordinary pinecones into decorative flowers is a simple way to combine creativity, nature, and budget-friendly home decorating.
With yellow paint on the tips, brown centers, green stems, and artificial leaves, you can create a bouquet that brings a warm, rustic touch to almost any room.
You can keep the colors traditional, experiment with seasonal shades, or make an entire collection of colorful pinecone blooms.
Best of all, every arrangement will be slightly different because no two pinecones have exactly the same shape.
Ready to give this craft a try? Gather a few pinecones, choose your favorite paint colors, and create your own handmade floral arrangement!
Which colors would you choose for your pinecone flowers—sunny yellow, autumn orange, soft pink, or something completely different? Share your favorite idea in the comments!
SEO details for your website
SEO title: DIY Pinecone Flowers: Easy Handmade Rustic Home Decor
Meta description: Learn how to turn ordinary pinecones into beautiful decorative flowers with paint, green stems, and artificial leaves. An easy, budget-friendly DIY craft!
Suggested keywords: DIY pinecone flowers, pinecone crafts, pinecone flower tutorial, nature-inspired crafts, rustic home decor, easy autumn crafts, handmade flower arrangements, budget-friendly DIY decor.
Suggested image alt text: Handmade yellow and brown pinecone flowers attached to green stems and arranged in a rustic white pitcher.
Pinterest description: Turn ordinary pinecones into beautiful DIY flowers! 🌼 This easy nature-inspired craft uses yellow paint, green stems, and artificial leaves to create a rustic bouquet perfect for home decor, autumn decorating, or handmade gifts.
