✓
DIY Pumpkin Bear 🧸🎃
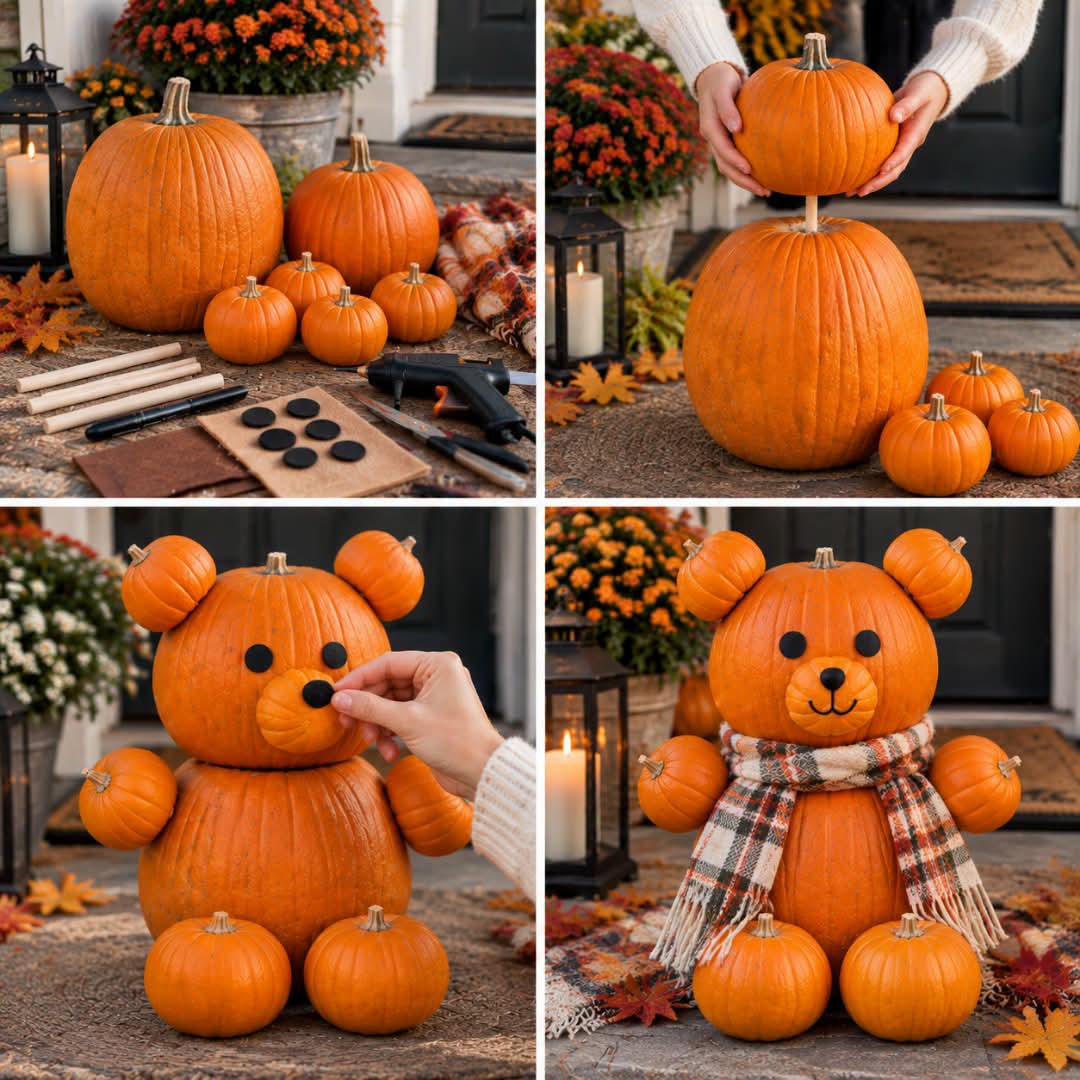
Turn ordinary pumpkins into an adorable DIY Pumpkin Bear that will instantly add a cozy autumn touch to your front porch, entryway, or home.
This cute pumpkin decoration is made by stacking two large pumpkins for the bear’s body and adding smaller pumpkins for the ears, arms, and feet. A few simple craft materials create the face, while a warm plaid scarf gives the finished bear an extra cozy fall look.
It is a fun project for Halloween, Thanksgiving, fall parties, or simply decorating your home for the autumn season.
What You’ll Need
Pumpkins
- 2 large pumpkins — one for the body and one for the head
- 2 small pumpkins for the ears
- 2 small pumpkins for the arms
- 2 small pumpkins for the feet
- 1 small or medium pumpkin for the muzzle
Try to choose pumpkins with relatively flat surfaces so they sit securely when stacked.
Craft Supplies
- Black felt, foam, or large black buttons for the eyes
- Black felt or foam for the nose
- A small piece of orange or tan felt for the muzzle, optional
- A plaid or fall-colored scarf
- Strong double-sided tape, removable adhesive, or hot glue for faux pumpkins
- Wooden skewers or a sturdy wooden dowel for extra support
- Optional: floral wire
- Optional: small pieces of cardboard for stabilizing the feet and arms
Tools
- Scissors
- Measuring tape or ruler
- Marker or pencil
- Hot-glue gun, if using artificial pumpkins
- Garden gloves, especially when handling pumpkins outdoors
Step 1: Choose and Prepare Your Pumpkins
Choose pumpkins in several different sizes.
The two largest pumpkins will become the bear’s body and head. The next-smallest pumpkins will become the ears, arms, and feet.
Before assembling anything, place the pumpkins together on the floor or porch and experiment with their arrangement.
The ideal proportions are:
- Large pumpkin = body
- Slightly smaller large pumpkin = head
- Small pumpkins = ears
- Small pumpkins = arms
- Small pumpkins = feet
Try to keep the pumpkins roughly the same shade of orange so the finished bear looks cohesive.
Wipe the pumpkins clean and allow them to dry completely.
Step 2: Create the Body
Place the largest pumpkin on a stable, level surface.
This will be the bear’s body.
For an outdoor display, stability is important. A non-slip mat underneath the bottom pumpkin can help prevent it from sliding. For taller stacked pumpkin displays, a wooden dowel through the center can also help keep the pumpkins aligned. {“fallbackMarkdown”:”(The Garden Style)”,”reference”:{“matched_text”:””,”prefix”:null,”start_idx”:2964,”end_idx”:2983,”safe_urls”:[“https://www.thegardenstyle.com/home-decor/stacked-pumpkins-porch-decor-ideas-fall/”,”https://www.thegardenstyle.com/home-decor/stacked-pumpkins-porch-decor-ideas-fall/?utm_source=chatgpt.com”],”refs”:[],”alt”:”(The Garden Style)”,”prompt_text”:null,”type”:”grouped_webpages”,”style”:null,”items”:[{“title”:”Stacked Pumpkins: 50 Porch Decor Ideas for Fall – The Garden Style”,”url”:”https://www.thegardenstyle.com/home-decor/stacked-pumpkins-porch-decor-ideas-fall/?utm_source=chatgpt.com”,”attribution”:”The Garden Style”,”pub_date”:1785110400,”snippet”:””,”attribution_segments”:null,”supporting_websites”:[],”refs”:[{“turn_index”:0,”ref_type”:”search”,”ref_index”:2}],”hue”:null,”attributions”:null}],”fallback_items”:null,”error”:null,”status”:”done”},”showLoginRequiredCard”:false}
If you are using real pumpkins, avoid making unnecessary holes unless you are prepared for the pumpkin to deteriorate more quickly.
For a temporary display, you can simply position the pumpkins carefully and use removable supports.
For a reusable decoration, foam or plastic pumpkins are the better choice.
Step 3: Add the Head
Place the second large pumpkin on top of the body.
Position it slightly toward the back so the bear has a natural face and the body remains stable.
If you’re using artificial pumpkins, you can secure the two pumpkins together with hot glue or another adhesive suitable for the pumpkin material. Hot glue is commonly used for assembling artificial stacked-pumpkin decorations. {“fallbackMarkdown”:”(Michaels)”,”reference”:{“matched_text”:””,”prefix”:null,”start_idx”:3706,”end_idx”:3725,”safe_urls”:[“https://www.michaels.com/project/stacked-fall-pumpkins-B_86051″,”https://www.michaels.com/project/stacked-fall-pumpkins-B_86051?utm_source=chatgpt.com”],”refs”:[],”alt”:”(Michaels)”,”prompt_text”:null,”type”:”grouped_webpages”,”style”:null,”items”:[{“title”:”Stacked Fall Pumpkins | Projects | Michaels”,”url”:”https://www.michaels.com/project/stacked-fall-pumpkins-B_86051?utm_source=chatgpt.com”,”attribution”:”Michaels”,”pub_date”:null,”snippet”:””,”attribution_segments”:null,”supporting_websites”:[],”refs”:[{“turn_index”:0,”ref_type”:”search”,”ref_index”:3}],”hue”:null,”attributions”:null}],”fallback_items”:null,”error”:null,”status”:”done”},”showLoginRequiredCard”:false}
If you’re using real pumpkins, don’t rely on hot glue to hold the pumpkin skin together. Instead, use a hidden support such as a wooden dowel or carefully position the pumpkins so their weight keeps them stable.
Step back and make sure the head is centered before continuing.
Step 4: Make the Bear’s Ears
Take two small pumpkins.
These will become the bear’s ears.
Place one pumpkin on each side of the head, slightly above the midpoint.
The pumpkins should stick out far enough to resemble rounded bear ears.
For artificial pumpkins, secure the ears using hot glue. For real pumpkins, you can use removable supports or carefully position them against the head.
Make sure both ears are approximately the same height.
Step 5: Add the Arms
Use two small pumpkins for the bear’s arms.
Place one on each side of the body, around the upper-middle section.
The arms should sit slightly lower than the head and extend outward.
For a more natural look, angle each pumpkin slightly forward.
If you’re making the bear from artificial pumpkins, hot glue can be used to secure the arms. If you’re using real pumpkins, consider using a small hidden support rather than piercing the pumpkin.
Step 6: Add the Feet
Place two small pumpkins at the bottom of the body.
These become the bear’s feet.
Position them side by side with a small gap between them.
Turn the pumpkins slightly outward so they look like paws.
Make sure the bottom of each pumpkin is stable. If necessary, place a small piece of non-slip material underneath each one.
Step 7: Make the Bear’s Muzzle
For the muzzle, use a small, flat pumpkin or a piece of orange/tan craft foam.
Place it in the center of the face, below where the eyes will go.
A small pumpkin works especially well because it gives the bear’s face a three-dimensional appearance.
If you’re using a small pumpkin, secure it with removable adhesive for real pumpkins or hot glue for artificial ones.
Step 8: Add the Eyes
Cut two small black circles from felt or craft foam.
You can also use large black craft buttons if you’re making an indoor decoration.
Place the eyes evenly above the muzzle.
Before attaching them, step back and check the expression.
Moving the eyes slightly closer together can make the bear look cute and playful, while positioning them farther apart creates a more relaxed expression.
For real pumpkins, removable adhesive is preferable if you want to avoid damaging the pumpkin.
Step 9: Add the Nose
Cut a small black oval or circle for the nose.
Place it in the center of the muzzle.
For the look shown in the photo, make the nose slightly larger than the eyes.
You can also use a small black craft pom-pom.
Step 10: Draw the Mouth
Use a black permanent marker or black paint to create a simple bear mouth.
Starting underneath the nose, draw a short vertical line.
Then create two small curved lines extending outward.
This gives the bear a sweet, smiling expression.
Take your time with this step because the mouth can dramatically change the character of the bear.
Step 11: Add the Scarf
Now comes one of the cutest parts!
Wrap a plaid, checked, or autumn-colored scarf around the bear’s neck.
Choose colors such as:
- Orange and cream
- Brown and beige
- Red and black
- Green and cream
- Burgundy and tan
Let the ends of the scarf hang naturally down the front.
The scarf helps hide the connection between the head and body while also making the pumpkin bear look warm and cozy.
Step 12: Give Your Bear a Final Check
Stand several feet away from your pumpkin bear and look at it from the front.
Check that:
- The head is centered.
- Both ears are at approximately the same height.
- The eyes are level.
- The nose is centered.
- The arms are balanced.
- The feet are stable.
- The scarf is positioned neatly.
- Nothing is likely to fall over.
Make any small adjustments before leaving the bear on display.
Optional: Make It Extra Cute
You can personalize your pumpkin bear with additional decorations.
Try adding:
- A small fall hat
- A bow tie
- A knitted scarf
- Artificial autumn leaves
- Small flowers
- A wooden sign
- A tiny basket
- Pinecones
- Fairy lights
- A welcome sign
You could even make different pumpkin bears with different expressions and scarves.
Real Pumpkins vs. Artificial Pumpkins
If you only want the bear for one fall season, real pumpkins give it a beautiful natural appearance.
However, real pumpkins will eventually soften and decay, especially if they are exposed to rain, moisture, or warm temperatures.
}
How to Keep Your Pumpkin Bear Stable Outdoors
If your bear will be displayed on a porch, stability is particularly important.
Use a level surface and place a non-slip mat beneath the bottom pumpkin.
For taller stacked pumpkin decorations, a wooden dowel can act as a central support. Some DIY pumpkin topiary projects use a dowel through the pumpkins to keep the stack aligned. {“}
If you live somewhere with strong winds, consider placing the bottom pumpkin inside a heavy planter or another stable base.
How Long Will It Last?
The lifespan depends on the type of pumpkins and where you display the bear.
Real pumpkins: generally intended as seasonal décor and should be monitored for soft spots, mold, or deterioration.
Artificial pumpkins: can last for many years when stored somewhere dry after the season.
For outdoor displays, protect the bear from prolonged rain and excessive moisture whenever possible.
Final Result
And that’s it!
With a few pumpkins and some simple craft supplies, you can create an adorable DIY Pumpkin Bear that looks perfect beside your front door.
The best part is that you don’t need advanced crafting skills. The pumpkins themselves create most of the shape—the ears, paws, face, and scarf simply bring the character to life.
Whether you make a classic orange bear like the one shown here or experiment with white, green, or neutral pumpkins, this is a fun and inexpensive way to bring a little autumn charm to your home.
Happy fall crafting! 🎃🧸🍂
You can also make this into a Pinterest-style article with a catchy title, introduction, SEO keywords, materials table, and short step-by-step version if you’re planning to publish it on a website or blog.
