🎃 🍪
Crispy Edges, Soft Centers, and Loaded with Chocolate Chips!
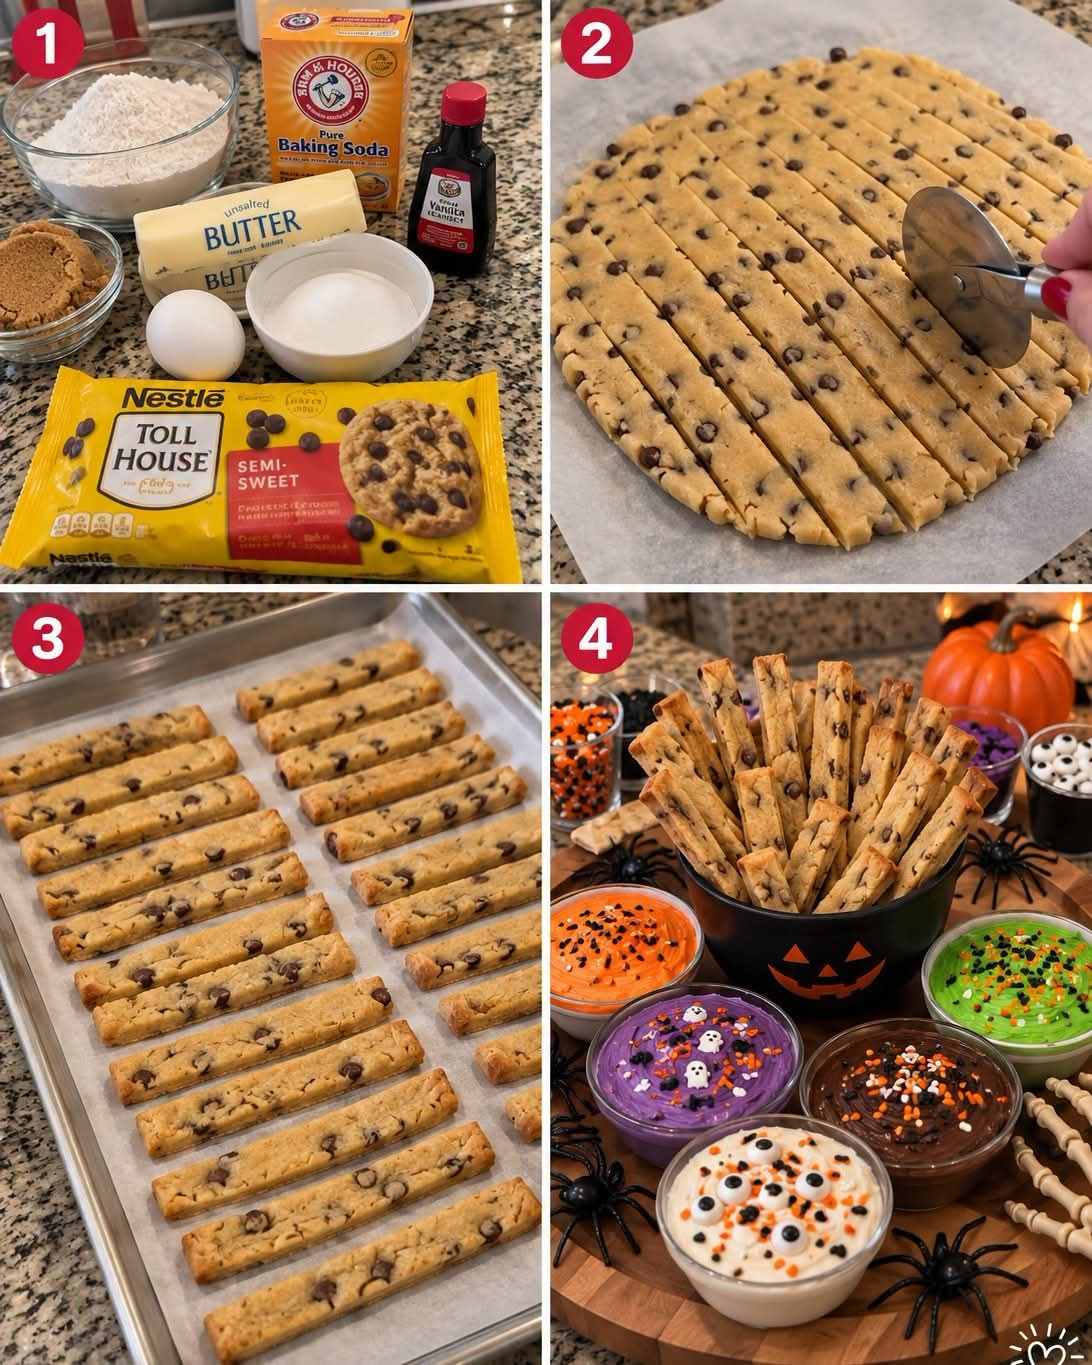
Looking for a fun Halloween treat that’s easy to make and perfect for parties? These Halloween Chocolate Chip Cookie Sticks are a delicious twist on classic chocolate chip cookies! Instead of shaping individual cookies, the dough is pressed into one large rectangle, cut into long sticks, and baked until golden around the edges.
They’re perfect for dipping into colorful Halloween dessert dips, serving on a party platter, or adding to a spooky dessert table. Kids and adults alike will love these buttery, chocolate-filled cookie sticks!
The best part? You can prepare them with simple pantry ingredients and customize them with your favorite chocolate chips or Halloween decorations.
Recipe Information
- Prep Time: 15 minutes
- Cook Time: 15–20 minutes
- Cooling Time: 10–15 minutes
- Total Time: Approximately 40–50 minutes
- Servings: 20–24 cookie sticks
- Difficulty: Easy
- Oven Temperature: 350°F (175°C)
Ingredients
- 2 cups (250 g) all-purpose flour
- ½ teaspoon baking soda
- ½ teaspoon salt
- ½ cup (113 g) unsalted butter, softened
- ½ cup (100 g) packed brown sugar
- ¼ cup (50 g) granulated sugar
- 1 large egg, at room temperature
- 1 teaspoon vanilla extract
- 1 cup (170 g) semi-sweet chocolate chips
Optional for serving:
- Chocolate dessert dip
- Orange-colored frosting or dip
- Purple or green dessert dip
- Halloween sprinkles
- Candy eyeballs
Instructions
Step 1: Prepare the Oven and Baking Sheet
Preheat your oven to 350°F (175°C).
Line a large baking sheet with parchment paper. Set it aside while you prepare the cookie dough.
Step 2: Mix the Dry Ingredients
In a medium bowl, whisk together the flour, baking soda, and salt until evenly combined.
Set aside.
Step 3: Cream the Butter and Sugars
In a large mixing bowl, beat the softened butter, brown sugar, and granulated sugar together until the mixture becomes creamy and smooth.
This usually takes about 2–3 minutes with an electric mixer.
Add the egg and vanilla extract. Beat until everything is well combined.
Step 4: Make the Cookie Dough
Gradually add the dry ingredients to the butter mixture, mixing on low speed until a soft dough forms.
Fold in the semi-sweet chocolate chips using a spatula.
The dough should be soft enough to press into shape but not overly sticky. Avoid overmixing, as this can make the cookie sticks tough.
Step 5: Shape and Cut the Cookie Sticks
Transfer the dough onto the prepared parchment paper.
Press it into a large rectangle approximately ¼ inch (6 mm) thick.
Try to keep the thickness consistent so the sticks bake evenly.
Using a pizza cutter or a sharp knife, cut the dough into long strips approximately ¾–1 inch (2–2.5 cm) wide.
You can make the sticks shorter or longer depending on how you plan to serve them.
Important: Leave a little space between the strips if possible. If the dough is too soft to handle, refrigerate it for 15–20 minutes before cutting and separating the sticks.
Step 6: Bake Until Golden
Arrange the cookie sticks on the prepared baking sheet, leaving about 1 inch (2.5 cm) between them.
Bake for 12–18 minutes, checking regularly toward the end of the baking time.
The edges should be lightly golden, while the centers may still look slightly soft.
For crispier cookie sticks, bake them a little longer, watching carefully to prevent burning.
Step 7: Cool Completely
Remove the baking sheet from the oven and let the cookie sticks rest for about 5 minutes.
Carefully transfer them to a wire rack and allow them to cool completely.
They will become firmer as they cool, making them easier to pick up and dip.
If some of the sticks have spread together during baking, carefully separate them with a knife while they are still slightly warm.
Step 8: Serve with Halloween Dessert Dips
Arrange the cooled cookie sticks in a tall glass, a serving bowl, or a Halloween-themed container.
Serve them alongside colorful dessert dips decorated with Halloween sprinkles or candy eyeballs.
For a festive presentation, use orange, purple, green, white, and chocolate-colored dips.
Your Halloween dessert table is ready!
Tips for Perfect Chocolate Chip Cookie Sticks
Use softened butter. Butter that is soft but not melted helps create a smooth dough and a tender cookie texture.
Keep the dough an even thickness. Uniform thickness helps the cookie sticks bake at the same rate.
Don’t overbake them. The sticks will continue to firm up as they cool. Remove them when the edges are lightly golden if you prefer a slightly tender center.
Chill the dough if necessary. If the dough becomes too soft while cutting, refrigerate it briefly to make shaping easier.
Customize the chocolate. Semi-sweet chocolate chips work beautifully, but you can also use milk chocolate, dark chocolate, or mini chocolate chips.
Make them extra festive. Add Halloween-colored sprinkles to the dough or decorate the serving dips with candy eyeballs and spooky designs.
Fun Halloween Dessert Dip Ideas
These cookie sticks are delicious on their own, but serving them with colorful dips makes them even more exciting.
1. Orange Vanilla Dip
Mix vanilla frosting with a small amount of orange food coloring. Add Halloween sprinkles just before serving.
2. Chocolate Dip
Serve chocolate frosting or a thick chocolate dessert dip in a small bowl. Add orange and black sprinkles for a spooky touch.
3. Purple Vanilla Dip
Tint vanilla frosting purple and decorate it with tiny candy ghosts or Halloween sprinkles.
4. Green Monster Dip
Prepare a vanilla dessert dip tinted green. Add candy eyeballs to create a fun monster-inspired presentation.
Food safety tip: If your dips contain cream cheese, whipped cream, or other perishable ingredients, keep them refrigerated until serving and follow appropriate food-storage guidelines.
How to Store Halloween Cookie Sticks
Allow the cookie sticks to cool completely before storing them.
- Room temperature: Store in an airtight container for up to 4–5 days for best quality.
- Freezer: Freeze the baked, cooled cookie sticks in a freezer-safe container for up to 2 months.
- Cookie dough: You can prepare the dough ahead of time and refrigerate it, covered, for up to 2 days before shaping and baking.
Store the cookie sticks separately from moist dessert dips to help them retain their texture.
Frequently Asked Questions
Can I make these cookie sticks ahead of time?
Yes! You can bake them a day or two before your Halloween party and store them in an airtight container. Prepare the dips separately and refrigerate them if needed.
Why did my cookie sticks spread too much?
Butter that is too warm, overly soft dough, or insufficient flour can cause excessive spreading. Measure your flour carefully and chill the dough briefly if it feels too soft.
How do I make the cookie sticks crispier?
Press the dough slightly thinner and bake until the edges are golden. Allow the sticks to cool completely before judging their final texture.
Can I use store-bought cookie dough?
Absolutely! Refrigerated chocolate chip cookie dough can be used as a shortcut. Press it into a rectangle, cut it into sticks, and bake according to the package directions, adjusting the time as needed for the thickness.
Can I make these without chocolate chips?
Yes. You can leave out the chocolate chips or replace them with Halloween-colored baking chips, chopped chocolate, or other suitable mix-ins.
Final Thoughts 🎃
These Halloween Chocolate Chip Cookie Sticks are a fun, delicious, and easy-to-make addition to your Halloween celebrations. With their buttery flavor, chocolatey bites, and convenient stick shape, they’re perfect for dipping, sharing, and displaying on a festive dessert table.
Serve them with colorful dips, decorate your table with spooky decorations, and let everyone choose their favorite combination!
Now it’s your turn! 👻🍪
Would you serve these cookie sticks with chocolate dip, orange vanilla dip, purple frosting, or green monster dip?
Tell us your favorite in the comments, and save this recipe for your next Halloween party!
