Gardening is a rewarding hobby that can bring beauty and tranquility to your outdoor space. However, one of the biggest challenges gardeners face is keeping their garden beds free of weeds. Weeds not only mar the appearance of your garden, but they also compete with your plants for nutrients, water, and sunlight, potentially stunting their growth or even causing them to wither and die.
Many gardeners have tried countless methods to keep weeds at bay, from backbreaking manual removal to the use of chemical herbicides. However, there’s a secret, eco-friendly trick that can help you achieve consistently weed-free garden beds without harsh chemicals or excessive labor. This article will reveal this simple technique and guide you through the process of implementing it in your own garden.
1. Why Weeds Keep Winning in Your Garden Beds
Weeds are incredibly resilient plants that have adapted to thrive in a variety of conditions. Their seeds can remain dormant in the soil for years until the right conditions trigger their germination. Often, when you disturb the soil by digging or tilling, you inadvertently bring these dormant seeds to the surface, where they can sprout and take over your garden beds.
In addition to their stealthy seed dispersal strategies, weeds grow quickly and can outcompete cultivated plants for sunlight, water, and nutrients. Their roots can spread extensively, and some species can even regrow from small fragments left in the soil, making them incredibly persistent. Understanding these characteristics is key to devising an effective weed management strategy.
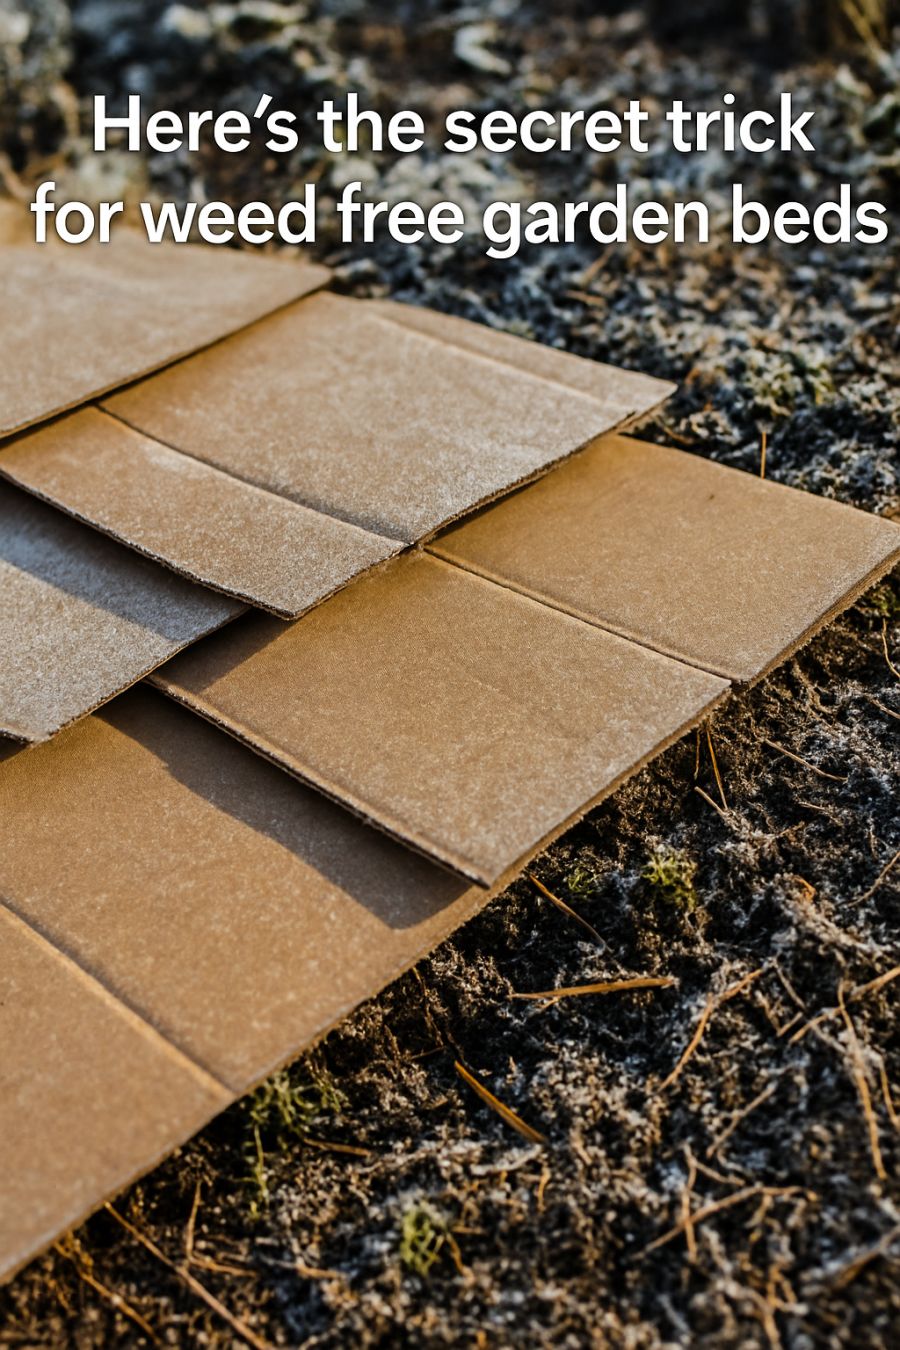
2. The Core Secret: Creating a Light-Proof Weed Barrier
The secret to a weed-free garden bed lies in denying weeds the light they need to grow. By creating a light-proof barrier over the soil, you prevent weed seeds from germinating. This barrier blocks sunlight, which is essential for photosynthesis and the growth of most plants, including weeds.
To create an effective light-proof barrier, you need to cover the soil with a material that is both thick enough to block sunlight and durable enough to withstand the elements. This barrier not only suppresses existing weed seeds but also prevents new seeds from taking root, providing a long-term solution to weed control.
3. Choosing the Right Barrier Material: Fabric, Cardboard, or Newspaper
There are several materials you can use to create a light-proof barrier, each with its own advantages. Landscape fabric is a popular choice due to its durability and permeability, allowing water and nutrients to reach your plants’ roots while blocking sunlight. When installing landscape fabric, ensure it is tightly secured and overlaps at the edges to prevent weeds from sneaking through.
Cardboard and newspaper are eco-friendly alternatives that can be used to create an effective weed barrier. Both materials are biodegradable, which means they will eventually break down and enrich the soil. When using cardboard or newspaper, lay down several layers to ensure complete coverage and block light. Wetting the material can help it stay in place and conform to the shape of your garden bed.
4. The Viral Trick: Layered Sheet Mulching for Instant Weed Suppression
Layered sheet mulching is a method that combines the use of organic matter with a light-proof barrier to suppress weeds and improve soil health. Start by laying down a thick layer of newspaper or cardboard over the soil, overlapping the edges to prevent light from reaching weed seeds. Next, cover the barrier with a thick layer of organic mulch, such as straw, wood chips, or compost.
The mulch not only adds an extra layer of light suppression but also helps retain soil moisture and gradually breaks down to provide nutrients to your plants. This method is highly effective for instant weed suppression and can be easily adapted to any garden size or shape.
5. How to Prep Your Beds So Weeds Don’t Come Back
Preparation is key to ensuring that your weed barrier is effective and long-lasting. Begin by removing any existing weeds from your garden bed, taking care to remove the entire root system to prevent regrowth. Level the soil and remove any debris or large rocks that could disrupt the barrier.
Next, water the soil thoroughly to encourage any remaining weed seeds to germinate. Wait a few days and then remove any new weeds that have sprouted. This process reduces the seed bank in the soil and increases the effectiveness of your barrier. Once the soil is prepped, lay down your chosen barrier material and secure it in place.
6. Laying the Barrier Correctly: Overlaps, Edges, and Tricky Corners
Proper installation of your weed barrier is crucial to its success. When laying down the material, ensure that each piece overlaps the next by at least 6 inches. This overlap prevents light from reaching the soil and eliminates gaps where weeds could emerge.
Pay special attention to the edges and corners of your garden beds, as these are common entry points for weeds. Use landscape staples to secure the barrier material in place, ensuring it lies flat against the soil. In tricky corners, cut the material to fit snugly and overlap any seams to maintain continuous coverage.
7. Topping It Off: The Perfect Mulch Depth for Weed-Free Beds
Mulch is an essential component of a successful weed barrier, providing additional light suppression and soil benefits. To effectively prevent weeds, apply a layer of mulch that is at least 2 to 3 inches deep. This depth is sufficient to block sunlight while allowing moisture and air to penetrate the soil.
Choose a mulch that complements your garden’s aesthetic and meets your plants’ needs. Organic mulches, such as shredded bark or wood chips, gradually break down and add nutrients to the soil. Replenish the mulch layer as needed to maintain the ideal depth and continue suppressing weeds throughout the growing season.
8. Planting Through the Barrier Without Letting Weeds In
Planting through a weed barrier requires careful planning to avoid creating openings for weeds. When planting, cut a small X-shaped slit in the barrier material at the desired location. Gently fold back the flaps and dig a hole for your plant, taking care not to disturb the surrounding barrier.
Once the plant is in place, fold the flaps back around the base of the plant and cover any exposed areas with mulch. This method ensures that your plants can grow without interference from weeds, while the barrier remains intact and effective.
9. Watering and Feeding Plants While Starving Weeds
A well-designed weed barrier allows you to water and feed your plants without nourishing weeds. If you’ve used permeable landscape fabric, water will naturally filter through to the soil. For other barrier materials, water at the base of your plants to ensure moisture reaches the roots.
Apply fertilizers or soil amendments directly to the mulch layer, allowing nutrients to gradually filter down to the plants. This approach minimizes nutrient availability to weed seeds, which remain trapped beneath the barrier. Regularly monitor soil moisture and adjust your watering schedule to meet your plants’ needs without over-saturating the soil.
10. Fast Fixes for Weeds Sneaking Through Cracks and Edges
Despite your best efforts, some weeds may find their way through small gaps or edges in your barrier. Regularly inspect your garden beds for any signs of weed growth, paying special attention to seams and edges.
If you spot a weed, remove it promptly by pulling it out by the roots. For persistent weeds, consider applying a small amount of vinegar or a natural herbicide directly to the plant. Reseal any gaps with additional barrier material or mulch to prevent further weed intrusion.
11. Low-Maintenance Upkeep to Keep Beds Weed Free All Season
Maintaining a weed-free garden requires regular attention, but it doesn’t have to be labor-intensive. Set aside time each week to inspect your garden beds for signs of weed growth and address any issues promptly. Regularly replenish your mulch layer to maintain its depth and effectiveness.
Consider using drip irrigation or soaker hoses to deliver water directly to the base of your plants, minimizing moisture exposure to weed seeds. By following these simple maintenance practices, you can enjoy a beautiful, weed-free garden with minimal effort throughout the growing season.
12. Common Mistakes That Make Weed Barriers Fail
One common mistake is failing to overlap barrier material adequately, which allows light to reach the soil and encourages weed growth. Another mistake is neglecting to secure the barrier at edges and seams, creating entry points for weeds.
Using insufficient mulch depth is another frequent error. Without a thick enough layer, weeds can penetrate through to the surface. Lastly, disturbing the barrier during planting or maintenance can create openings for weeds. By avoiding these pitfalls, you can ensure your weed barrier remains effective and your garden beds stay weed-free.
13. Eco-Friendly Tweaks: Using Recycled and Natural Materials
For an eco-friendly approach to weed control, consider using recycled materials for your barrier. Cardboard from shipping boxes or layers of newspaper are excellent choices that reduce waste and enrich the soil as they decompose.
Choose organic mulches like straw, leaves, or grass clippings, which can be sourced from your own garden or local community. These materials break down over time, adding valuable nutrients back into the soil and supporting a healthy garden ecosystem.
14. When to Refresh the Barrier for Long-Term Weed Control
Even the best weed barriers will eventually degrade and require refreshing to maintain their effectiveness. Monitor your barrier for signs of wear, such as thinning or visible patches of soil. Generally, organic materials like cardboard or newspaper will need to be refreshed annually, while landscape fabric may last several years.
Replenish the mulch layer as needed to maintain the ideal depth, especially after heavy rains or wind events. By regularly refreshing your barrier and mulch, you can enjoy long-term weed control and a thriving garden year after year.
