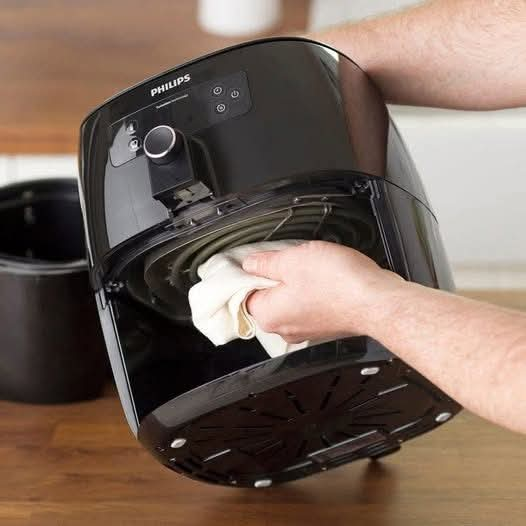
: The Easy Step-by-Step Guide for a Grease-Free Appliance
Air fryers have become a favorite kitchen appliance for preparing crispy fries, chicken wings, roasted vegetables, and countless other delicious meals. They’re convenient, easy to use, and can make everyday cooking simpler. But there’s one thing many people don’t enjoy: cleaning the air fryer afterward!
Grease, crumbs, and baked-on food can quickly build up inside the basket and drawer. If you cook frequently, you might notice unpleasant odors, stubborn residue, or even smoke coming from your air fryer.
The good news? Cleaning an air fryer is much easier than you might think! With a little warm water, mild dish soap, and a soft sponge, you can remove most everyday messes without expensive cleaning products or hours of scrubbing.
Whether you’re cleaning your air fryer for the first time or trying to remove stubborn grease, this step-by-step guide will show you how to clean it safely and keep it working properly.
Why Is It Important to Clean Your Air Fryer?
Cleaning your air fryer isn’t just about keeping your kitchen looking tidy. Regular cleaning helps maintain the appliance and prevents old food residue from affecting your next meal.
Here are a few reasons to make air fryer cleaning part of your kitchen routine.
1. Prevents Grease Buildup
When you cook fatty foods such as bacon, chicken wings, or sausages, grease can collect in the basket and drawer.
Over time, this residue becomes sticky and difficult to remove.
Cleaning the removable components after use helps prevent grease from accumulating.
2. Reduces Unpleasant Odors
Food particles left behind can produce unpleasant smells when the appliance heats up again.
If your air fryer smells like yesterday’s dinner, leftover grease and crumbs may be responsible.
A thorough cleaning can help eliminate these odors.
3. Helps Prevent Excessive Smoking
Old grease and food residue can smoke when exposed to high temperatures.
Cleaning the basket, drawer, and accessible interior surfaces helps reduce this problem.
However, smoke can also result from excess oil, cooking temperatures, or food spilling into areas that are not easily accessible. If your air fryer continues to smoke after cleaning, stop using it and consult the manufacturer’s instructions.
4. Protects the Nonstick Coating
Many air fryer baskets have a nonstick coating that can be damaged by abrasive scrubbers, metal utensils, or harsh cleaning products.
Using gentle cleaning methods helps preserve the surface and makes future cleaning easier.
5. Keeps Your Appliance in Good Condition
Regular maintenance helps prevent crumbs and grease from interfering with normal use.
Always follow the manufacturer’s cleaning recommendations for your particular model.
What You’ll Need to Clean Your Air Fryer
You don’t need a cabinet full of specialty cleaners to clean an air fryer.
Most of the time, these basic household supplies are enough:
- Warm water
- Mild dishwashing liquid
- A soft sponge or microfiber cloth
- A soft-bristled cleaning brush
- A nonabrasive bottle brush, if needed
- A clean, dry towel
- A soft toothbrush for small, accessible crevices, if appropriate
For stubborn residue, soaking the removable basket and drawer in warm, soapy water can make cleaning much easier.
Important: Avoid steel wool, metal scouring pads, abrasive powders, oven cleaner, and harsh chemicals unless your appliance manufacturer specifically approves a product. These can damage the basket’s coating or other components.
Step-by-Step Guide: How to Clean an Air Fryer
Follow these steps after cooking to remove grease, crumbs, and food residue.
Step 1: Turn Off and Unplug the Air Fryer
Before cleaning, turn off your air fryer and unplug it from the electrical outlet.
Allow the appliance to cool completely.
The basket and drawer can remain hot long after cooking, so don’t begin cleaning immediately after removing your food.
Never immerse the main appliance, power cord, or electrical components in water.
Step 2: Remove the Basket and Drawer
Once the appliance has cooled, remove the basket and drawer according to the manufacturer’s instructions.
Empty any loose crumbs or food particles into the trash.
If there’s a significant amount of grease in the drawer, allow it to cool before disposing of it appropriately.
Avoid pouring large amounts of cooking grease down the drain because it can contribute to plumbing blockages.
Step 3: Soak the Removable Parts
Fill your sink with warm water and add a small amount of mild dish soap.
Place the basket and drawer in the water if the manufacturer confirms that these components are safe to soak.
Let them sit for approximately 10–15 minutes.
This helps loosen grease and soften food particles, reducing the amount of scrubbing required.
For stubborn residue, you may need to soak the components a little longer.
Tip: Don’t use boiling water. Warm water is generally sufficient and reduces the risk of thermal shock or damage to certain components.
Step 4: Wash the Basket and Drawer
Use a soft sponge or nonabrasive brush to clean the surfaces.
Pay particular attention to:
- The corners of the basket
- The holes in the basket’s base
- The sides of the drawer
- Areas where grease collects
- Any removable rack or crisper plate
Work gently and avoid scraping the nonstick coating.
If food remains stuck to the surface, soak the component again instead of forcing it off with a metal utensil.
Rinse thoroughly with clean water to remove all soap residue.
Step 5: Clean the Interior of the Air Fryer
The inside of the air fryer can collect grease and food splatters, especially around the area above the basket.
Make sure the appliance is unplugged and completely cool.
Remove the basket and drawer to improve access.
Use a slightly damp, soft cloth to wipe accessible interior surfaces.
Avoid allowing water to drip into electrical components, vents, or openings.
Never pour water directly into the appliance.
If you notice baked-on grease, use a soft cloth dampened with mild soapy water, provided the manufacturer permits it.
Wipe the surface with a clean, damp cloth afterward to remove soap residue.
Important: Do not disassemble the air fryer or attempt to clean inaccessible electrical or mechanical components yourself.
Step 6: Clean the Heating Element Carefully
Grease can sometimes accumulate on the heating element or the area around it.
To inspect this area, follow your appliance’s instructions for accessing the interior safely.
Make sure the appliance is unplugged and completely cool.
If the manufacturer permits cleaning the heating element, use a soft, slightly damp cloth or soft-bristled brush to remove accessible residue gently.
Do not use abrasive tools, spray cleaners directly onto the element, or apply excessive pressure.
Avoid soaking the heating element or allowing water to enter the appliance.
If grease is baked onto the element and won’t come off with gentle cleaning, consult the manufacturer’s guidance rather than scraping it aggressively.
Step 7: Clean the Exterior
Don’t forget the outside of your air fryer!
Fingerprints, grease splashes, and kitchen dust can collect on the exterior over time.
Wipe the outside with a soft cloth lightly dampened with water and a little mild dish soap, if appropriate for the finish.
Follow with a clean, damp cloth to remove any soap residue.
Dry the exterior with a soft towel.
Keep the control panel, display, buttons, and electrical connections as dry as possible.
Step 8: Dry Everything Completely
Before reassembling the air fryer, dry the basket, drawer, racks, and other removable components thoroughly.
You can use a clean towel or allow the parts to air-dry completely.
Check that no water remains in corners, crevices, or underneath removable plates.
Once everything is dry, reassemble the appliance according to the manufacturer’s instructions.
Your air fryer is now ready for its next use!
How to Remove Stubborn Grease From an Air Fryer
Sometimes, ordinary washing isn’t enough.
If you’ve cooked particularly greasy foods or haven’t cleaned the appliance for a while, you may find sticky, baked-on residue.
Fortunately, there are a few ways to tackle it safely.
Method 1: Warm Water and Dish Soap
This should always be your first choice.
- Remove the basket and drawer.
- Soak them in warm, soapy water for 15–30 minutes, if permitted by the manufacturer.
- Gently scrub the affected areas with a soft sponge.
- Rinse thoroughly.
- Repeat if necessary.
Allowing the residue to soften often works better than scrubbing harder.
Method 2: Use a Soft-Bristled Brush
A soft cleaning brush can help reach corners and small openings in the basket.
Use gentle movements and avoid forcing bristles into areas where they might become trapped.
Do not use metal brushes or anything that could scratch the nonstick surface.
Method 3: Repeat the Soaking Process
If the grease is particularly stubborn, another soak may help.
Fresh warm, soapy water can loosen residue that remains after the first cleaning.
Avoid turning to aggressive chemicals simply because the first attempt didn’t remove everything.
Never mix cleaning products, particularly bleach with vinegar, ammonia, or other cleaners.
Can You Use Baking Soda to Clean an Air Fryer?
Baking soda is often recommended for household cleaning, but it’s important to consider the surface you’re cleaning.
Baking soda is mildly abrasive and may damage some nonstick coatings if rubbed against them.
For that reason, warm water and dish soap are generally the safer first choice for air fryer baskets.
If your manufacturer’s instructions specifically permit baking soda, follow its recommendations carefully and avoid vigorous scrubbing.
Never pour loose baking soda or cleaning mixtures into the electrical housing or directly onto the heating element.
Can You Put Air Fryer Parts in the Dishwasher?
Some air fryer baskets, drawers, and accessories are dishwasher-safe, while others are not.
Check your model’s manual before putting any component in the dishwasher.
Even when dishwasher use is permitted, repeated cycles may affect the appearance or longevity of certain coatings.
Handwashing with warm, soapy water is often a gentle alternative.
Never put the main air fryer unit, power cord, or electrical components in the dishwasher.
How Often Should You Clean Your Air Fryer?
The ideal cleaning schedule depends on how often you use your appliance and what you cook.
Here’s a simple routine to follow.
| Component | Recommended cleaning frequency |
|---|---|
| Basket and drawer | After every use |
| Crisper plate or removable rack | After every use |
| Interior surfaces | Regularly, and whenever grease or food residue appears |
| Heating element area | Inspect regularly; clean gently when needed |
| Exterior | Whenever dirty or greasy |
| Vents and accessible openings | Inspect regularly and keep free of dust and debris |
If you frequently cook foods that release a lot of grease, you may need to clean the appliance more thoroughly.
The key is to avoid letting residue accumulate until it becomes difficult to remove.
Five Common Air Fryer Cleaning Mistakes to Avoid
Even with good intentions, some cleaning habits can damage your appliance.
1. Cleaning While the Appliance Is Hot
Hot components can cause burns, and cold water on very hot surfaces can cause thermal shock.
Always unplug the appliance and allow it to cool completely before cleaning.
2. Using Abrasive Scrubbers
Steel wool and harsh scouring pads can scratch nonstick coatings.
Choose soft sponges and nonabrasive brushes instead.
3. Immersing the Main Unit in Water
The main air fryer housing contains electrical components.
Never submerge it or rinse it under running water.
4. Ignoring the Heating Element Area
Grease and food splatters can accumulate above the basket.
Inspect accessible areas regularly and clean them according to the manufacturer’s instructions.
5. Putting Damp Parts Back Into the Appliance
Moisture left in the basket or drawer can create problems during storage and use.
Dry all removable components completely before reassembling the appliance.
How to Keep Your Air Fryer Cleaner Between Uses
A few simple habits can reduce the amount of cleaning required.
Clean the basket promptly. Once the appliance has cooled, remove food residue before it hardens.
Avoid using excessive oil. Too much oil can create extra splattering and residue.
Remove crumbs regularly. Loose crumbs can burn during subsequent cooking.
Use compatible accessories. If you use parchment liners or silicone accessories, ensure they’re designed for your air fryer and follow the manufacturer’s instructions. Never place a loose liner inside an air fryer during preheating, because the airflow can lift it into the heating element.
Inspect the appliance before cooking. Make sure the basket is clean and that no old food particles remain.
Don’t ignore unusual smoke. If the appliance begins smoking excessively, switch it off, unplug it when safe, and investigate the cause only after it has cooled.
These habits can help keep your air fryer cleaner while making everyday maintenance much easier.
Frequently Asked Questions
Why does my air fryer smell even after cleaning?
Persistent odors may come from grease or food residue in areas that haven’t been cleaned, including accessible areas around the heating element.
Clean the removable parts and accessible interior surfaces thoroughly, following the manual.
If the odor resembles burning plastic or electrical insulation, stop using the appliance and contact the manufacturer or a qualified repair professional.
Why is my air fryer smoking?
Common causes include excess grease, food residue on the heating element, or oil from particularly fatty foods.
Turn off the appliance if it produces excessive smoke. Once it has cooled, clean it thoroughly and check the manufacturer’s troubleshooting instructions.
If smoking continues, discontinue use until the problem has been resolved.
Can I use oven cleaner on my air fryer?
Generally, avoid oven cleaner unless the manufacturer explicitly approves it for the specific component. Many oven cleaners are too aggressive for nonstick coatings and other appliance materials.
Mild dish soap and warm water are usually the best starting point.
Can I clean my air fryer with vinegar?
Mild vinegar solutions are sometimes used for household cleaning, but they aren’t necessary for routine air fryer maintenance.
Use only products approved by the manufacturer, and never spray liquids directly into electrical components or mix vinegar with bleach or other cleaning products.
Do I need to clean my air fryer after every meal?
You should clean the basket and drawer after each use, especially if food or grease remains.
The interior and heating element area may not require a full cleaning every time, but inspect them regularly and remove residue whenever it appears.
Final Thoughts: A Clean Air Fryer Makes Cooking Easier!
Keeping your air fryer clean doesn’t have to be a difficult chore.
With warm water, mild dish soap, a soft sponge, and a few minutes of attention after cooking, you can prevent stubborn grease buildup and keep your appliance looking its best.
The most important rule is to clean gently, avoid abrasive products, and always follow your air fryer’s manufacturer instructions.
A little regular maintenance can make a big difference, helping your appliance stay cleaner and reducing unpleasant odors and smoke caused by old food residue.
So the next time you finish cooking crispy fries or delicious chicken wings, don’t put off cleaning the basket. Let the appliance cool, wash the removable parts, wipe away any accessible residue, and dry everything thoroughly.
Your future self will thank you!
🧽 Let’s Talk Cleaning!
How often do you clean your air fryer?
Do you wash the basket after every use, or do you sometimes leave it until the next day?
And what’s your favorite trick for removing stubborn grease?
Share your air fryer cleaning tips in the comments! We’d love to hear what works best in your kitchen. ❤️
