How to Make Your Carved Pumpkin Last Longer Using Vinegar
Carving pumpkins is one of the most enjoyable ways to celebrate Halloween. Whether you prefer a traditional jack-o’-lantern with a spooky smile or a creative design, you want your pumpkin to look fresh and festive for as long as possible.
Unfortunately, once a pumpkin is carved, it begins to deteriorate. Exposure to air, moisture loss, and the growth of mold and bacteria can cause the flesh to soften, wrinkle, and rot. The good news is that a few simple care techniques may help slow this process.
One popular home remedy is soaking a freshly carved pumpkin in a diluted vinegar solution. Vinegar is inexpensive, easy to find, and simple to use. Although it is not a guaranteed way to preserve a pumpkin, it may help reduce some microbial growth when combined with proper pumpkin care.
Here is a step-by-step guide to preparing and using a vinegar solution for your Halloween pumpkin.
What You’ll Need
Before you begin, gather the following supplies:
- 1 freshly carved pumpkin
- White distilled vinegar
- Clean water
- A large bucket, basin, or container
- A clean towel or paper towels
- A spoon or scoop for removing pumpkin seeds and pulp
- A clean cloth or sponge (optional)
Important: Use plain white distilled vinegar rather than a flavored or colored vinegar. Never mix vinegar with bleach or other cleaning products, as this can produce dangerous chemical reactions.
Step 1: Choose and Carve Your Pumpkin
Start with a fresh, firm pumpkin that has no soft spots, bruises, or visible mold. A pumpkin with an intact stem is generally a good choice because damaged areas can make it more vulnerable to decay.
Before carving, wash the outside of the pumpkin under clean running water to remove dirt and debris. This helps prevent contaminants on the rind from being transferred to the flesh when you cut into it.
Next, follow these steps:
- Place the pumpkin on a stable, flat surface.
- Use a clean, sharp carving knife to cut out your design.
- Remove the seeds and stringy pulp with a spoon or scoop.
- Scrape away as much loose material as possible from the inside.
- Wipe away excess moisture and debris.
For a longer-lasting jack-o’-lantern, avoid carving it too far in advance. North Carolina Cooperative Extension recommends carving approximately 8–10 days before your event rather than weeks beforehand. Even with careful preparation, a carved pumpkin will eventually deteriorate. cherokee.ces.ncsu.edu
Helpful tip: Consider cutting an opening in the back or bottom instead of removing the stem and cutting a large opening at the top. This can help preserve the pumpkin’s appearance.
Step 2: Prepare a Vinegar and Water Solution
Once your pumpkin is carved, prepare a diluted vinegar solution.
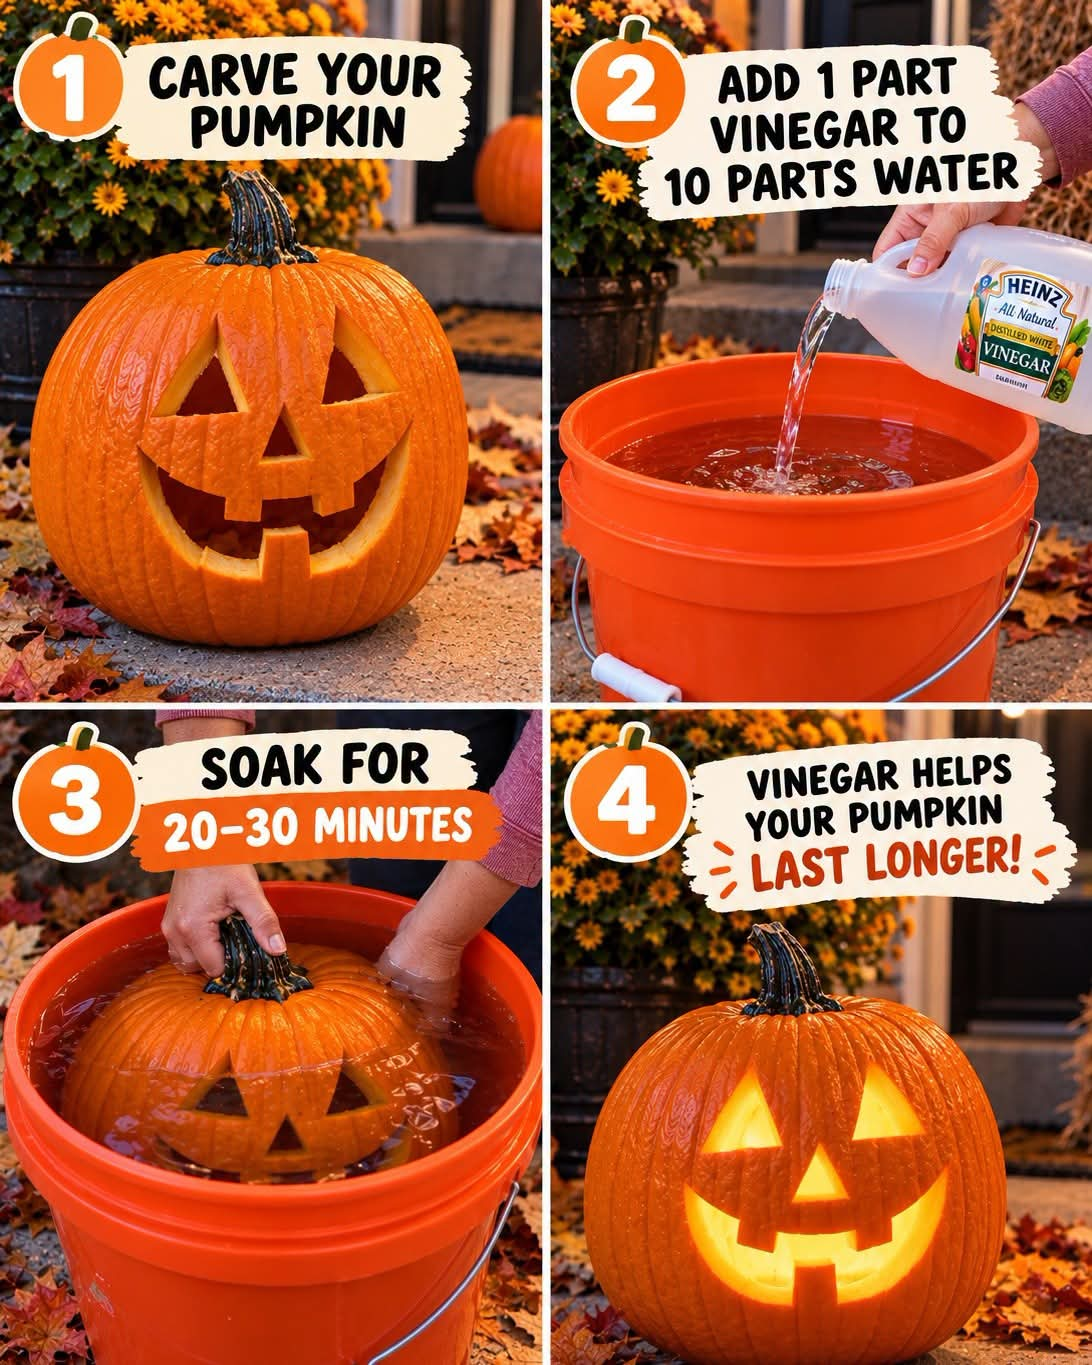
The recommended mixture shown in the image is:
- 10 parts water
- 1 part white distilled vinegar
This ratio creates a relatively mild solution that is easy to prepare at home.
How to mix the solution
You can adjust the quantities to suit the size of your container.
| Water | White vinegar |
|---|---|
| 1 litre | 100 ml |
| 2 litres | 200 ml |
| 5 litres | 500 ml |
| 10 litres | 1 litre |
For example, if you use 5 litres of water, add 500 millilitres of white vinegar and mix thoroughly.
Use a clean bucket, basin, or large container that is deep enough to hold the pumpkin.
Why use vinegar?
White vinegar contains acetic acid, which makes the solution acidic. Under suitable conditions, this acidity can help reduce certain microorganisms that contribute to spoilage.
Research on freshly cut pumpkin has found that diluted vinegar treatments can reduce some microbial populations under refrigerated storage conditions. However, those findings do not guarantee that soaking a carved Halloween pumpkin will produce the same results at room temperature. ResearchGate
Vinegar should therefore be viewed as one possible preservation aid rather than a solution that completely prevents mold or rot.
Step 3: Soak the Pumpkin for 20–30 Minutes
After preparing your vinegar solution, it is time to give your carved pumpkin a bath.
Follow these instructions:
- Carefully lower the carved pumpkin into the container.
- Make sure the solution reaches the carved surfaces and the inside of the pumpkin.
- Allow the pumpkin to soak for approximately 20–30 minutes.
- Turn the pumpkin gently if necessary to expose areas that remain above the solution.
- Remove the pumpkin carefully and allow the excess liquid to drain.
If your pumpkin is too large to fit inside a bucket, you can apply the diluted solution to its exterior and carved surfaces using a clean cloth or spray bottle instead.
Take care when handling the pumpkin because the carved edges can be fragile.
Should you rinse the pumpkin afterward?
The illustrated method does not require a separate rinsing step. After removing the pumpkin from the bath, let excess solution drain away and allow the pumpkin to dry.
Avoid leaving it sitting in a pool of liquid. Excess moisture can encourage deterioration, particularly if it collects inside the pumpkin.
North Carolina Cooperative Extension also recommends soaking pumpkins in a mixture of 10 parts water to 1 part vinegar for 20–30 minutes, followed by air-drying. cherokee.ces.ncsu.edu
Step 4: Let the Pumpkin Dry and Display It
Once the soak is complete, place your pumpkin on a clean, dry surface.
Allow it to air-dry before returning it to its display location. You can gently blot excess moisture with a clean towel or paper towels.
Avoid rubbing the carved edges too vigorously, as this could damage the design.
When the pumpkin is dry, place it somewhere cool and protected.
Where should you keep your pumpkin?
For the best chance of keeping your jack-o’-lantern looking fresh:
- Avoid direct sunlight. Heat and sunlight can accelerate deterioration.
- Protect it from rain. Repeated exposure to water can leave the pumpkin excessively wet.
- Keep it away from heat sources. Warm conditions can encourage microbial growth.
- Choose a cool location. Refrigerating the pumpkin when it is not on display may help slow deterioration, provided it fits safely in your refrigerator.
- Keep it off wet ground. A dry, stable surface helps prevent the bottom from remaining damp.
Temperature and moisture are important factors in pumpkin deterioration. After carving, the exposed flesh becomes more vulnerable to environmental conditions and organisms that cause decay. SDSU Extension
Step 5: Maintain Your Pumpkin Throughout Halloween
Soaking your pumpkin once does not guarantee that it will remain fresh for the rest of the season.
Regular care is essential if you want to extend its decorative life.
Check your pumpkin every day
Look for signs of deterioration, including:
- Soft or sunken areas.
- Wrinkled or shriveled skin.
- Visible mold.
- Leaking liquid.
- An unpleasant smell.
- A face that begins to collapse.
If your pumpkin develops extensive mold, becomes slimy, or starts to smell unpleasant, discard it rather than trying to restore it.
Keep the carved surfaces clean
Remove loose debris and avoid allowing dirt, fallen leaves, or other organic material to accumulate inside the pumpkin.
You can apply a fresh, lightly diluted vinegar solution to the carved surfaces if desired. However, the effectiveness of repeated vinegar treatments on decorative pumpkins has not been firmly established, so do not rely on spraying alone to prevent decay.
Consider refrigeration
If practical, place your pumpkin in the refrigerator when it is not being displayed.
Cooler conditions can slow the processes responsible for deterioration. If the pumpkin must remain outdoors, choose a shaded, sheltered location whenever possible.
Avoid excessive heat from candles
Traditional candles produce heat, which can accelerate drying and shorten the life of a carved pumpkin.
For a safer, longer-lasting display, use a battery-powered LED candle or another suitable electric light instead. Artificial lighting also reduces the fire risk associated with an open flame.
North Carolina Cooperative Extension specifically recommends artificial lighting as a way to avoid the heat produced by real candles. cherokee.ces.ncsu.edu
Does Vinegar Really Make a Carved Pumpkin Last Longer?
Vinegar is a popular home remedy for preserving carved pumpkins, but it is important to understand what it can and cannot do.
Vinegar’s acidity can help inhibit some microorganisms. However, a carved pumpkin is still a fresh biological material that will eventually break down.
The results depend on several factors:
- The pumpkin’s condition before carving.
- How thoroughly it is cleaned.
- The amount of flesh exposed during carving.
- The temperature and humidity of its surroundings.
- How much moisture remains on the pumpkin.
- Whether mold or other decay-causing organisms are already present.
A vinegar soak may help as part of a broader care routine, but there is no guarantee that it will extend the life of every carved pumpkin.
It is also worth noting that laboratory research on refrigerated pumpkin pieces is not the same as testing whole jack-o’-lanterns displayed outdoors. The conditions and results can differ considerably. ResearchGate
For the best results, combine careful cleaning, a fresh pumpkin, appropriate temperature control, and protection from excessive moisture.
Common Mistakes to Avoid
Even if you follow the vinegar-soaking method, a few common mistakes can shorten your pumpkin’s life.
1. Carving too early
A pumpkin starts deteriorating after it has been cut. Carving it several weeks before Halloween gives it more time to soften and decay.
What to do instead: Plan to carve your pumpkin about a week before your event, adjusting the timing to suit the conditions where you live.
2. Leaving the seeds and pulp inside
Stringy pulp and leftover seeds can retain moisture and make cleaning more difficult.
What to do instead: Remove as much of the loose material as possible and clean the inside carefully.
3. Using too much vinegar
A stronger solution is not necessarily more effective for preserving a decorative pumpkin.
What to do instead: Start with the recommended ratio of 10 parts water to 1 part vinegar.
4. Keeping the pumpkin somewhere hot
Warm temperatures can accelerate deterioration, particularly when the pumpkin is exposed to direct sunlight.
What to do instead: Display it in a cool, shaded location and refrigerate it when practical.
5. Letting water collect inside
Excess moisture can accumulate at the bottom of a carved pumpkin and contribute to deterioration.
What to do instead: Drain away excess liquid after soaking and allow the pumpkin to dry before displaying it.
6. Using a real candle without considering the risks
An open flame can heat the pumpkin and create a fire hazard.
What to do instead: Use an LED candle or battery-powered light.
Frequently Asked Questions
1. How much vinegar should I use to preserve a carved pumpkin?
Use approximately one part white distilled vinegar to 10 parts water. For example, combine 100 millilitres of vinegar with 1 litre of water.
2. How long should I soak my pumpkin?
The method shown in the image recommends soaking the pumpkin for 20–30 minutes.
3. Can I use apple cider vinegar instead of white vinegar?
White distilled vinegar is the preferred option for this method because it is clear and has a predictable acidity for household use. Apple cider vinegar may also be acidic, but it is not the vinegar specified in the recommended method.
4. Can I spray the vinegar solution onto my pumpkin instead of soaking it?
Yes. If your pumpkin is too large for a bucket, you can apply the diluted solution to the carved surfaces using a clean cloth or spray bottle.
However, spraying and soaking are not necessarily equally effective, and neither method guarantees that the pumpkin will remain fresh.
5. Will vinegar completely prevent mold?
No. Vinegar may help inhibit some microorganisms, but it does not sterilize the pumpkin or eliminate every cause of decay.
6. How long will a pumpkin last after carving?
The lifespan varies with the pumpkin’s condition and its environment. A carved pumpkin may begin deteriorating within a few days, while a well-maintained pumpkin in favorable conditions may last longer.
Vinegar treatment does not guarantee a specific number of additional days.
7. Can I use bleach instead of vinegar?
Some extension services discuss diluted bleach solutions as an alternative for treating decorative pumpkins. However, bleach requires careful handling, and treated pumpkins should not be eaten or offered to wildlife or livestock.
Never mix bleach with vinegar or any other cleaning product. If you plan to compost the pumpkin or allow wildlife to access it, a vinegar-based method is preferable to bleach treatment. cherokee.ces.ncsu.edu+1
8. Is the pumpkin still safe to eat after this treatment?
The method is intended for decorative pumpkins, not food preservation.
If you intend to eat your pumpkin, use food-safe preparation practices and do not eat a pumpkin that has developed mold, become slimy, or started to rot. A pumpkin treated for decoration should not automatically be considered suitable for consumption.
9. Should I apply petroleum jelly or vegetable oil to the carved edges?
Some pumpkin-care guides suggest coating cut surfaces to slow moisture loss. However, these products can introduce other considerations, especially around lighting.
Never apply flammable coatings if you intend to use a real candle. An LED light is the safer choice.
10. Can I use this method on an uncarved pumpkin?
Yes. A diluted vinegar solution can also be applied to the exterior of an uncarved pumpkin. However, an intact pumpkin generally has better natural protection than one that has been cut, so the treatment may not be necessary.
Final Thoughts
A freshly carved pumpkin is a classic Halloween decoration, but keeping it looking good can be challenging as the days pass.
The vinegar method shown in the image is straightforward:
- Carve and clean your pumpkin.
- Mix one part white distilled vinegar with 10 parts water.
- Soak the pumpkin for 20–30 minutes.
- Remove it and allow it to dry.
- Keep it cool, shaded, and protected from excessive moisture.
- Check it regularly for signs of deterioration.
Vinegar may help reduce some microbial growth, but it is not a miracle preservative. The most reliable approach is to combine the treatment with careful cleaning, suitable storage, and good pumpkin-care practices.
With a little preparation, you can give your Halloween jack-o’-lantern a better chance of staying attractive throughout the spooky season! 🎃
