🍂👼
A Charming Nature-Inspired DIY Ornament for Fall, Christmas, and Rustic Home Decor
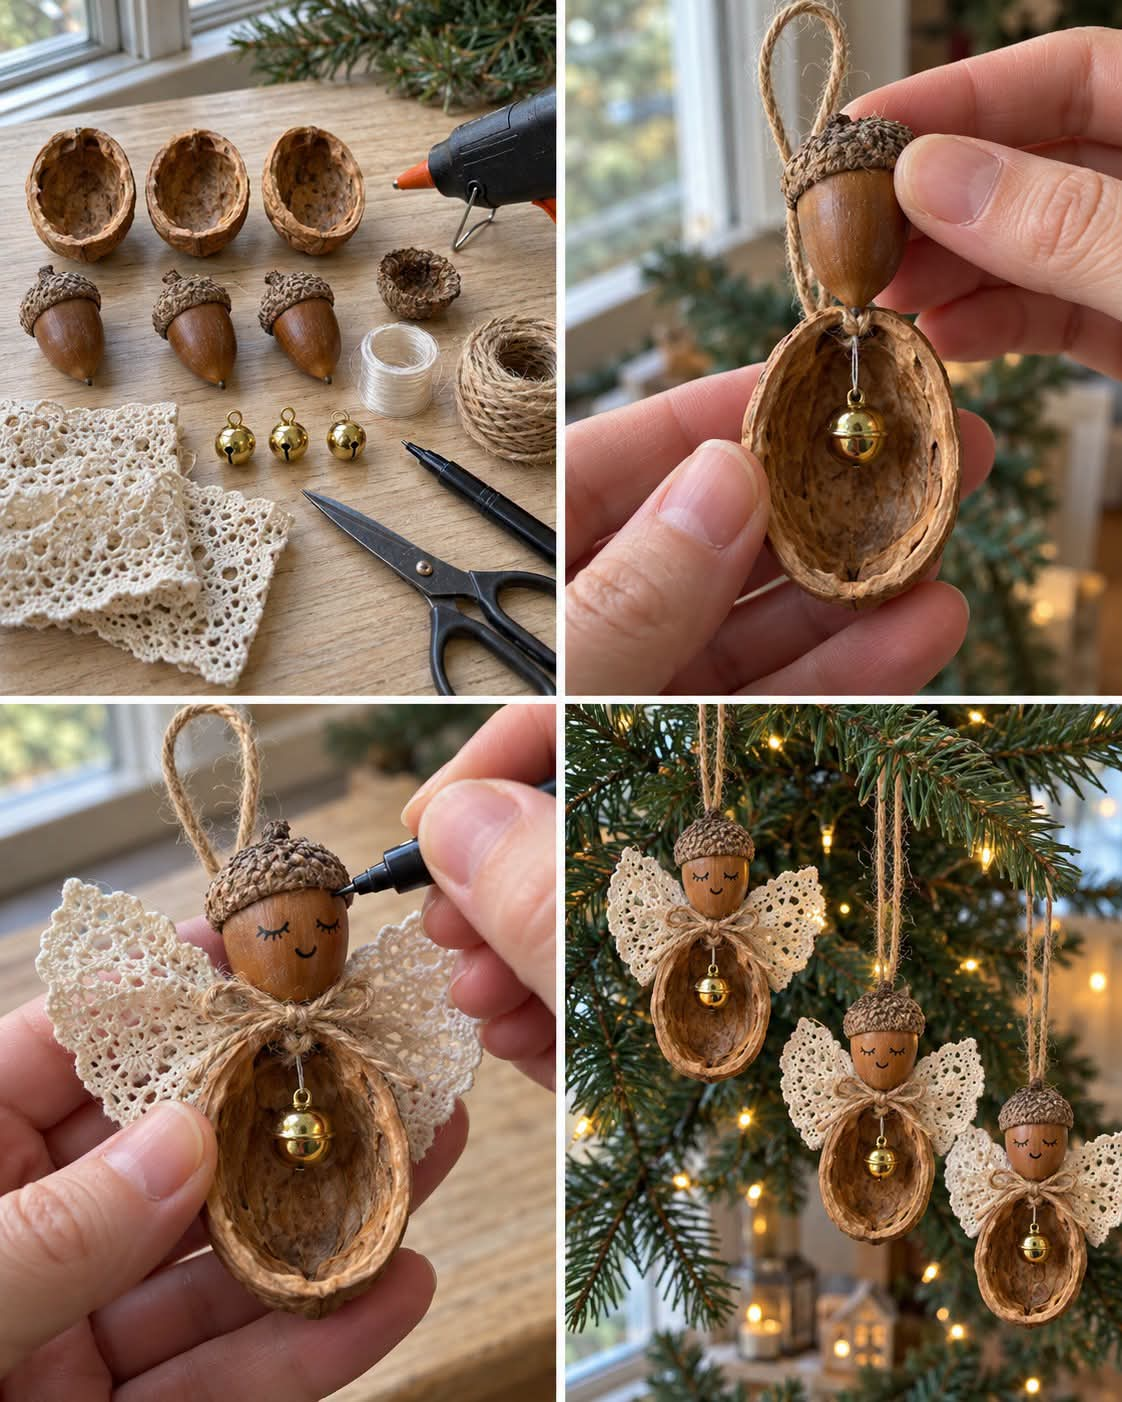
Looking for a sweet little craft that brings the beauty of nature into your home? These little woodland angels made from walnut shells and acorns are absolutely adorable! With their tiny golden bells, delicate lace wings, and simple hand-drawn faces, they make beautiful handmade ornaments that look as though they came straight from an enchanted woodland.
The best part? You don’t need expensive craft supplies to make them. A few natural treasures collected outdoors, some leftover lace, a little jute twine, and a hot glue gun are all you need to create these charming miniature angels.
They are perfect for decorating a Christmas tree, adding a rustic touch to a seasonal display, creating handmade gifts, or spending a cozy afternoon crafting with family.
Each little angel has its own personality, and you can easily customize the colors and details to match your home decor.
Let’s gather our supplies and make these sweet woodland decorations!
Why You’ll Love These Little Woodland Angels
- Inexpensive to make: Walnuts, acorns, and simple craft materials can go a long way.
- Inspired by nature: Their natural textures and earthy colors create a rustic, woodland look.
- Easy to personalize: Change the lace, ribbons, and facial expressions to make every angel unique.
- Perfect for handmade gifts: These little ornaments make thoughtful gifts for friends, teachers, and family members.
- Great for seasonal decorating: Display them throughout autumn and winter, or use them as Christmas tree ornaments.
- A lovely way to reuse materials: Small scraps of lace and twine can become beautiful decorative details.
Whether you prefer a natural farmhouse style or delicate woodland decorations, these tiny angels are a wonderful addition to your handmade collection.
Materials You’ll Need
Gather the following supplies before getting started.
For Each Woodland Angel
- 1 intact walnut shell half
- 1 small whole acorn with its cap attached
- 1 tiny golden bell
- 2 small pieces of cream-colored cotton lace
- A short piece of jute twine for the hanging loop
- A small piece of fine thread for attaching the bell
- A tiny piece of jute twine for the neck bow
- A fine black permanent marker
- Scissors
- A hot glue gun and glue sticks
Optional Decorative Supplies
You can also use:
- Small white or ivory ribbons
- Thin natural-colored string
- Tiny wooden beads
- Gold thread
- Small pieces of muslin or cotton fabric
- A soft brush for cleaning the shells
Helpful tip: Choose walnut shell halves that are relatively intact, with no sharp, splintered edges. Small, symmetrical acorns work especially well for the angel’s head.
Step-by-Step Instructions: How to Make Woodland Angels
Step 1: Prepare the Walnut Shells and Acorns
Begin by gathering your walnut shells and acorns.
If you’re using walnuts from the kitchen, carefully crack them open and try to preserve one or both shell halves. Remove any remaining nut material from the shells.
Brush away loose dirt and debris from the acorns and their caps.
If the natural materials need cleaning, wipe them gently with a slightly damp cloth and allow them to dry completely before crafting. Avoid leaving them wet, as moisture trapped inside the shells can encourage mold.
Check the walnut shells for sharp edges or loose fragments. Discard any pieces that are badly damaged.
Once everything is clean and dry, arrange your materials on your work surface.
Step 2: Attach the Tiny Golden Bell
The little golden bell adds a delicate finishing touch and gives each angel a charming detail.
Cut a short piece of fine thread and pass it through the hanging ring at the top of the bell.
Tie a secure knot so the bell cannot slip off.
Apply a small amount of hot glue near the upper inside edge of the walnut shell. Press the thread into the glue, positioning the bell so it hangs freely inside the shell.
Hold the thread in place until the glue begins to set.
Be careful not to glue the bell itself to the shell. It should be able to move freely and produce a gentle sound when the ornament is handled.
Crafting tip: Keep the bell small and lightweight so it doesn’t pull the ornament out of balance.
If you’re making these angels with children, an adult should handle the hot glue gun and small bells.
Step 3: Make the Hanging Loop
Cut a piece of jute twine long enough to form a small loop.
Fold the twine in half, bringing the two ends together. Tie a knot near the ends to create a secure loop.
Position the knotted ends behind the upper edge of the walnut shell, leaving the loop extending above the ornament.
Secure the ends with hot glue.
Make sure the loop is firmly attached before continuing. You can gently tug on it once the glue has cooled to check that it stays in place.
For a rustic appearance, use natural jute twine. For a softer, more delicate ornament, substitute a narrow cream ribbon.
Step 4: Attach the Acorn Head
Now it’s time to give your little angel a face!
Position the walnut shell with its hollow side facing forward. Place the acorn above the upper edge of the shell, with its pointed end facing downward and its cap at the top.
The acorn should sit just above the shell, creating the appearance of a small head attached to the angel’s body.
Apply a small amount of hot glue to the base of the acorn or the area where it meets the shell.
Press the acorn into position and hold it gently until the glue sets.
Check that the head is straight and that the hanging loop remains visible behind it.
Helpful tip: If the acorn is unusually small or the shell is uneven, experiment with the positioning before applying glue. Finding the right balance makes the finished ornament look much neater.
Step 5: Create the Lace Wings
The cream-colored lace wings are what give these woodland angels their delicate, whimsical appearance.
Cut two small pieces of cotton lace. The pieces don’t need to be identical, but they should be similar in size.
Gently gather or fold each piece to create a soft wing shape.
Apply a small amount of hot glue to the back of the walnut shell, one side at a time.
Attach the first piece of lace to one side of the shell, then attach the second piece to the opposite side.
Position the lace so that the wings extend outward from behind the walnut shell.
Adjust the folds before the glue sets completely.
You can leave the lace flat for a simple, elegant look or gently pleat it to create more texture.
Want a different style? Try cream muslin, narrow cotton ribbon, or soft white fabric scraps instead of lace. Each material creates a slightly different look.
Step 6: Draw the Angel’s Face
This is where your woodland angel gets its personality!
Using a fine black permanent marker, carefully draw a simple face on the front of the acorn, just beneath its cap.
You can make the face as simple as two tiny eyes and a small curved smile.
For a peaceful, sleeping angel, draw two short curved lines for closed eyes.
For a cheerful angel, add two small dots for the eyes and a delicate smile.
Keep the details small so they complement the natural shape of the acorn.
If you’re unsure about drawing directly on the acorn, practice on a spare piece of paper first.
Allow the ink to dry completely before handling the face again.
Crafting tip: Use a fine-tip marker rather than a thick one. Tiny details look more natural on such a small surface.
Step 7: Add a Tiny Jute Bow
A little bow at the neck creates a lovely finishing detail.
Cut a short piece of jute twine and tie it into a small bow.
If tying such a tiny bow is difficult, make a simple loop with the twine and secure it in the center with another small piece.
Apply a tiny dot of glue at the base of the acorn, just where the head meets the walnut shell.
Carefully press the bow into place.
Trim any long or uneven ends with scissors.
You can also use a thin cream ribbon, a piece of gold thread, or a narrow strip of cotton fabric to create a different look.
Step 8: Check the Details and Let Everything Dry
Before hanging your woodland angel, inspect the entire ornament.
Make sure:
- The acorn head is securely attached.
- The lace wings are firmly glued.
- The golden bell hangs freely.
- The jute bow is neatly positioned.
- The hanging loop is securely fastened.
- There are no loose threads or sharp shell fragments.
Trim away any excess glue strands once the glue has cooled.
Allow the ornament to sit undisturbed until all the glue has fully set, following the glue manufacturer’s instructions.
Your little woodland angel is now ready to display!
Creative Ways to Decorate Your Woodland Angels
One of the best things about this project is how easy it is to customize. Once you’ve made your first angel, you may want to experiment with different materials and styles.
1. Make Rustic Farmhouse Angels
Keep the design simple with natural walnut shells, brown jute twine, cream lace, and unpainted acorns.
These neutral colors look beautiful with wooden decorations, dried flowers, pinecones, and other farmhouse-style accessories.
2. Create Elegant Christmas Ornaments
Use delicate ivory lace, gold thread, and tiny golden bells to give your angels a festive appearance.
Hang them on a Christmas tree alongside wooden ornaments, dried orange slices, cinnamon sticks, and natural garlands.
3. Add Soft White Wings
Replace the lace with small pieces of white cotton fabric or muslin.
Gently fold the material to create wings with a soft, feather-like appearance.
4. Make a Woodland Angel Family
Use different sizes of walnut shells and acorns to create a little family of angels.
Give each one a slightly different expression, bow, or wing shape.
Arrange them together on a shelf or place them in a small decorative basket.
5. Create Handmade Gift Decorations
Attach a tiny angel to a wrapped gift using its hanging loop.
It makes a lovely alternative to a traditional bow and gives the recipient a small keepsake to enjoy after opening the package.
6. Make a Nature-Inspired Garland
Create several angels and hang them along a length of jute twine.
Space them evenly and add a few wooden beads or small fabric bows between them.
Display the garland on a mantel, shelf, or seasonal decorating area, keeping it away from candles and heat sources.
Tips for Making Your Woodland Angels Look Beautiful
Choose well-shaped acorns. Acorns with intact caps and relatively smooth surfaces make the best little heads.
Keep the glue discreet. Small amounts of glue are usually sufficient. Too much can create visible lumps around the shell and lace.
Use lightweight decorations. Heavy bells or thick ribbons can make the ornament hang unevenly.
Prepare several sets of materials at once. If you’re making multiple angels, cut all the lace, twine, and thread before beginning assembly.
Allow enough drying time. Natural materials can shift while the glue is setting. Let each angel dry completely before hanging it.
Embrace natural variations. No two walnut shells or acorns are exactly alike. Their differences are part of what makes these handmade decorations so charming.
Frequently Asked Questions
Can I make these angels without a hot glue gun?
Yes. A suitable strong craft adhesive can work, provided it bonds well to the natural materials and dries completely. Follow the adhesive manufacturer’s instructions and allow extra drying time if needed.
Where can I find walnut shells and acorns?
You can collect acorns from the ground where gathering is permitted, or save walnut shells from walnuts you use in cooking.
If collecting outdoors, choose clean materials from areas away from roads, chemical treatments, and other potential contaminants.
How can I keep the acorns from attracting insects?
Inspect the acorns carefully before crafting and avoid those with holes, mold, or visible insect damage.
If you want to prepare gathered acorns for long-term indoor decorations, research an appropriate drying or heat-treatment method for your specific materials. Avoid using damp acorns, and allow them to dry thoroughly before assembly.
Can I paint the walnut shells or acorns?
Absolutely! You can leave them natural for a rustic look or use craft paint to create white, cream, gold, or pastel decorations.
Allow any paint to dry completely before attaching the pieces together.
Are these ornaments suitable for young children?
They can be a fun supervised craft for older children, but walnut shells can have sharp edges, and small bells, acorns, and other pieces may pose choking hazards.
Adults should handle hot glue guns and any sharp tools. Keep small components away from young children and pets.
How should I store the angels after the season?
Store them in a clean, dry container with enough room to prevent the lace wings and hanging loops from being crushed.
Keep them away from damp basements, excessive heat, and direct sunlight. Check the natural materials for signs of moisture or deterioration before storing them.
Final Thoughts: Small Natural Treasures, Beautiful Handmade Decorations 🍂👼
These little woodland angels are a lovely reminder that beautiful decorations don’t always need to come from a store.
With a walnut shell, an acorn, a tiny golden bell, and a few scraps of lace and twine, you can create a charming handmade ornament inspired by nature.
Make one as a simple seasonal decoration, create a whole collection for your Christmas tree, or give a little angel to someone who appreciates handmade gifts.
The possibilities are endless, and each angel will have its own unique character.
Sometimes, the smallest crafts bring the most joy!
🍁 Let’s Talk!
Would you make these little woodland angels using natural walnut shells and acorns?
Would you keep them rustic with cream lace and jute twine, or add a little gold and white for a more festive look?
Tell us your favorite idea in the comments, and share this DIY project with someone who loves nature-inspired crafts! ❤️
