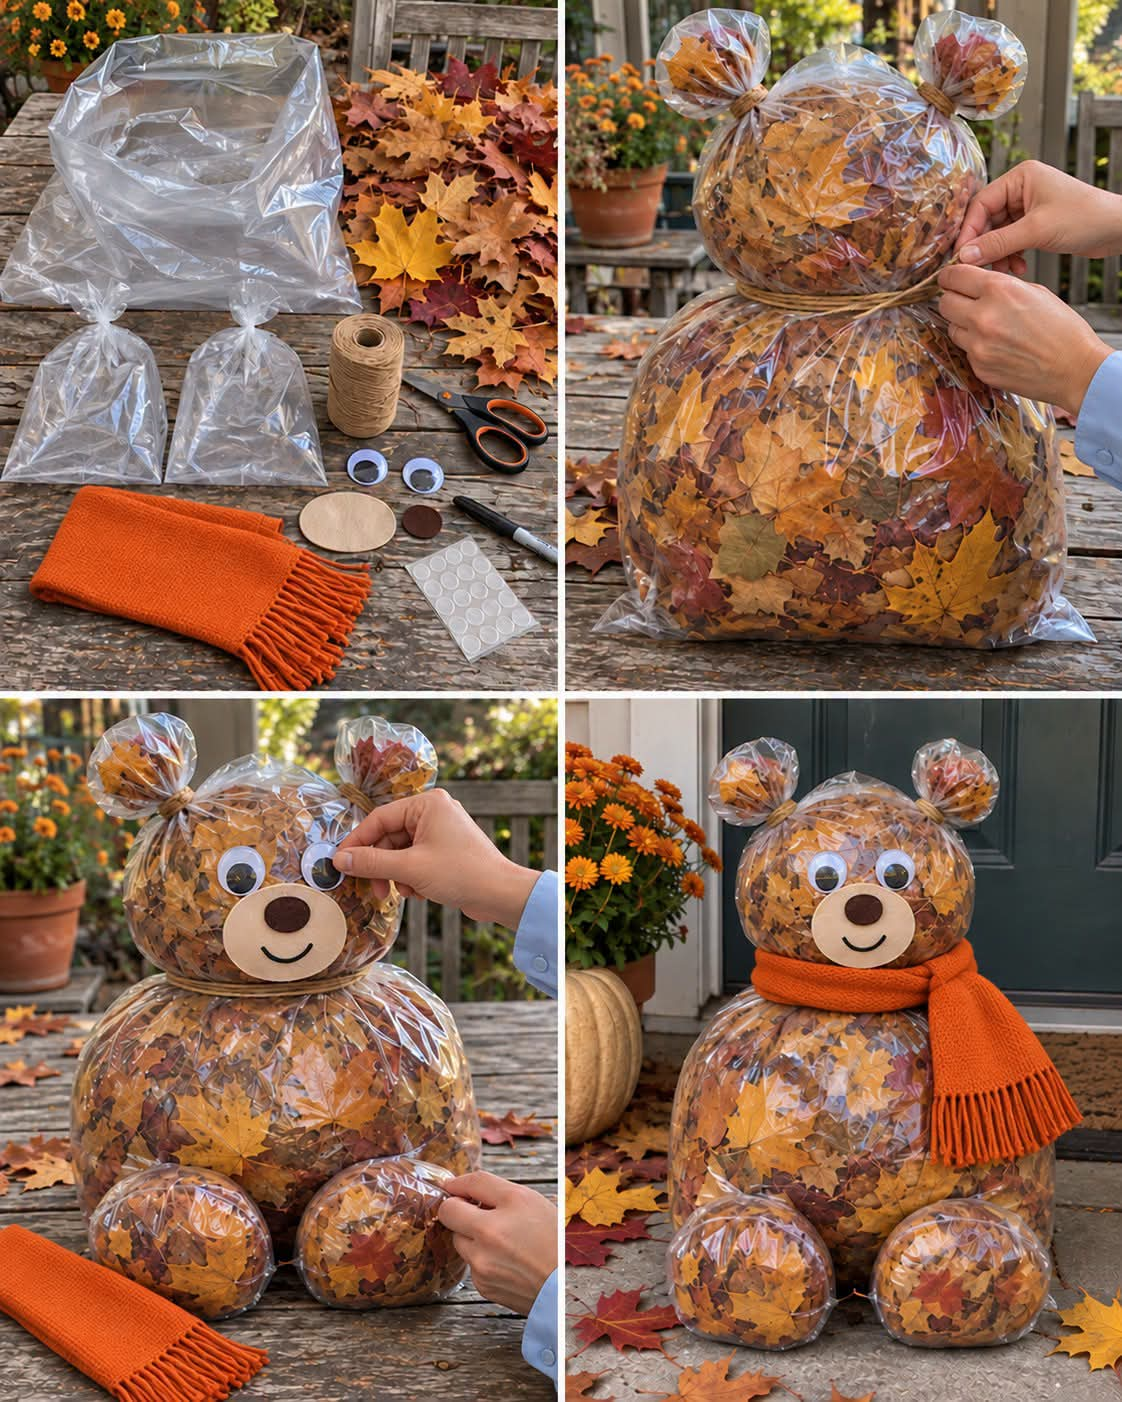
What you need: One large transparent plastic bag, two small clear bags, plenty of dry fallen leaves, jute twine, scissors, two large googly eyes, beige and dark brown felt, a black marker, clear adhesive dots and a small plaid scarf.
How to make it: Fill the large bag with dry leaves, keeping them loose enough to reshape. Gather and tie the opening, then tuck it behind the upper section. Tie twine around the bag below the head to separate it from the larger body. Pinch two small leaf-filled sections at the upper sides and tie their bases to form ears. Attach the eyes and a felt muzzle decorated with a nose and smile. Fill and tie the two smaller bags to make feet, securing them against the body with adhesive dots. Wrap the scarf around the neck and display the bear in a sheltered spot.
🍂 DIY Autumn Bear Made From Fallen Leaves: An Adorable Fall Craft for Your Home!
Looking for a creative way to celebrate autumn while making use of all those beautiful fallen leaves? 🍁🧸 This adorable DIY autumn bear made from plastic bags and colorful fall leaves is a fun, budget-friendly craft that brings the beauty of the season right to your doorstep!
With its round body, little ears, googly eyes, sweet felt muzzle, and cozy orange scarf, this charming leaf-filled bear makes a wonderful seasonal decoration for a porch, garden, entryway, or autumn-themed display. It’s a delightful project for families, craft lovers, and anyone who enjoys turning simple materials into something special.
The best part? You don’t need expensive supplies or advanced crafting skills. A few clear plastic bags, fallen leaves, some twine, and a handful of decorative materials are enough to create a cute autumn character that will make visitors smile.
Let’s discover how to make your own little leaf bear! 🍂❤️
🍁 Why You’ll Love This DIY Autumn Bear
Autumn is one of the most inspiring seasons for crafting. The trees fill the landscape with shades of orange, red, yellow, and brown, while fallen leaves create a beautiful natural material for seasonal decorations.
This project combines those warm autumn colors with a simple bear-shaped design.
Here are a few reasons to try it:
- Budget-friendly: Many of the materials may already be available at home.
- Easy to customize: Give your bear a different scarf, facial expression, or decorative accessories.
- Perfect for autumn decorating: Display it near your front door, on a covered porch, or beside your fall pumpkins.
- Family-friendly: Children can help collect leaves and decorate the bear with adult supervision.
- Creative reuse: The project gives clean plastic bags another purpose instead of immediately throwing them away.
- Unique seasonal decoration: Every bear looks a little different because the leaves have their own natural colors and shapes.
Whether you love rustic farmhouse decor or simply enjoy seasonal crafts, this little bear is a charming way to welcome fall.
🧺 Materials You’ll Need
Gather the following supplies before getting started.
Main Materials
- 1 large transparent plastic bag for the body
- 2 small transparent plastic bags for the feet
- Plenty of dry fallen leaves in orange, yellow, red, and brown
- Natural jute twine or sturdy string
- Scissors
- 2 large googly eyes
- Beige felt for the muzzle
- Dark brown felt for the nose
- A black marker
- Clear adhesive dots or suitable craft adhesive
- 1 small autumn-colored scarf, preferably orange or plaid
Optional Supplies
- Extra plastic bags for the ears
- Cardboard to reinforce the feet
- Additional felt for the paws
- Small artificial leaves for decoration
- A lightweight ribbon for a bow
- Waterproof tape for reinforcing the bags
- A small weight or stable base for display
Helpful tip: Choose a large bag that is strong enough to hold the leaves without tearing. Transparent bags allow the colorful foliage to show through, creating the beautiful autumn look seen in the finished craft.
For the best results, collect leaves that are dry, clean, and free from mold. Leaves that are too damp can deteriorate inside the bags and may develop an unpleasant smell.
🍂 Step 1: Collect and Prepare Your Fallen Leaves
Start by gathering fallen leaves from your yard, garden, or another suitable outdoor area.
Look for a mixture of colors and shapes. Golden yellow leaves create a bright autumn appearance, orange leaves add warmth, and red or brown leaves provide contrast.
Before using them, spread the leaves out on a dry surface and remove any that are wet, moldy, or badly damaged.
If the leaves are slightly damp, allow them to dry completely before placing them inside the bags.
You don’t need to arrange every leaf perfectly. In fact, a mixture of natural shapes gives the bear a more interesting appearance.
Crafting tip: Collect more leaves than you think you’ll need. The amount depends on the size of your bags and how densely you want to fill the bear.
🧸 Step 2: Create the Bear’s Body
Take your large transparent plastic bag and begin filling it with the dry fallen leaves.
Add the leaves gradually, spreading them throughout the bag so that the body takes on a rounded shape.
Avoid packing the leaves too tightly. The bag should be full enough to hold its shape but loose enough to reshape with your hands.
Once you’ve added enough leaves, gently press the bag into a broad, rounded form.
Gather the open end of the bag and tie it securely with jute twine.
Tuck the tied section toward the back or underside of the body so it is less noticeable.
How to Get a Nice Rounded Shape
Use your hands to move the leaves around inside the bag. Push some toward the sides and bottom to create a fuller, more bear-like silhouette.
If the bag has excess plastic around the opening, fold or tuck it neatly behind the body.
Remember that the body doesn’t need to be perfectly round. A slightly oval shape can make your bear look even more adorable!
🐻 Step 3: Make the Bear’s Head
Take another transparent bag and fill it with dry leaves.
This bag should be smaller than the body bag so that the finished bear has a recognizable head-and-body shape.
Add leaves until the bag forms a rounded head. Gently adjust the contents until the front looks full and smooth.
Gather the opening and tie it securely with twine.
Position the head above the larger body, placing the tied opening toward the back.
Use twine to secure the head to the body. You can also use suitable strong adhesive or carefully applied tape where appropriate, making sure the connection is hidden as much as possible.
Create the Neck
Wrap a length of jute twine around the lower part of the head, where it meets the body.
Tie it firmly enough to define the neck without cutting into or damaging the plastic.
This small detail helps separate the bear’s head from its body and creates a natural place for the scarf.
Important: If the head feels loose, adjust the leaves inside the bag and reinforce the connection before adding the decorations.
👂 Step 4: Make Two Cute Bear Ears
A bear needs ears, and these little details help bring the character to life!
Take two small sections of transparent plastic bag and fill them with dry leaves.
Pinch each section near its base to create a rounded ear shape. Tie the bases with jute twine so the leaves remain inside.
Position one ear on each upper side of the head.
Secure them with suitable adhesive or twine, keeping the attachment points as hidden as possible.
Adjust the ears until they look balanced.
They don’t have to be exactly identical. Slight differences can give your bear a playful, handmade appearance.
Alternative idea: If you prefer a more polished look, make the ears from brown felt or soft fabric instead of leaf-filled bags.
👀 Step 5: Add the Googly Eyes
Now comes one of the most enjoyable parts: giving your bear a face!
Take the two large googly eyes and position them on the front of the head.
Before attaching them, hold them in place to experiment with their spacing.
Placing them too close together creates a different expression from positioning them slightly farther apart. Choose the look you like best.
Once you’re happy with the placement, secure the eyes using clear adhesive dots or an adhesive suitable for the materials.
Press gently and allow the adhesive to set according to the manufacturer’s instructions.
Make the Face Even More Expressive
You can give your bear a curious, surprised, or cheerful expression simply by changing the placement of the eyes and muzzle.
For a more natural appearance, keep the eyes approximately level and place the muzzle beneath them.
Safety note: Small googly eyes can be a choking hazard. If young children will be near the decoration, use larger securely attached felt features instead.
🤎 Step 6: Create the Bear’s Muzzle and Nose
The felt muzzle is the detail that gives this autumn bear its sweet, recognizable face.
First, cut a rounded oval or circle from beige felt. This will form the muzzle area.
Next, cut a smaller oval from dark brown felt to make the nose.
Place the brown nose near the upper center of the beige felt piece.
Secure it with suitable craft adhesive.
Using a black marker, draw a gentle curved smile beneath the nose.
Allow any adhesive or marker to dry completely before attaching the muzzle to the bear.
Attach the Muzzle
Position the finished felt muzzle on the front of the head, beneath the googly eyes.
Check that it is centered and that the smile is clearly visible.
Once you are satisfied with the placement, attach it securely.
The contrast between the beige muzzle, dark nose, and colorful leaves makes the face stand out beautifully.
Design tip: You can use brown, cream, or tan felt to create different looks. A slightly larger muzzle gives the bear a playful cartoon appearance, while a smaller one creates a more subtle expression.
🐾 Step 7: Make the Bear’s Feet
The two small plastic bags will become the bear’s feet.
Fill each bag with dry fallen leaves until it forms a rounded shape.
Gather and tie the opening of each bag securely with twine.
Place the feet at the bottom front of the body, positioning them side by side.
Adjust their shapes so that both feet appear balanced.
Use suitable clear adhesive dots or another compatible attachment method to secure them to the body.
Make the Feet More Stable
If the feet are too soft or keep moving, consider placing a small piece of lightweight cardboard inside each bag before filling it.
You can also use additional twine or suitable tape to reinforce the attachment points.
If the bear will be displayed outdoors, remember that wind can move lightweight decorations. Position it against a stable surface and secure it appropriately.
🧣 Step 8: Add a Cozy Autumn Scarf
No fall bear is complete without a cozy scarf!
Choose an orange, rust-colored, brown, or plaid scarf to complement the colors of the leaves.
Wrap it gently around the bear’s neck, covering the twine used to separate the head from the body.
Arrange the scarf so that one end hangs down the front or side.
You can tie it loosely in a knot or create a small bow.
If the scarf is too long, adjust it so it doesn’t drag on the ground or cover the bear’s face.
Other Scarf Ideas
Try one of these styles:
- Rust orange: A classic autumn look that matches the warm leaves.
- Red and black plaid: Perfect for a rustic farmhouse theme.
- Cream or beige: Creates a soft, neutral appearance.
- Mustard yellow: Adds a cheerful pop of seasonal color.
- Brown knit fabric: Gives the bear a cozy woodland feel.
You can even make a miniature scarf from leftover fabric, an old sweater, or a piece of fleece.
✨ Step 9: Add the Finishing Touches
Your bear is almost ready!
Take a moment to examine the finished decoration and make any necessary adjustments.
Check that the head is securely attached, the ears are balanced, the facial features are firmly in place, and the feet are positioned evenly.
If you can see any loose plastic or untidy ties, tuck them toward the back of the bear.
You can also add a few optional decorations to personalize your creation.
Optional Decorating Ideas
Add a ribbon: Tie a small bow around one ear or at the neck.
Use extra felt: Add small paw details or felt patches to the feet.
Create a woodland theme: Place pinecones, small pumpkins, or artificial autumn leaves around the bear.
Add a seasonal sign: Position a small sign nearby with a message such as Hello, Autumn! or Welcome, Fall!
Make a family of bears: Create several bears in different sizes and arrange them together.
Just remember that simple decorations often work best. The colorful leaves and cute face already make this little bear a standout seasonal craft.
🏡 Where to Display Your Autumn Leaf Bear
Once your bear is complete, find the perfect spot to show it off!
Here are some lovely display ideas.
1. On a Covered Front Porch
Place the bear near your front door alongside pumpkins, potted chrysanthemums, and a fall wreath.
The orange scarf and colorful leaves will complement traditional autumn decorations beautifully.
2. Beside Your Entryway
Position the bear near a sheltered entrance to create a cheerful seasonal welcome for family and guests.
Make sure it doesn’t obstruct the doorway or create a tripping hazard.
3. In an Autumn Garden Display
Arrange your bear among decorative pumpkins, planters, and other seasonal ornaments.
Choose a sheltered area where it won’t be exposed to strong wind or rain.
4. As Part of a Fall Table Display
If you make a smaller version, it can become a charming centerpiece for a covered outdoor table or a seasonal craft display.
Keep it away from candles, heaters, and other sources of heat because plastic bags can melt or catch fire.
5. At a Seasonal Craft Fair
If you’re preparing a fall-themed display, a collection of leaf bears in different sizes can make a fun visual feature.
You can vary the scarf colors, facial expressions, and decorations to give each bear its own personality.
🌦️ How to Protect Your DIY Autumn Bear
Because this craft uses plastic bags, real leaves, felt, and adhesive, it is best suited to a sheltered outdoor area or an indoor display.
Although the plastic bags are transparent, they do not make the entire decoration completely weatherproof.
Rain can enter through openings or damage the felt, while wind may shift the leaves and loosen the decorations. Sunlight can also weaken some plastic materials over time.
To help your bear last longer:
- Display it under a covered porch or awning.
- Bring it indoors during rain, strong winds, or severe weather.
- Keep the leaves dry before filling the bags.
- Check the knots and attachment points regularly.
- Avoid placing the bear near flames, hot lights, or heaters.
- Store it in a dry place when the autumn season ends.
If you want to reuse the bear next year, inspect the plastic and decorations before storing it. Repair any loose parts and make sure there is no moisture trapped inside.
♻️ Can You Make This Craft More Eco-Friendly?
Absolutely! Although the project reuses fallen leaves, it also uses plastic bags and synthetic decorative materials. A few thoughtful choices can reduce waste.
Here are some ideas:
- Reuse clean plastic bags that you already have rather than buying new ones specifically for the craft.
- Use leftover fabric to make the scarf.
- Cut the muzzle and nose from felt scraps.
- Reuse googly eyes and other decorations from previous projects where possible.
- Choose durable materials that can be reused for several autumn seasons.
- At the end of the craft’s life, separate materials where practical and follow local waste and recycling guidance.
You could also experiment with reusable fabric bags or other materials, although you may need a different method to keep the bear’s shape.
The goal is to enjoy a creative project while making thoughtful use of the materials available to you.
👨👩👧 A Fun Autumn Craft for Families
This leaf bear can be a wonderful family activity, especially when the weather is cool and the trees are full of color.
Children can help collect leaves, sort them by color, choose the scarf, and decide what kind of expression the bear should have.
Adults can handle cutting, tying, and attaching the smaller pieces.
For younger children, consider replacing the googly eyes with larger felt features and supervising the use of scissors and adhesives.
You can make the activity even more enjoyable by turning it into a little autumn challenge: everyone can create a different bear and give it a name!
One bear might wear a red scarf, another might have oversized ears, and another could feature a cheerful yellow bow.
It’s a simple way to encourage creativity while making memories together. 🍂❤️
❓ Frequently Asked Questions
Can I use artificial leaves instead of real leaves?
Yes! Artificial leaves can be a great alternative. They often retain their color and shape longer than real leaves and can be reused for future crafts.
You may need to adjust the amount of filling to achieve the desired shape.
How many leaves will I need?
The amount depends on the size of your bags and how tightly you fill them. Start with a generous pile of leaves and add more as needed until the body, head, ears, and feet look full.
Can I make the bear without googly eyes?
Of course! Cut eyes from felt or use other suitable craft materials. Felt features can create a softer appearance and may be more appropriate for decorations used around young children.
What if the head keeps falling forward?
Check that the head isn’t too heavy and that the connection to the body is secure. Redistribute the leaves inside the head and reinforce the attachment with twine or a suitable fastening method.
Can I leave the bear outside all autumn?
It can be displayed outdoors in a sheltered location, but it shouldn’t be considered completely weatherproof. Protect it from rain, strong wind, and prolonged exposure to harsh sunlight.
Can I save it for next year?
Yes, provided the materials remain in good condition. Keep the bear dry, inspect it for damage, and store it in a cool, dry place away from heat and direct sunlight.
🍂 Final Thoughts: A Little Bear With a Lot of Autumn Charm!
Who knew a handful of fallen leaves and a few simple craft supplies could become such an adorable seasonal decoration?
This DIY autumn bear is a lovely reminder that decorating for fall doesn’t have to be expensive or complicated. With a little imagination, everyday materials can be transformed into something cheerful, colorful, and full of personality.
From its rounded leaf-filled body to its tiny ears, sweet felt face, and cozy orange scarf, every detail adds to its charm.
Place it beside your pumpkins, display it on a sheltered porch, or make several bears to create a playful autumn scene. You can even change the scarf and accessories each year to give your creation a fresh new look.
The beauty of handmade crafts is that they don’t have to be perfect. Every little detail makes your bear unique, and that’s part of what makes it special.
So gather those colorful fallen leaves, grab your twine and scissors, and let your creativity take over! 🧸🍁
❤️ Let’s Talk Fall Crafts!
Would you make this adorable autumn leaf bear for your home?
🍂 Would you use real fallen leaves or artificial ones?
🧣 Would you choose an orange scarf, a plaid scarf, or another color?
🎃 Would you display your bear beside pumpkins on the porch or keep it indoors?
Share your thoughts in the comments—and if you make one, what would you name your little autumn bear? 🧸👇
