🍞☁️
Soft, Fluffy, Buttery Bread That’s Perfect for Any Day!
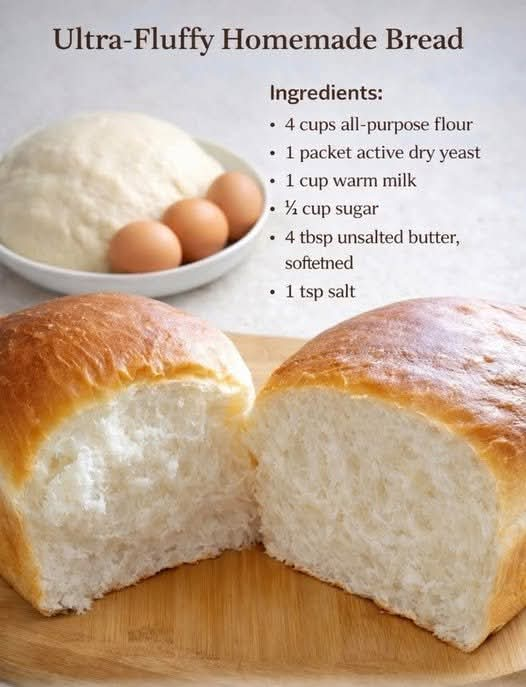
There’s nothing quite like the smell of freshly baked bread filling your kitchen. This ultra-fluffy homemade bread is soft, tender, slightly sweet, and wonderfully buttery. Made with simple pantry ingredients, it’s perfect for breakfast, sandwiches, afternoon snacks, or serving alongside your favorite meals.
The secret to achieving that soft, pillowy texture is allowing the dough enough time to rise, kneading it until smooth and elastic, and avoiding too much extra flour.
Whether you’re a beginner baker or an experienced home cook, this easy homemade bread recipe is a wonderful addition to your baking collection!
📝 Ingredients
Preparation Time: 20 minutes
Rising Time: 1 hour 30 minutes to 2 hours
Baking Time: 25–30 minutes
Total Time: Approximately 2 hours 30 minutes
Servings: 10–12 slices
Yield: 1 standard loaf
Difficulty: Easy
Ingredients
- 4 cups (480 g) all-purpose flour, plus a little extra if needed
- 1 packet (7 g or 2¼ teaspoons) active dry yeast
- 1 cup (240 ml) warm milk, approximately 100–110°F (38–43°C)
- ½ cup (100 g) granulated sugar
- 4 tablespoons (56 g) unsalted butter, softened
- 1 teaspoon salt
Optional for the top:
- 1 tablespoon melted butter for brushing after baking
Important note: This recipe makes a noticeably sweet, enriched bread because it contains ½ cup of sugar. If you prefer a less-sweet loaf for everyday sandwiches, you can reduce the sugar to ¼ cup without changing the basic method.
👩🍳 Instructions
Step 1: Activate the Yeast
Pour the warm milk into a small bowl. The milk should feel comfortably warm, not hot.
Add the active dry yeast and about 1 teaspoon of the measured sugar. Stir gently and let the mixture stand for 5–10 minutes.
The mixture should become foamy or bubbly, indicating that the yeast is active.
Tip: If nothing happens after 10–15 minutes, your yeast may be inactive, or the milk may have been too hot or too cold. Check your yeast before continuing.
Step 2: Mix the Dough
In a large mixing bowl, combine the flour, remaining sugar, and salt.
Add the activated yeast mixture and softened butter. Mix with a wooden spoon or sturdy spatula until the ingredients form a rough dough.
The dough may look slightly sticky at first. That’s normal!
If the dough seems very wet and cannot hold together, add a little flour, one tablespoon at a time. Avoid adding too much, because excess flour can make the finished bread dense.
Step 3: Knead Until Smooth
Transfer the dough to a lightly floured work surface.
Knead for approximately 8–12 minutes by hand, pushing the dough away from you, folding it over, and turning it as you work.
Continue until the dough becomes smooth, elastic, and soft.
If you’re using a stand mixer, knead with the dough hook on low to medium-low speed for approximately 6–8 minutes, checking the dough’s texture as you go.
How do you know it’s ready?
The dough should feel soft and stretchy rather than stiff or crumbly. It may remain slightly tacky, but it shouldn’t cling excessively to your hands.
Step 4: Let the Dough Rise
Lightly grease a large bowl with butter or a little neutral oil.
Place the dough inside and turn it once so the surface is lightly coated. Cover the bowl with a clean kitchen towel, plastic wrap, or a reusable bowl cover.
Leave it in a warm, draft-free place for approximately 60–90 minutes, or until it has roughly doubled in size.
The exact time depends on your kitchen temperature and the activity of your yeast.
Baking tip: Don’t rush this step. A properly risen dough helps create a lighter, softer loaf.
Step 5: Shape the Loaf
Once the dough has doubled in size, gently press it to release some of the accumulated gas.
Transfer it to a lightly floured surface and shape it into a rectangle.
Roll the dough into a log, pinch the seam closed, and tuck the ends underneath.
Place the shaped dough seam-side down into a greased 9 × 5-inch loaf pan.
If you prefer individual portions, you can divide the dough into 10–12 equal pieces and shape them into soft dinner rolls instead.
Step 6: Allow the Second Rise
Cover the loaf pan loosely and let the dough rise again for approximately 30–45 minutes.
The dough should become visibly puffy and rise to about 1 inch above the rim of the loaf pan, depending on the pan and how the dough has been shaped.
Avoid letting it rise so much that it collapses or becomes fragile.
While the dough finishes rising, preheat your oven to 350°F (175°C).
Step 7: Bake Until Golden
Place the loaf on the middle rack of the preheated oven.
Bake for approximately 25–30 minutes, or until the top is golden brown and the bread is cooked through.
If the top browns too quickly, loosely cover it with aluminum foil for the remaining baking time.
For a more reliable doneness check, the center of the loaf should reach approximately 190°F (88°C) when measured with an instant-read thermometer.
The kitchen will begin to smell wonderfully buttery as the bread bakes!
Step 8: Brush With Butter
Remove the loaf from the oven and let it rest in the pan for about 5 minutes.
Carefully transfer it to a wire rack.
For a soft, tender crust, brush the top lightly with melted butter while the bread is still warm.
Allow the loaf to cool for at least 30–45 minutes before slicing. Cutting it while it’s extremely hot can compress the soft interior and make the slices appear gummy.
Once cooled, slice and enjoy!
✨ Tips for Extra-Fluffy Homemade Bread
Want to make your bread as soft and fluffy as possible? Keep these tips in mind.
1. Use warm, not hot, milk.
Milk that’s too hot can damage the yeast. Aim for approximately 100–110°F (38–43°C).
2. Measure your flour carefully.
Too much flour is one of the most common reasons homemade bread turns out dry or dense. Weighing the flour is the most reliable method.
3. Knead the dough properly.
Kneading develops gluten, which helps the dough trap gas and gives the bread its soft, stretchy structure.
4. Give the dough enough time to rise.
Follow the dough’s appearance rather than relying entirely on the clock. It should become noticeably larger and puffier.
5. Don’t add too much extra flour.
A slightly tacky dough often produces a softer loaf than a stiff, dry one.
6. Brush the crust with butter.
A light coating of melted butter adds flavor and helps keep the crust tender.
7. Let the loaf cool before slicing.
Cooling allows the interior structure to finish setting, making it easier to cut clean slices.
🍯 Delicious Ways to Enjoy This Bread
This sweet, buttery homemade loaf is versatile enough for breakfast, snacks, and desserts.
Here are a few delicious serving ideas:
- With butter and honey: Spread a little butter over a warm slice and drizzle with honey.
- As French toast: Dip thick slices into an egg-and-milk mixture and cook until golden.
- With homemade jam: Pair it with strawberry, raspberry, or apricot preserves.
- For sweet sandwiches: Fill with peanut butter and banana slices.
- As cinnamon toast: Brush with butter and sprinkle with cinnamon sugar before lightly toasting.
- Alongside tea or coffee: Enjoy a slice as a simple afternoon treat.
- For bread pudding: Use leftover slices to make a comforting homemade dessert.
Because this loaf contains a generous amount of sugar, it also works especially well for sweet breakfast preparations.
🥖 How to Store Homemade Bread
Proper storage helps keep your homemade bread soft and delicious.
At room temperature: Once completely cool, store the loaf in an airtight bag or bread container for approximately 2–3 days.
In the refrigerator: Refrigeration can make bread go stale more quickly, so room-temperature storage is generally preferable if you plan to eat it within a few days.
In the freezer: Slice the cooled loaf and place the slices in a freezer-safe bag. Remove as much excess air as possible and freeze for up to 3 months for best quality.
You can thaw individual slices at room temperature or warm them directly in a toaster.
Important: Never seal the bread while it’s still hot. Trapped steam can create excess moisture and encourage mold growth.
❓ Frequently Asked Questions
Why Didn’t My Bread Rise?
Several factors can prevent bread from rising properly, including inactive yeast, milk that was too hot, a cold kitchen, or insufficient rising time.
Always check that your yeast is active and allow the dough to rise until it has visibly expanded.
Why Is My Homemade Bread Dense?
Dense bread can result from adding too much flour, insufficient kneading, inactive yeast, or cutting the loaf before it has cooled.
For the best texture, keep the dough soft, knead it thoroughly, and allow both rises to finish properly.
Can I Make This Bread Without a Stand Mixer?
Absolutely! You can prepare the entire recipe by hand.
Mix the ingredients in a large bowl, then knead the dough on a lightly floured surface for approximately 8–12 minutes.
Can I Use Instant Yeast Instead of Active Dry Yeast?
Yes. You can replace the active dry yeast with 2¼ teaspoons of instant yeast.
Instant yeast can be mixed directly with the flour. Add the warm milk and other ingredients, then knead as directed. The rising time may vary depending on the yeast and room temperature.
Can I Reduce the Sugar?
Yes. Reducing the sugar to ¼ cup will give you a less-sweet loaf while maintaining the recipe’s general method.
The bread may taste less like a sweet breakfast loaf and more like a lightly enriched everyday bread.
Can I Make Dinner Rolls With This Dough?
Yes! Divide the prepared dough into 10–12 equal pieces and shape them into balls.
Arrange them in a greased baking dish, leaving a little space between them. Allow them to rise until puffy, then bake at 350°F (175°C) for approximately 18–23 minutes, checking that they’re golden and cooked through.
Brush with melted butter after baking for a soft finish.
Can I Prepare the Dough Ahead of Time?
Yes. After kneading, place the dough in a covered, lightly greased bowl and refrigerate it overnight.
The dough will rise more slowly in the refrigerator. The next day, let it warm slightly if necessary, shape it, and allow it to complete its second rise before baking.
Because the dough contains milk and butter, keep it refrigerated during the overnight rest.
❤️ Final Thoughts
Making homemade bread doesn’t have to be complicated. With a handful of simple ingredients, a little kneading, and enough time for the dough to rise, you can create a beautiful loaf that’s soft, fluffy, and full of homemade flavor.
The best part? You can enjoy it fresh from your own oven, customize it to suit your taste, and fill your kitchen with that irresistible smell of freshly baked bread.
Serve it with butter and jam for breakfast, turn it into French toast, or enjoy a slice whenever you’re craving something comforting.
Once you try homemade bread this soft, you might find yourself wanting to bake it again and again! 🍞❤️
🍞 Let’s Talk Bread!
Do you prefer homemade bread that’s soft and slightly sweet or a more traditional loaf with a neutral flavor?
Tell us in the comments, and share your favorite homemade bread-baking tip!
