Homemade Sauerkraut: A Traditional Way to Preserve Cabbage for Winter 🥬❤️
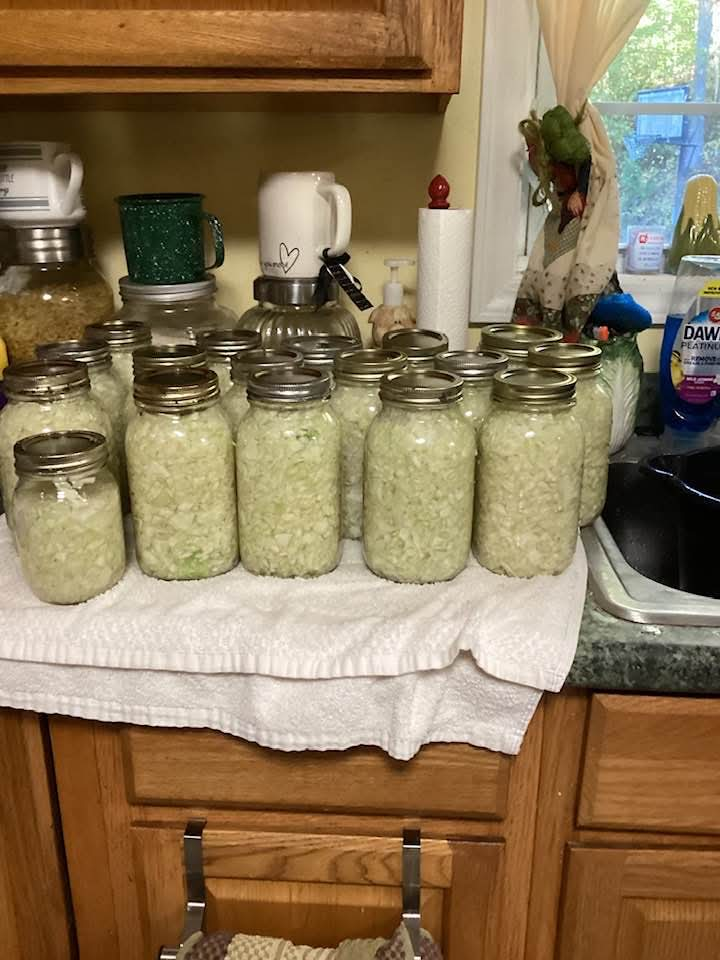
Sixteen quarts and one pint of homemade sauerkraut from just three heads of cabbage! That’s a wonderful way to prepare for the colder months, stock the pantry, and enjoy a traditional fermented food throughout winter. There’s something special about turning fresh cabbage into jars of tangy, crunchy sauerkraut that can be shared around the family table.
Making sauerkraut at home requires only a few simple ingredients, some patience, and proper fermentation techniques. Whether you’re an experienced homesteader or trying fermentation for the first time, this traditional recipe is a great place to start.
One important note: the amount of sauerkraut you get depends on the size and density of the cabbage heads. Three exceptionally large heads might yield a substantial batch, but 16 quarts and 1 pint is an unusually large yield for three average-sized cabbages. The recipe below is designed to help you make a batch of any size by measuring the cabbage and salt.
Let’s get started!
Why Make Homemade Sauerkraut?
Homemade sauerkraut is a favorite among gardeners, homesteaders, and people who enjoy traditional food preservation.
Here are a few reasons to make your own:
- Simple ingredients: Traditional sauerkraut requires only cabbage and salt.
- Budget-friendly: Cabbage is often an inexpensive vegetable, especially when purchased in season.
- Long-lasting when properly preserved: Correctly fermented sauerkraut can be stored for extended periods under appropriate conditions.
- Versatile: Enjoy it with sausages, roasted meats, potatoes, sandwiches, or hearty winter meals.
- A traditional preservation method: Fermentation transforms fresh cabbage into a tangy food without requiring vinegar.
Best of all, you can adjust the batch size to match the amount of cabbage you harvest or purchase.
Homemade Sauerkraut Recipe
Preparation time: 30–60 minutes, depending on the quantity
Fermentation time: Approximately 1–4 weeks, sometimes longer
Total time: Several weeks
Yield: Varies according to the weight of the cabbage
Ingredients
- Fresh green cabbage
- Non-iodized salt suitable for fermentation
- Clean water, only if needed to make additional brine
The most important ingredient ratio: Use approximately 2% salt by weight of the prepared cabbage.
For every 1 kilogram (2.2 pounds) of shredded cabbage, use 20 grams of salt.
For example:
| Shredded cabbage | Salt |
|---|---|
| 1 kg (2.2 lb) | 20 g |
| 2 kg (4.4 lb) | 40 g |
| 5 kg (11 lb) | 100 g |
| 10 kg (22 lb) | 200 g |
Weighing the cabbage and salt is more reliable than measuring salt by volume because different types of salt have different densities.
Equipment
- A large food-safe bowl
- A sharp knife or cabbage shredder
- A kitchen scale
- A food-grade fermentation crock or suitable fermentation vessel
- Fermentation weights or another suitable food-safe method to keep the cabbage submerged
- A fermentation lid or airlock, if available
- Clean utensils
- Clean glass jars for storage
For large batches, a fermentation crock or several smaller fermentation vessels can be easier to manage than a single enormous container.
Step 1: Prepare the Cabbage
Remove the outer leaves from the cabbage heads. Discard any leaves that are dirty, damaged, or showing signs of spoilage.
Rinse the cabbage under clean running water and allow excess water to drain.
Cut each head into quarters and remove the hard central core.
Slice the cabbage into thin strips. You can shred it finely for a softer texture or cut it into slightly thicker strips if you prefer sauerkraut with more crunch.
Place the shredded cabbage in a large bowl and weigh it.
Calculate the amount of salt needed using the 2% ratio.
Example: If you have 3 kilograms of shredded cabbage, you’ll need 60 grams of salt.
Step 2: Add the Salt
Sprinkle the measured salt over the shredded cabbage.
Using clean hands, massage and squeeze the cabbage for several minutes.
At first, the cabbage will look dry and bulky. As you continue massaging it, the salt will draw moisture from the leaves.
Continue until the cabbage begins to soften and a noticeable amount of liquid collects at the bottom of the bowl.
Depending on the cabbage’s freshness and moisture content, this may take 5–15 minutes or a little longer.
Allowing the salted cabbage to rest for another 20–30 minutes can help release additional liquid.
Step 3: Pack the Cabbage Into the Fermentation Vessel
Transfer the cabbage into a clean, food-grade fermentation crock or suitable fermentation vessel.
Add it in small batches, pressing firmly after each addition to remove air pockets and encourage the brine to rise.
Pour any liquid remaining in the bowl into the vessel.
Continue packing until the cabbage is firmly compressed.
Leave enough space at the top for the brine and cabbage to expand slightly during fermentation. Follow the vessel manufacturer’s recommended headspace.
What if there isn’t enough liquid?
The cabbage should be covered by brine before fermentation begins.
If the cabbage doesn’t release enough liquid, prepare additional brine using the same approximate 2% salt concentration by weight: 20 grams of salt per liter of water.
Use clean, suitable drinking water and dissolve the salt completely before adding only enough brine to cover the cabbage.
Avoid adding large quantities of plain water, which can dilute the salt concentration and interfere with proper fermentation.
Step 4: Keep the Cabbage Submerged
This is one of the most important steps in making sauerkraut.
Use fermentation weights or another suitable food-safe arrangement to keep all the cabbage beneath the brine.
Cabbage exposed to air is more likely to develop surface yeast or mold.
If your fermentation vessel has an airlock, use it according to the manufacturer’s instructions. Otherwise, choose a suitable fermentation cover that allows gas to escape safely.
Never tightly seal an ordinary glass jar without a pressure-management system during active fermentation. Carbon dioxide builds up as fermentation progresses and can create dangerous pressure.
Place the vessel on a tray to catch any liquid that may overflow.
Step 5: Let the Sauerkraut Ferment
Place the vessel in a clean location away from direct sunlight.
A temperature of approximately 65–72°F (18–22°C) is a useful target for home fermentation.
At warmer temperatures, fermentation may proceed faster. Cooler temperatures slow the process.
During fermentation, beneficial lactic acid bacteria convert sugars naturally present in the cabbage into lactic acid. This gradually creates the characteristic sour flavor of sauerkraut.
Depending on the temperature and your preferred taste, fermentation may take approximately 1–4 weeks or longer.
You may notice:
- Small bubbles forming in the brine
- A tangy, sour smell
- Changes in the cabbage’s color and texture
- A gradually developing sour flavor
These can be normal signs of fermentation, but they do not independently prove that the sauerkraut is safe.
Keep the cabbage submerged and inspect the surface regularly. Do not taste sauerkraut that shows signs of spoilage.
How do you know when it’s ready?
The sauerkraut should have a pleasantly sour aroma and flavor, with the texture and acidity you prefer.
For a more reliable assessment, follow a tested fermentation recipe and use an appropriate method to confirm that the fermentation has reached its required acidity. For traditional fermented vegetables, a final pH of 4.6 or below is an important safety threshold, although reaching that number alone does not guarantee that every other aspect of the process was safe.
If you see fuzzy mold, unusual colored growth, or notice a putrid or otherwise distinctly unpleasant odor, do not taste the batch. Discard it if spoilage is suspected.
Step 6: Transfer the Finished Sauerkraut to Jars
Once fermentation is complete, you can transfer the sauerkraut into clean glass jars for refrigerated storage.
Pack the cabbage firmly and add enough brine to keep it submerged. Leave appropriate headspace.
Close the jars with suitable lids and place them in the refrigerator.
Refrigeration slows fermentation and helps maintain the flavor and texture.
Important: Filling jars with fermented sauerkraut and closing the lids does not make them shelf-stable at room temperature. If you want to store sauerkraut in a pantry without refrigeration, use a tested home-canning process specifically intended for sauerkraut, following the recommended processing method for your jar size and altitude.
Do not improvise a water-bath or pressure-canning process.
How to Make a Large Batch of Sauerkraut
If your goal is to fill 16 quart jars and one pint jar, start by weighing all your prepared cabbage.
Sixteen US quarts plus one US pint equal approximately 15.6 liters of capacity.
The actual quantity of cabbage needed depends on how finely it is shredded, how firmly it is packed, and how much brine is present.
For a batch this large, it’s often easier to work in manageable portions.
For example:
- Shred and weigh the first batch of cabbage.
- Calculate the correct salt quantity.
- Massage the cabbage until it releases liquid.
- Pack it into the fermentation vessel.
- Repeat with the remaining cabbage, maintaining the same salt-to-cabbage ratio.
- Keep every portion submerged beneath brine throughout fermentation.
If you have several fermentation vessels, you can divide the cabbage among them. Just make sure you measure the cabbage and salt accurately for each batch.
And remember, the number of cabbage heads isn’t the best way to calculate the yield. Large heads can weigh several times as much as small ones, so weighing the shredded cabbage gives you a much more dependable result.
How to Enjoy Sauerkraut During Winter
Once your sauerkraut is ready, there are plenty of delicious ways to serve it.
1. With Sausages
Serve sauerkraut alongside cooked sausages, mustard, and roasted potatoes for a simple, hearty meal.
2. With Pork
Its tangy flavor pairs beautifully with roasted pork, pork chops, or slow-cooked pork shoulder.
3. In Soups and Stews
Add sauerkraut to traditional cabbage soups, hearty vegetable stews, or Eastern European-inspired dishes.
4. With Potatoes
Serve it alongside boiled or roasted potatoes, or combine it with sautéed onions for a comforting side dish.
5. In Sandwiches
Add a small serving to sandwiches, burgers, or other dishes that benefit from a crisp, tangy contrast.
6. Straight From the Refrigerator
Some people enjoy a small portion of properly fermented sauerkraut as a cold side dish with lunch or dinner.
If you want to retain more of the live microorganisms present in unpasteurized sauerkraut, avoid cooking it and keep it refrigerated. The number and types of live microorganisms can vary from batch to batch.
Tips for Better Homemade Sauerkraut
Use fresh cabbage. Fresh, firm cabbage generally releases liquid more readily and produces a better texture.
Measure the salt by weight. A consistent salt concentration helps support the desired fermentation process.
Keep the cabbage submerged. Exposure to air increases the risk of surface spoilage.
Maintain a suitable temperature. Fermenting in a cool, stable environment helps you manage the process.
Use food-safe equipment. Avoid containers or weights that can react with acidic brine or introduce unwanted substances.
Don’t rush the fermentation. Give the cabbage enough time to develop its characteristic sour flavor.
Store it appropriately. Refrigerate finished sauerkraut unless you have processed it using a tested canning procedure.
Keep everything clean. Wash your hands, utensils, and equipment before preparing the cabbage.
Frequently Asked Questions
Can I make sauerkraut with only cabbage and salt?
Yes! Traditional sauerkraut needs only cabbage and salt. The cabbage supplies both the moisture and the natural sugars that support fermentation.
Do I need to add vinegar?
No. Traditional sauerkraut develops its acidity through fermentation rather than the addition of vinegar.
Can I use ordinary table salt?
Salt without unnecessary additives is often preferred because it makes the process easier to measure consistently. However, the important consideration is using an appropriate salt and accurately weighing it according to a reliable fermentation recipe.
How long does homemade sauerkraut last?
It depends on the fermentation method, acidity, handling, and storage conditions. Properly fermented sauerkraut kept refrigerated can last for months, although quality gradually changes. Always inspect it before use, and discard it if spoilage is suspected.
Can I ferment sauerkraut in ordinary mason jars?
Yes, provided you use jars suitable for fermentation, leave adequate headspace, manage gas safely, and keep the cabbage submerged. Fermentation lids and weights can make the process easier.
Why is my sauerkraut not producing much brine?
The cabbage may be less fresh, the strips may be too thick, or it may need more time and massaging to release moisture. You can allow it to rest after salting or add properly measured 2% brine if necessary.
Can I store fermented sauerkraut in the pantry?
Not simply by placing it in sealed jars. For pantry storage, use a tested canning recipe and the appropriate processing method. Otherwise, keep the fermented sauerkraut refrigerated.
A Little Winter Preparation Goes a Long Way ❤️
Making homemade sauerkraut is about more than preserving cabbage. It’s about using seasonal produce wisely, preparing food ahead of time, and keeping traditional kitchen skills alive.
Whether you grow your own cabbage or buy it in bulk, a successful batch can provide a delicious accompaniment to winter meals for weeks or months.
And if you’ve managed to make 16 quarts and 1 pint from your cabbage harvest, that’s a wonderful supply to have on hand!
There’s something deeply satisfying about looking at a shelf full of homemade food and knowing that you prepared it yourself.
Now it’s your turn!
🥬 Have you ever made homemade sauerkraut?
❤️ Do you prefer it freshly fermented, or do you like cooking it with pork, sausages, or potatoes?
🌱 And if you grow your own cabbage, how many heads do you usually harvest in a season?
Share your favorite sauerkraut-making tips in the comments. Let’s keep traditional food-preservation skills alive, one batch at a time!
