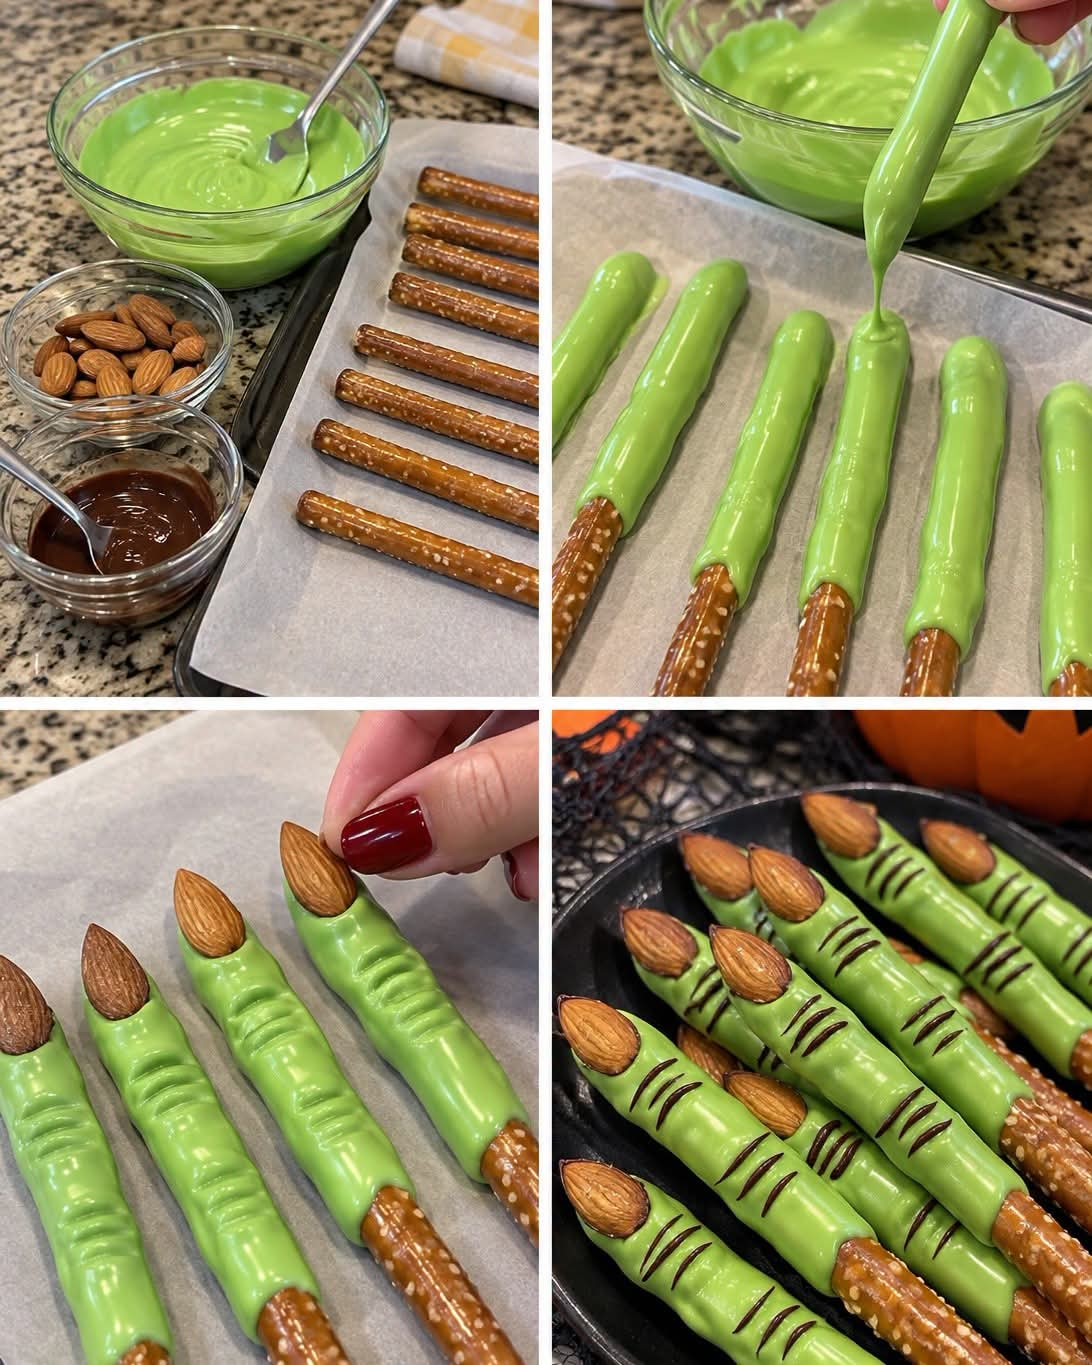
🎃 Witch Finger Pretzels 👻💚
Spooky Halloween Pretzel Fingers with Green Candy Coating
These creepy-cute Witch Finger Pretzels are the perfect Halloween treat! 💚🧙♀️ With crunchy, salty pretzel rods, a sweet green candy coating, almond fingernails, and spooky chocolate lines, they look just like a witch’s fingers.
They’re fun to make with kids, easy to customize, and perfect for Halloween parties, dessert tables, school celebrations, or a spooky movie night. Best of all, you don’t need to bake anything!
If you’re looking for a Halloween snack that’s both delicious and a little creepy, these chocolate-covered witch fingers are sure to be a hit. 👻🍫
🥨 Recipe Details
- Preparation time: 25 minutes
- Setting time: 20–30 minutes
- Total time: Approximately 55 minutes
- Servings: 12–16 witch fingers, depending on the pretzel size
- Difficulty: Easy
- Cooking required: No baking needed
🛒 Ingredients
Here’s everything you’ll need to make your own spooky witch fingers.
For the pretzel fingers
- 12–16 pretzel rods
- 12–16 whole almonds, one for each fingernail
- 300 g (about 10.5 oz) green candy melts
- 1–2 teaspoons vegetable shortening or coconut oil, if needed to thin the candy coating
For the spooky details
- 30–50 g (1–2 oz) dark chocolate
- 1/2 teaspoon coconut oil or vegetable shortening, optional
Optional additions:
- Green food coloring, if needed
- Edible black food coloring for extra-dark details
- Halloween sprinkles
- Crushed chocolate cookies for a spooky serving decoration
Tip: Green candy melts are the easiest option because they melt smoothly and are designed to set firmly. If you use white chocolate instead, choose oil-based food coloring rather than ordinary water-based coloring to avoid making the chocolate seize.
👩🍳 Instructions: How to Make Witch Finger Pretzels
Step 1: Prepare Your Workstation
Line a baking sheet with parchment paper or wax paper.
Arrange your pretzel rods on the prepared tray so they’re ready for dipping.
Place the whole almonds in a small bowl, and keep the dark chocolate nearby for decorating later.
Helpful tip: Make sure your pretzels are completely dry. Even a little moisture can interfere with the candy coating.
Step 2: Melt the Green Candy Coating 💚
Place the green candy melts in a microwave-safe bowl.
Microwave in 20–30-second intervals, stirring thoroughly after each interval until the candy melts are completely smooth.
If the coating seems too thick, add a small amount of vegetable shortening or coconut oil and stir until it reaches a smooth, dip-friendly consistency.
The coating should be thick enough to cling to the pretzels but fluid enough to create a smooth finish.
Important: Avoid overheating the candy melts, as they can become thick and difficult to work with.
Step 3: Dip the Pretzel Rods
Hold one pretzel rod at one end and dip it into the melted green candy coating.
Use a spoon to spread the coating around the pretzel, covering most of its length while leaving a small section uncovered at the bottom to resemble the end of a finger.
Allow any excess coating to drip back into the bowl.
Place the coated pretzel on the parchment-lined baking sheet.
Repeat with the remaining pretzels.
Pro tip: For a more realistic witch-finger shape, don’t worry about making every pretzel perfectly smooth. Slightly uneven coating can give the fingers a wonderfully creepy appearance!
Step 4: Add the Almond Fingernails 🌰
While the green coating is still wet, gently press one whole almond onto the tip of each pretzel.
Position the pointed end of the almond toward the end of the pretzel to create a long, pointed fingernail.
Press gently so the almond sticks without pushing it too deeply into the coating.
If the coating begins to harden before you add the almonds, warm a small amount of leftover green coating and use it as edible glue.
These almond fingernails are what make the pretzels instantly recognizable as spooky witch fingers!
Step 5: Create the Finger Wrinkles
Let the green coating sit for a few minutes until it begins to thicken but hasn’t completely hardened.
Using a toothpick or the tip of a small, clean knife, gently draw several short horizontal lines across the coating to imitate the wrinkles around finger joints.
Create two or three groups of lines along each pretzel.
You can vary the spacing and depth to make each finger look a little different.
If the coating sets too quickly, allow it to harden completely and use the chocolate decoration in the next step to create the wrinkle effect instead.
Step 6: Add Spooky Chocolate Details 🍫
Place the dark chocolate in a microwave-safe bowl.
Microwave in short intervals, stirring between each one until the chocolate melts smoothly. Add a little coconut oil if necessary to make it easier to drizzle.
Transfer the melted chocolate to a small piping bag or a plastic sandwich bag with a tiny corner snipped off.
Carefully pipe thin, short lines across the green coating to create the appearance of knuckles and finger creases.
You can also add small dark marks around the almond nails for an extra spooky effect.
For a look similar to the photo, make several short, slightly curved chocolate lines across each finger.
Don’t worry about making the lines identical. The variety makes the finished treats look more realistic!
Step 7: Let the Witch Fingers Set
Leave the pretzels at room temperature until the green coating and chocolate decorations are completely firm.
This usually takes about 20–30 minutes, depending on the coating and the temperature of your kitchen.
If your kitchen is particularly warm, place the tray in the refrigerator for 10–15 minutes to help the coating set.
Once firm, carefully remove the witch fingers from the parchment paper.
Arrange them on a dark serving platter, and your spooky Halloween treats are ready! 🎃
🎃 Tips for Perfect Witch Finger Pretzels
1. Choose the right pretzels.
Pretzel rods are ideal because their long shape makes convincing witch fingers. Choose rods that are relatively straight and intact.
2. Make the coating smooth.
Melt the candy coating slowly and stir frequently. If it’s too thick, add a little shortening rather than a large amount of oil.
3. Attach the almonds while the coating is wet.
This helps the fingernails stay in place as the coating hardens.
4. Create realistic wrinkles.
Use a toothpick to make shallow creases in the coating before it sets. Dark chocolate lines can then emphasize the knuckles.
5. Work in small batches.
If the coating begins to harden in the bowl, gently rewarm it according to the package instructions.
6. Keep the pretzel ends uncovered.
Leaving a small section of the pretzel visible makes the finished fingers look more convincing and gives everyone a convenient place to hold them.
7. Make them extra spooky.
For a Halloween party, scatter a few candy eyeballs or Halloween sprinkles around the platter. You could even arrange the fingers as though they’re reaching out of a witch’s cauldron!
🍫 Fun Variations to Try
1. Bloody Witch Fingers
Drizzle a little red candy coating around the almond nails to create a spooky, blood-inspired effect.
2. Purple Monster Fingers
Swap the green candy melts for purple ones to create colorful monster fingers.
3. Black Magic Fingers
Use black candy melts for a darker Halloween look, with orange or purple chocolate details.
4. White Ghost Fingers
Dip the pretzels in white candy coating and use dark chocolate to create spooky finger creases.
5. Extra Chocolatey Fingers
Before adding the green coating, dip the pretzels in melted chocolate and allow them to set. Then add the green coating for a layered chocolate treat.
🎁 How to Store Witch Finger Pretzels
Store your finished witch fingers in an airtight container at room temperature in a cool, dry place.
They generally keep well for about 5–7 days, provided the pretzels remain crisp and the coating is stored away from heat and moisture.
If your kitchen is warm, refrigerate them in a sealed container. Allow them to come closer to room temperature before serving to help minimize condensation on the coating.
Avoid storing them in a humid environment, as moisture can make the pretzels lose their crunch.
Allergy note: These treats contain gluten and almonds, and the candy coating or chocolate may contain milk or soy. Check the ingredient labels carefully, especially when serving children or guests with food allergies. Whole almonds can also pose a choking hazard for young children.
🎃 Frequently Asked Questions
Can I make witch finger pretzels ahead of time?
Absolutely! You can prepare them one or two days before your Halloween party. Store them in an airtight container in a cool, dry place to maintain their crunch.
Can I use white chocolate instead of candy melts?
Yes. Melted white chocolate works, although it may be thicker and more sensitive to overheating. Use a suitable oil-based green food coloring, or purchase ready-colored green confectionery coating for easier results.
What can I use instead of almonds?
You can use almond-shaped candies or other nut-free decorations that resemble fingernails. If you’re serving guests with nut allergies, check all ingredients for cross-contact warnings and choose a clearly labeled nut-free alternative.
Why is my candy coating too thick?
It may have overheated or simply need thinning. Try adding a small amount of vegetable shortening and stirring well. Avoid adding water, which can cause the coating to seize.
How do I stop the almonds from falling off?
Attach each almond while the green coating is still wet. If the coating has already hardened, use a small dab of melted candy coating to secure the almond in place.
Can I freeze witch finger pretzels?
Freezing isn’t recommended because condensation during thawing can soften the pretzels and affect the appearance of the coating. They’re best prepared a few days before serving.
👻 Final Thoughts
These Witch Finger Pretzels prove that Halloween treats don’t have to be complicated to be impressive!
With crunchy pretzel rods, a smooth green candy coating, pointed almond fingernails, and dark chocolate wrinkles, these creepy little snacks are as fun to make as they are to eat.
They’re perfect for Halloween parties, autumn gatherings, school celebrations, or a spooky night at home with family and friends.
Best of all, you can personalize every finger with different wrinkles, colors, and decorations to make your own collection of creepy creations.
So grab your pretzels, melt that green candy coating, and get ready to make a batch of spooky snacks that everyone will be talking about!
Would you dare to take a bite of one of these creepy witch fingers? 💚🧙♀️🎃
