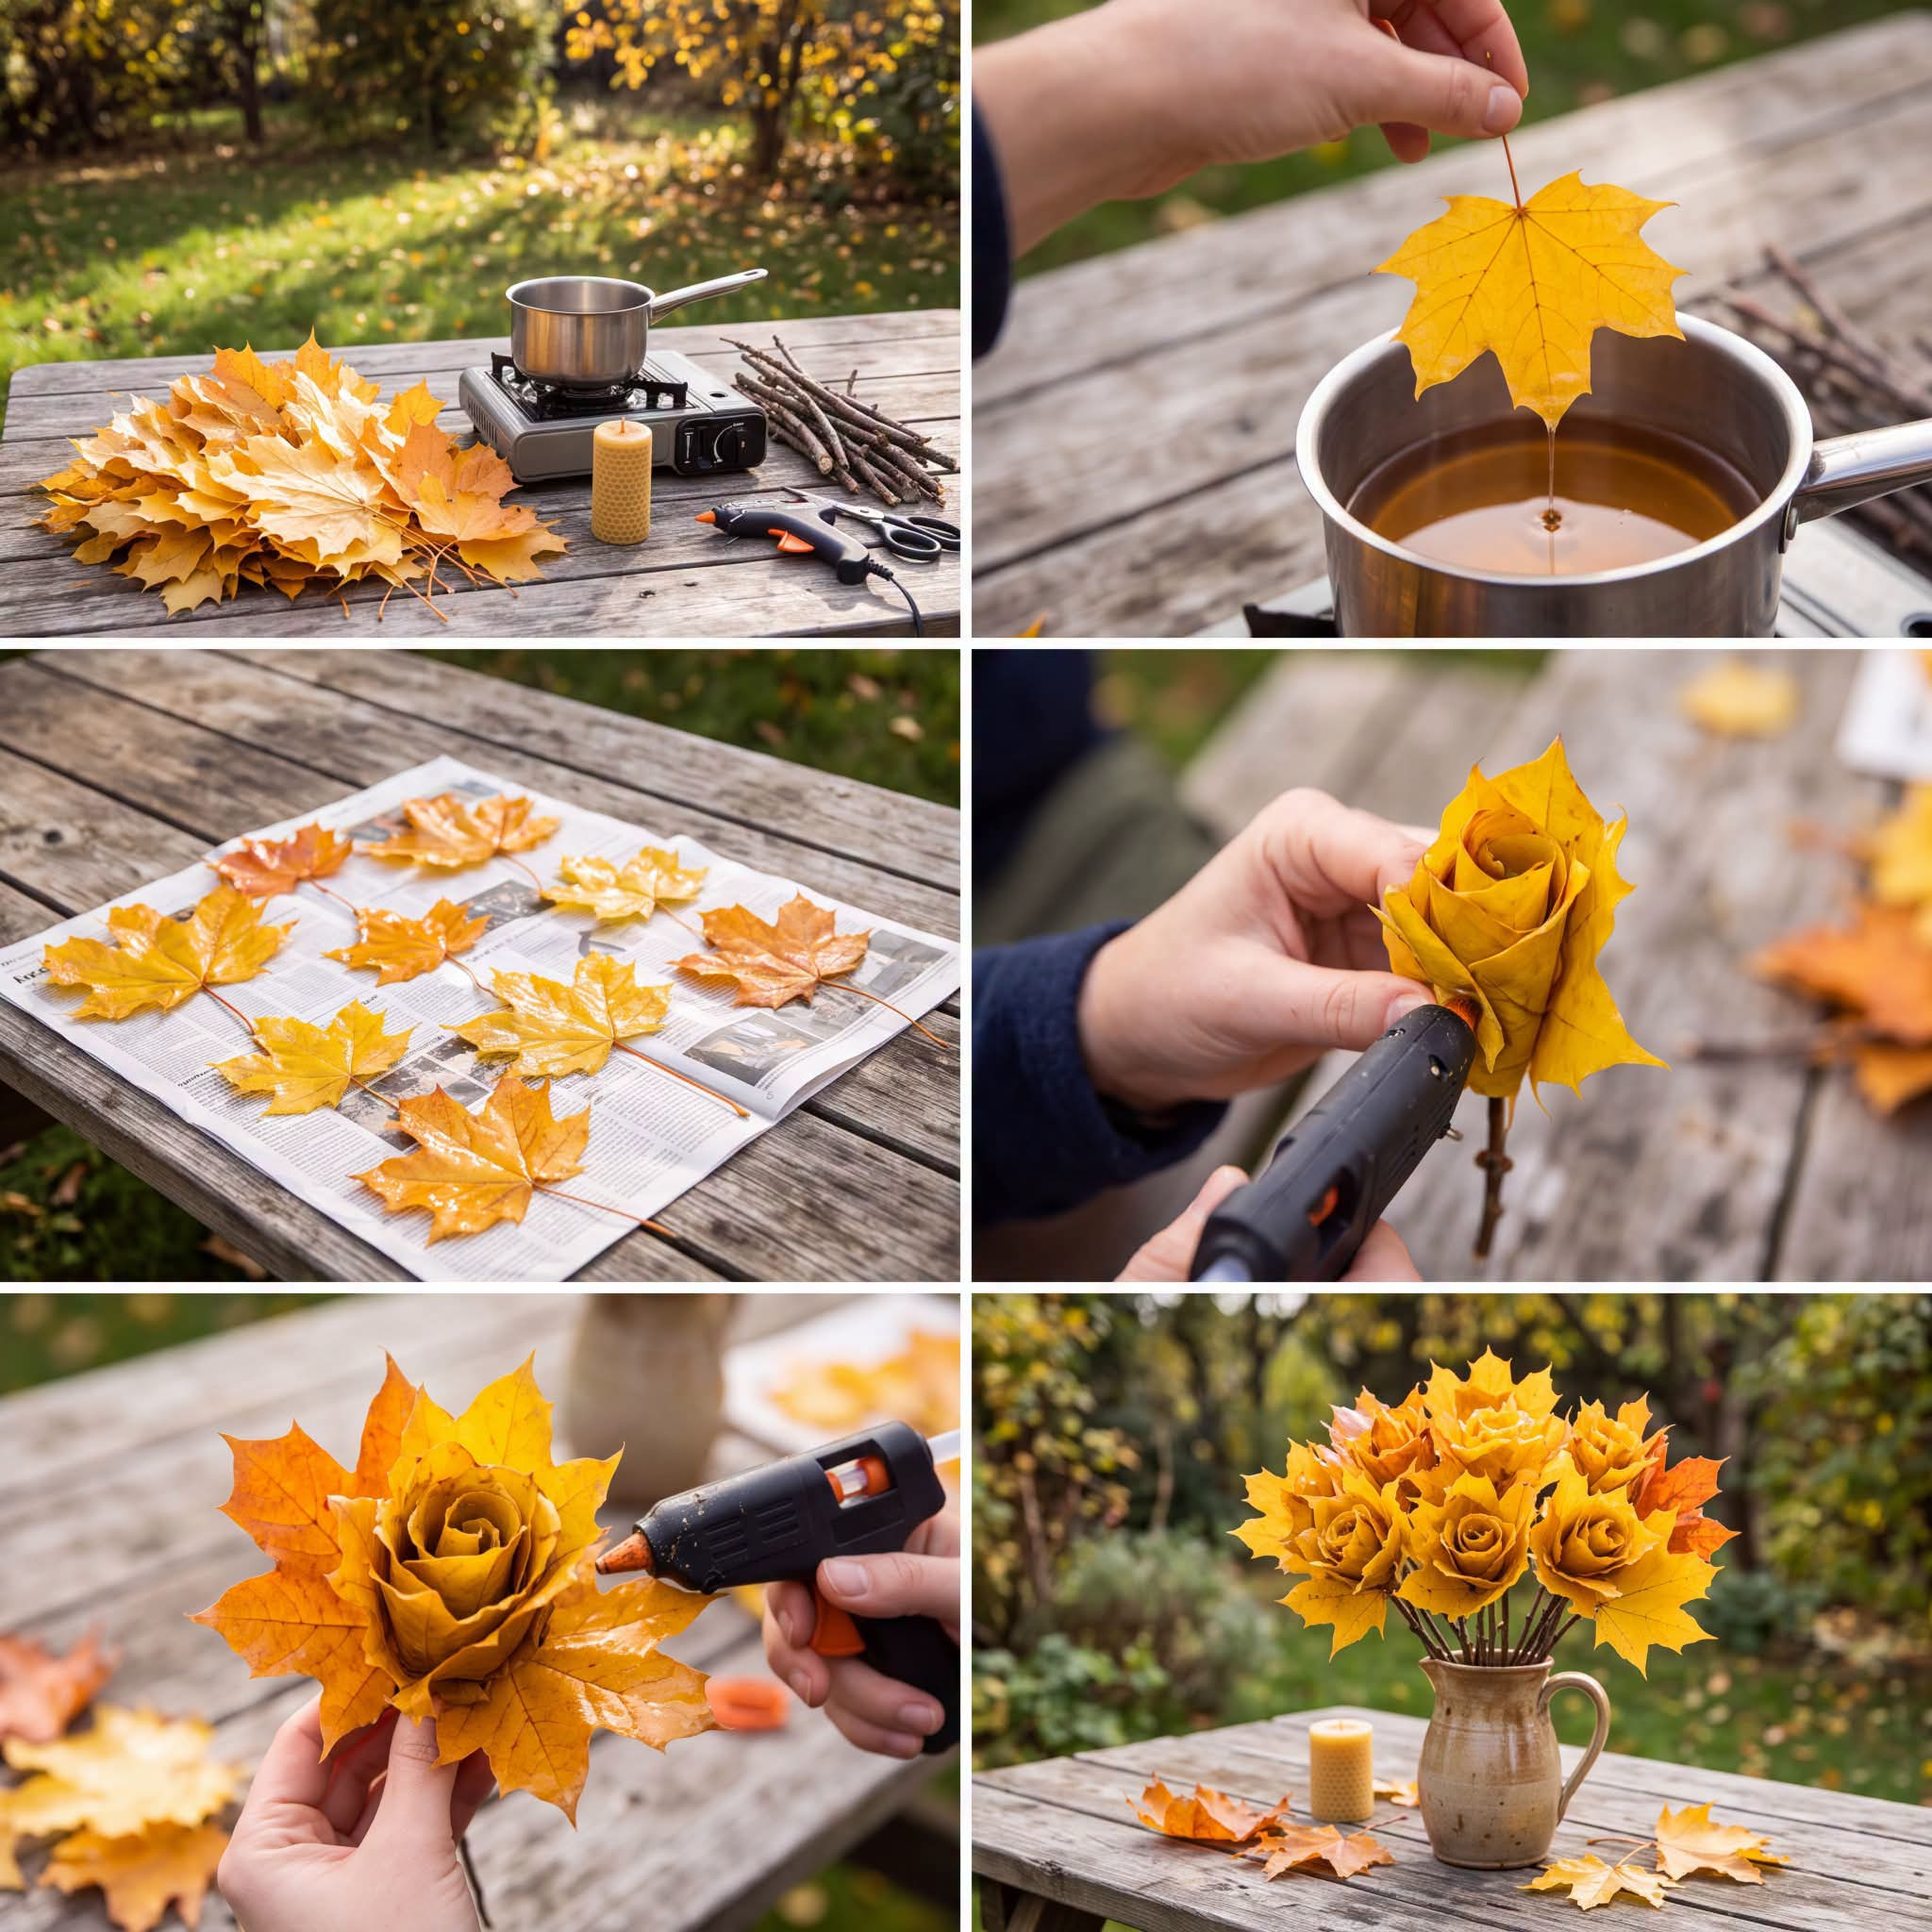
: A Step-by-Step DIY Guide 🍂🌹
Create Stunning Autumn Flower Arrangements Using Natural Leaves
What if you could turn fallen autumn leaves into beautiful roses instead of throwing them away? 🍁
When the trees begin to change color and the ground fills with golden, orange, and red leaves, nature provides all the materials you need for a charming seasonal craft. With a handful of flexible leaves, a few simple tools, and a little patience, you can create gorgeous leaf roses that look wonderful in a vase, make thoughtful handmade gifts, or add a cozy autumn touch to your home.
This project is inexpensive, beginner-friendly, and a lovely way to enjoy the beauty of fall. You don’t need special crafting skills or expensive supplies—just collect some suitable leaves and follow the steps below!
Why You’ll Love This Autumn Craft
- Budget-friendly: Fallen leaves are usually free.
- Beautiful natural colors: Yellow, orange, red, and golden-brown leaves create different flower styles.
- Easy to personalize: Make a single rose or an entire bouquet.
- Perfect for autumn decorating: Display your creations on a table, mantel, shelf, or entryway.
- A fun family activity: Children can help collect leaves and arrange the finished flowers with adult supervision.
- A thoughtful handmade gift: A bouquet of leaf roses makes a lovely seasonal present.
Materials You’ll Need
Gather these simple supplies before you begin.
For the leaf roses
- 15–25 freshly fallen leaves per rose, depending on their size
- Flexible maple leaves or other broad, soft leaves
- Small twigs or wooden skewers for stems
- Floral wire or green floral tape
- Scissors
- A hot glue gun and glue sticks, or a suitable craft adhesive
- Newspaper or scrap paper to protect your work surface
Optional supplies
- Clear craft sealer suitable for natural materials
- Ribbon or twine
- A vase or decorative pitcher
- Additional leaves for arranging around the finished bouquet
Helpful tip: Choose leaves that are colorful, flexible, and free from holes or serious damage. Freshly fallen leaves are usually easier to fold than brittle, dry ones.
Avoid collecting leaves from roadsides treated with chemicals or areas where gathering natural materials is prohibited.
Step 1: Collect the Best Leaves 🍁
Start by taking a walk outside and gathering fallen leaves in beautiful autumn colors.
Maple leaves are especially popular for this project because their broad shape and pointed edges make attractive rose petals. You can experiment with different varieties to create bouquets with different textures and colors.
Look for leaves that are:
- Freshly fallen and still flexible
- Large enough to fold without tearing
- Free from mold and significant damage
- Similar in size for the inner petals, with larger leaves for the outer layers
Try collecting several shades of yellow, orange, red, and brown. Combining colors can make each flower look more natural.
Important: Don’t use leaves that are completely dry and crispy. They tend to crack when folded. If your leaves feel slightly dry, place them between barely damp paper towels for a short time to help soften them. Do not soak them, as excess moisture can cause damage or encourage mold.
Step 2: Prepare Your Leaves
Before shaping the flowers, gently wipe away dirt and inspect each leaf.
If necessary, rinse the leaves briefly and pat them dry. They should be clean but not wet when you start crafting.
Separate your leaves into three groups:
- Small leaves: For the center of the rose.
- Medium leaves: For building the middle layers.
- Large leaves: For the outer petals.
Having your leaves sorted in advance makes the assembly process easier and helps create a balanced flower.
If the stems are very long, trim them slightly while leaving enough length to attach the leaves to the flower.
Step 3: Make the Center of the Rose 🌹
The center is the most important part because it gives the finished flower its recognizable rose shape.
Take one small leaf and place it with the colored side facing down.
Fold the pointed tip or upper portion toward the center of the leaf. Then fold one side inward and roll the leaf gently into a small cylinder.
Keep the roll snug enough to hold its shape, but don’t pull too tightly or the leaf may split.
This little roll will become the center bud of your rose.
Hold it between your fingers while you prepare the next leaf.
Tip: A smaller, tighter center generally produces a more realistic rosebud, while a loose center creates a more open flower.
Step 4: Add the First Petals
Take a second leaf and position it with the colored side facing outward.
Place the rolled center near the middle of the leaf. Fold one side of the leaf inward around the center, then fold the opposite side over it.
The folded edges should overlap slightly, creating the appearance of a curved petal.
Repeat the process with another leaf, positioning it a little farther around the center.
Continue adding leaves one at a time, turning the flower as you work.
Try to avoid placing every leaf in exactly the same position. Slightly overlapping the petals at different angles gives the rose a more natural appearance.
Step 5: Build the Rose Shape
Now it’s time to give your flower volume.
Continue adding medium-sized leaves around the center, allowing each new leaf to overlap the previous one.
As you move outward, leave the upper edges of some leaves more open so they resemble the curved petals of a rose.
Turn the flower regularly to check its shape from every angle.
If one side looks flatter than the other, add another leaf to that area.
You can create different styles depending on how tightly you fold the leaves:
- A tight rosebud: Keep the inner layers close together.
- A classic rose: Gradually loosen the outer petals.
- A fully open rose: Use larger leaves around the outside and allow their edges to flare outward.
There is no need for every rose to look identical. Small differences make a handmade bouquet feel more natural.
Step 6: Add the Outer Petals
Once the center looks full, use your largest leaves to create the outer layer.
Position each leaf around the flower, allowing its pointed edges to extend outward like rose petals.
You may need to gently curve or fold the leaves to achieve the shape you want.
Hold the base of the flower firmly as you work so the petals don’t unravel.
When you’re happy with the appearance, secure the bottom of the rose using floral wire or green floral tape.
Wrap carefully around the gathered leaf stems, tightening just enough to hold everything together without crushing the leaves.
Crafting tip: If your leaves are especially delicate, use small amounts of adhesive at the base rather than applying glue across the visible petals.
Step 7: Attach the Stem
Choose a small, sturdy twig or wooden skewer for the stem.
Position it against the base of the rose, where the leaf stems meet.
Use floral wire or green floral tape to secure the stem to the flower. Wrap the tape around the base and continue down the twig if you want a more finished appearance.
If you use a hot glue gun, ask an adult to handle it around children, and avoid touching the hot nozzle or freshly applied glue.
Trim any excess leaf stems or loose wire with scissors.
Your rose should now hold its shape when you gently lift it by the stem.
Step 8: Finish and Arrange Your Roses
Repeat the process to create as many flowers as you like.
A bouquet of five to seven roses makes an attractive centerpiece, while a larger arrangement can become a beautiful autumn decoration.
Mix yellow, orange, and red leaves for a colorful display, or keep the bouquet in one color family for a more coordinated look.
Arrange the stems in a vase, ceramic pitcher, or rustic container. You can also tie the stems together with twine or ribbon to create a handmade gift.
For extra decoration, place a few loose autumn leaves around the base of the vase.
Your finished bouquet is ready to display!
How to Make Your Leaf Roses Last Longer
Because these flowers are made from real leaves, they won’t last indefinitely. As the leaves lose moisture, they may curl, shrink, or become brittle.
However, a few simple precautions can help your arrangement stay attractive for longer.
Keep Them Away From Direct Sunlight
Strong sunlight can fade the colors and dry the leaves quickly.
Display your bouquet in a cool, dry location away from sunny windows, radiators, fireplaces, and heating vents.
Avoid Excess Moisture
Damp conditions can encourage mold, particularly if the leaves were collected wet or are packed tightly together.
Make sure the leaves are dry before arranging them, and keep the finished bouquet in a well-ventilated space.
Handle the Petals Gently
Natural leaves become fragile as they dry. Avoid squeezing the flowers or repeatedly bending the petals.
If a leaf becomes loose, carefully secure it before the rest of the flower dries.
Consider a Suitable Craft Sealer
A clear craft sealer labeled for natural materials may help reduce handling damage, depending on the product and the condition of the leaves.
Test it on a spare leaf first, since some finishes can change the color or texture.
Remember that a sealer won’t preserve fresh leaves indefinitely or prevent every kind of deterioration.
Make a New Bouquet Each Autumn
One of the nicest things about this craft is that you can make a fresh arrangement every year using the colors of the current season.
You can also photograph your finished bouquets to keep a record of your autumn creations.
Creative Ways to Use Your Fallen-Leaf Roses
Once you’ve mastered the technique, there are many ways to use your finished flowers.
1. Create an autumn centerpiece
Arrange several roses in a rustic vase and place them in the center of your dining table.
2. Make a seasonal mantel decoration
Combine your bouquet with pinecones, small pumpkins, and other autumn decorations.
3. Create a handmade gift
Tie a small bouquet with ribbon or twine and give it to a friend, neighbor, or family member.
4. Decorate a seasonal table
Use a few individual roses as decorative accents for an autumn gathering. Keep them away from candles and other open flames because dried leaves are flammable.
5. Make a colorful doorway arrangement
Combine leaf roses with sturdy twigs to create a rustic seasonal display. If you use it outdoors, protect it from rain and strong winds.
6. Experiment with different colors
Use golden-yellow leaves for a sunny bouquet, deep red leaves for a dramatic look, or a mixture of orange and brown for a warm, rustic effect.
Common Problems and How to Fix Them
The Leaves Keep Breaking
Your leaves may be too dry or brittle.
Choose freshly fallen leaves that bend gently without cracking. If the leaves are already brittle, it may be easier to collect a new batch.
The Rose Keeps Unrolling
The center may be too loose, or the flower may not be secured firmly enough at the base.
Start with a snug center and hold the layers together as you add petals. Use floral tape or wire to secure the completed flower.
The Rose Looks Flat
You may be folding every leaf too tightly or placing the petals in the same position.
Allow some of the outer leaves to flare outward and vary their placement as you build the flower.
The Flowers Turn Brown Quickly
Natural leaves change color as they dry, and some varieties deteriorate faster than others.
Keep the finished flowers away from direct sunlight and heat. If you want a long-lasting decorative arrangement, consider using preserved leaves or artificial leaves instead.
Frequently Asked Questions
What kind of leaves work best for making roses?
Maple leaves are a popular choice because they are broad, colorful, and have pointed edges. Other flexible leaves may also work, but the results will depend on their shape and thickness.
How many leaves do I need for one rose?
Plan on approximately 15–25 leaves per flower, although you may need fewer for a small rose or more for a large, full bloom.
Can children make leaf roses?
Yes, with age-appropriate supervision. Children can collect leaves, sort them by color, and help fold the petals. Adults should handle hot glue guns, sharp scissors, and floral wire.
Can I use completely dry leaves?
You can experiment with dry leaves, but they are more likely to crack when folded. Flexible, freshly fallen leaves are generally easier to work with.
Will these roses last forever?
No. Real leaves naturally dry out and become brittle. You can extend the life of your arrangement by keeping it dry and away from direct sunlight, but it won’t last forever.
Can I use these roses outdoors?
They are best displayed indoors or in a sheltered, dry location. Rain, wind, and humidity can damage the leaves and cause the flowers to lose their shape.
Final Thoughts 🍂
Turning fallen leaves into roses is a simple way to transform something ordinary into something beautiful.
Instead of throwing away the colorful leaves scattered across the yard, you can use them to create a handmade bouquet that celebrates the colors of autumn.
With a little patience and a few simple supplies, you can make flowers in different shapes, sizes, and colors—all inspired by nature.
It’s an enjoyable seasonal activity, an inexpensive decorating idea, and a wonderful reminder that sometimes the most beautiful crafts begin with materials we find right outside our doors.
🍁 Let’s Talk!
Would you try making these beautiful leaf roses this autumn?
Would you arrange them in a vase, give them as a handmade gift, or use them to decorate your home?
Tell us in the comments, and share this guide with someone who loves autumn crafts and natural decorations! 🌹
