In the world of beauty, innovation often arises from the simplest of tools, and the humble spoon is no exception. While traditionally used for culinary purposes, this everyday kitchen item has found a new role in the realm of eyelash curling. Beauty enthusiasts across social media platforms like TikTok have been sharing their experiences with this unconventional method, and the results are turning skeptics into believers.
The spoon lash curling hack is gaining traction because it’s both cost-effective and surprisingly effective. Unlike traditional eyelash curlers that can sometimes pinch or damage lashes, a spoon offers a gentle alternative. The trick lies in the warmth, which helps to set the curl more naturally and longer-lastingly, giving you that wide-eyed, lifted look without the need for costly salon treatments or high-end gadgets.
1. Why a Simple Spoon Hack Is Taking Over Lash TikTok
The spoon hack for curling lashes has taken TikTok by storm due to its simplicity and accessibility. Unlike traditional lash curlers that can be intimidating or expensive, a spoon is something almost everyone has at home. This zero-cost beauty tool offers a way to achieve a salon-like curl without leaving the comfort of your home.
TikTok users are particularly drawn to the visual transformation that this hack delivers. Videos demonstrating the hack show dramatic before-and-after shots that make the process look almost magical. The hashtag #spoonlashcurl has garnered millions of views, with countless beauty influencers jumping on board to showcase their own results and tips for perfecting the technique.
2. How Heat Lifts Lashes: The Beauty Science Behind the Spoon Trick
The science behind using a spoon to curl lashes lies in the heat’s ability to mold the hair. When you heat the spoon with warm water, it becomes a gentle tool that helps to reshape your lashes. The heat causes the keratin in the hair to temporarily soften, allowing the hair to be bent into a new shape. Once the hair cools down, it holds the new form, resulting in a curl.
Unlike mechanical curlers that can apply excessive pressure and risk breaking the lashes, this method uses gentle heat to achieve the curl. This makes the spoon trick a safer alternative for those with brittle or fine lashes who are looking to enhance their eye look without causing damage.
3. Choosing the Right Spoon for Safe, Even Curl
The type of spoon you choose can significantly affect the outcome of your lash curling efforts. A teaspoon is often recommended over a tablespoon due to its smaller size, which fits the curve of the eye more comfortably. The spoon’s edge should be smooth without any nicks or sharp edges to prevent any injury or discomfort.
Stainless steel spoons are ideal as they conduct and retain heat well, providing a consistent temperature across the surface. Avoid using plastic spoons, as they might not retain heat effectively and could even warp under high temperatures, posing a risk of burns or uneven curling.
4. Warming the Spoon With Water: The Exact Temperature Sweet Spot
For optimal results, the spoon should be warmed to a temperature that is comfortable to the touch yet effective in reshaping the lashes. This typically ranges between 100°F to 120°F. To achieve this, run the spoon under hot tap water for about 30 seconds, or immerse it in a cup of hot water for a minute.
Test the temperature on the back of your hand before applying it near your eye to ensure it’s not too hot. The goal is to have it warm enough to manipulate the lashes without causing discomfort or burns. If it’s too hot, let it cool down for a few seconds before proceeding.
5. Prepping Your Lashes So They Don’t Break or Fall Out
Preparation is key to ensuring your lashes remain healthy and intact during the curling process. Start by cleaning your lashes thoroughly to remove any mascara, oil, or dirt. This not only helps the curl set better but also prevents any buildup from being pressed into the lash follicle, which could cause irritation or infection.
To further protect your lashes, consider applying a lash serum or a thin coat of clear, conditioning mascara. This acts as a barrier and strengthens the lashes, making them more resilient to heat and manipulation.
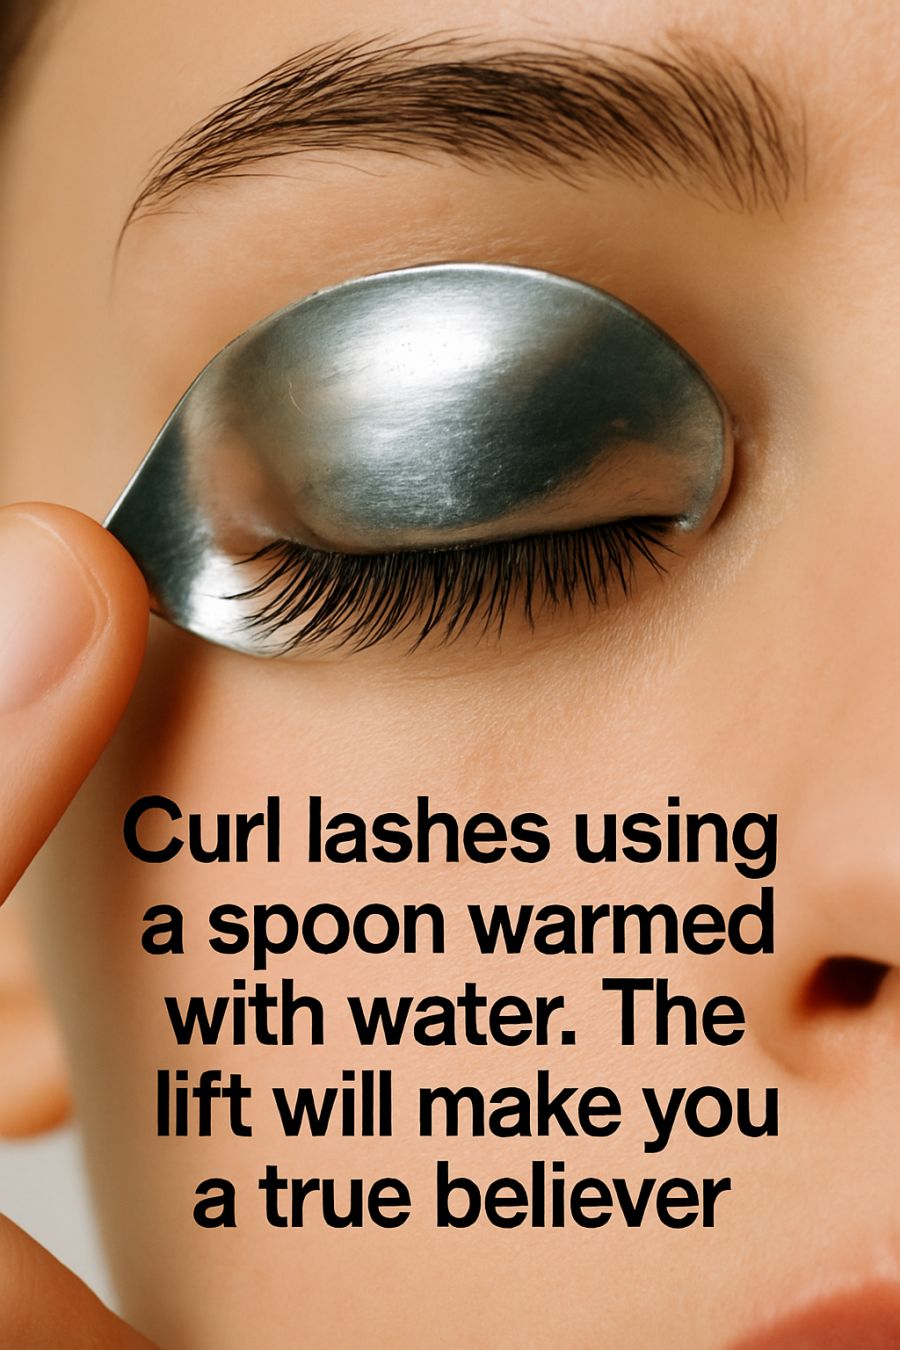
6. Step-By-Step: How to Curl Lashes With a Warmed Spoon
Start by holding the warmed spoon with the curved side facing outwards, resting gently against your eyelid. Position the edge of the spoon just above the lash line. Using your thumb, press your lashes against the curved surface of the spoon, gently lifting them upwards. Hold for about 10 seconds.
Slowly move the spoon upwards along the lashes, maintaining gentle pressure to ensure even curling. Repeat as necessary to achieve the desired lift. It’s important to keep the movement smooth and avoid tugging, which can damage the lashes.
7. Mastering the Angle: Positioning the Spoon for Maximum Lift
The angle at which you hold the spoon can make a significant difference in the curl’s effectiveness. Tilt the spoon slightly upwards so that it mimics the natural curve of your eyelid. This helps in lifting the lashes from the root without crimping them awkwardly.
Experiment with slight adjustments to find the angle that best suits your eye shape and lash length. For those with shorter lashes, a more pronounced tilt might be required to catch and curl the lashes effectively.
8. Adding Mascara After the Curl for a False-Lash Effect
After achieving the desired curl, applying mascara will help to set the lashes and add volume and definition. Begin at the base of the lashes and wiggle the wand upwards to separate and coat each lash evenly. Opt for a volumizing or lengthening mascara to enhance the curled effect further.
For a false-lash effect, apply multiple coats, allowing each layer to dry slightly before adding the next. This will build thickness without clumping, giving your lashes a dramatic, lifted look that rivals false lashes.
9. Spoon Versus Lash Curler: Pros, Cons, and Real-World Results
While traditional lash curlers are designed specifically for curling lashes, they can sometimes pinch the skin or damage the lashes if not used correctly. The spoon method offers a gentler alternative, using heat to shape the lashes without mechanical pressure.
On the downside, the spoon technique requires a bit more practice to master and may not provide the same precision as a well-designed lash curler. However, for those who experience discomfort with metal curlers or have particularly sensitive eyes, the spoon method can be a game-changer, offering a natural curl with less risk of damage.
10. Common Mistakes With the Spoon Hack and How to Avoid Them
One common mistake is applying the spoon when it’s too hot, which can lead to burns or lash damage. Always test the temperature on your hand first. Another mistake is not holding the spoon at the correct angle, leading to uneven or insufficient curls.
Avoid pressing too hard against the lashes, as this can cause them to break. Gentle pressure is enough, especially when combined with the heat. Finally, skipping the prep step can lead to product buildup and lash breakage, so always start with clean, conditioned lashes.
11. Safety First: Protecting Your Lids, Lashes, and Eyes From Heat
Safety should always come first when dealing with any heat-based beauty hack. Ensure the spoon is at a safe temperature by testing it on your skin before bringing it near your eyes. If you feel any discomfort, stop immediately.
Consider using a heat-protectant serum or balm on your lashes to create a barrier against the heat. This not only protects the lashes but also helps to lock in moisture, preventing them from becoming brittle or dry over time.
12. Viral Variations: The Spoon-and-Hair-Dryer and Coffee-Mug Hacks
Some variations of the spoon hack involve using a hair dryer to heat the spoon. This method allows for more precise temperature control but requires caution to avoid overheating. Hold the spoon with a cloth or glove to prevent burns, and test the spoon’s heat before applying it to your lashes.
Another popular hack involves placing the spoon in a coffee mug filled with hot water. This is a convenient way to keep the spoon warm between uses, ensuring a consistent temperature for multiple applications. Both variations offer unique benefits but require careful handling to ensure safety.
13. When the Spoon Trick Works Best—and When to Skip It
The spoon trick is particularly effective for those with naturally straight or downward-facing lashes, providing a noticeable lift without the need for excessive product. It’s also a great option for those with sensitive eyes or allergies to certain makeup tools and products.
However, this method might not be suitable for those with extremely short or sparse lashes, as the spoon may not effectively grip them for curling. In such cases, a traditional lash curler or even lash extensions might be a better option to achieve the desired look.
14. From Skeptic to Believer: Real-Life Before-and-After Lash Stories
Many who have tried the spoon trick for the first time report being pleasantly surprised by the results. Stories of transformation abound on social media, with users posting dramatic before-and-after photos showcasing the effectiveness of the method.
Testimonials from beauty enthusiasts often highlight the ease and affordability of the spoon trick, emphasizing how it has become a staple in their daily beauty routines. For many, this simple hack has not only improved their lash game but also inspired them to explore more DIY beauty solutions with an open mind.
