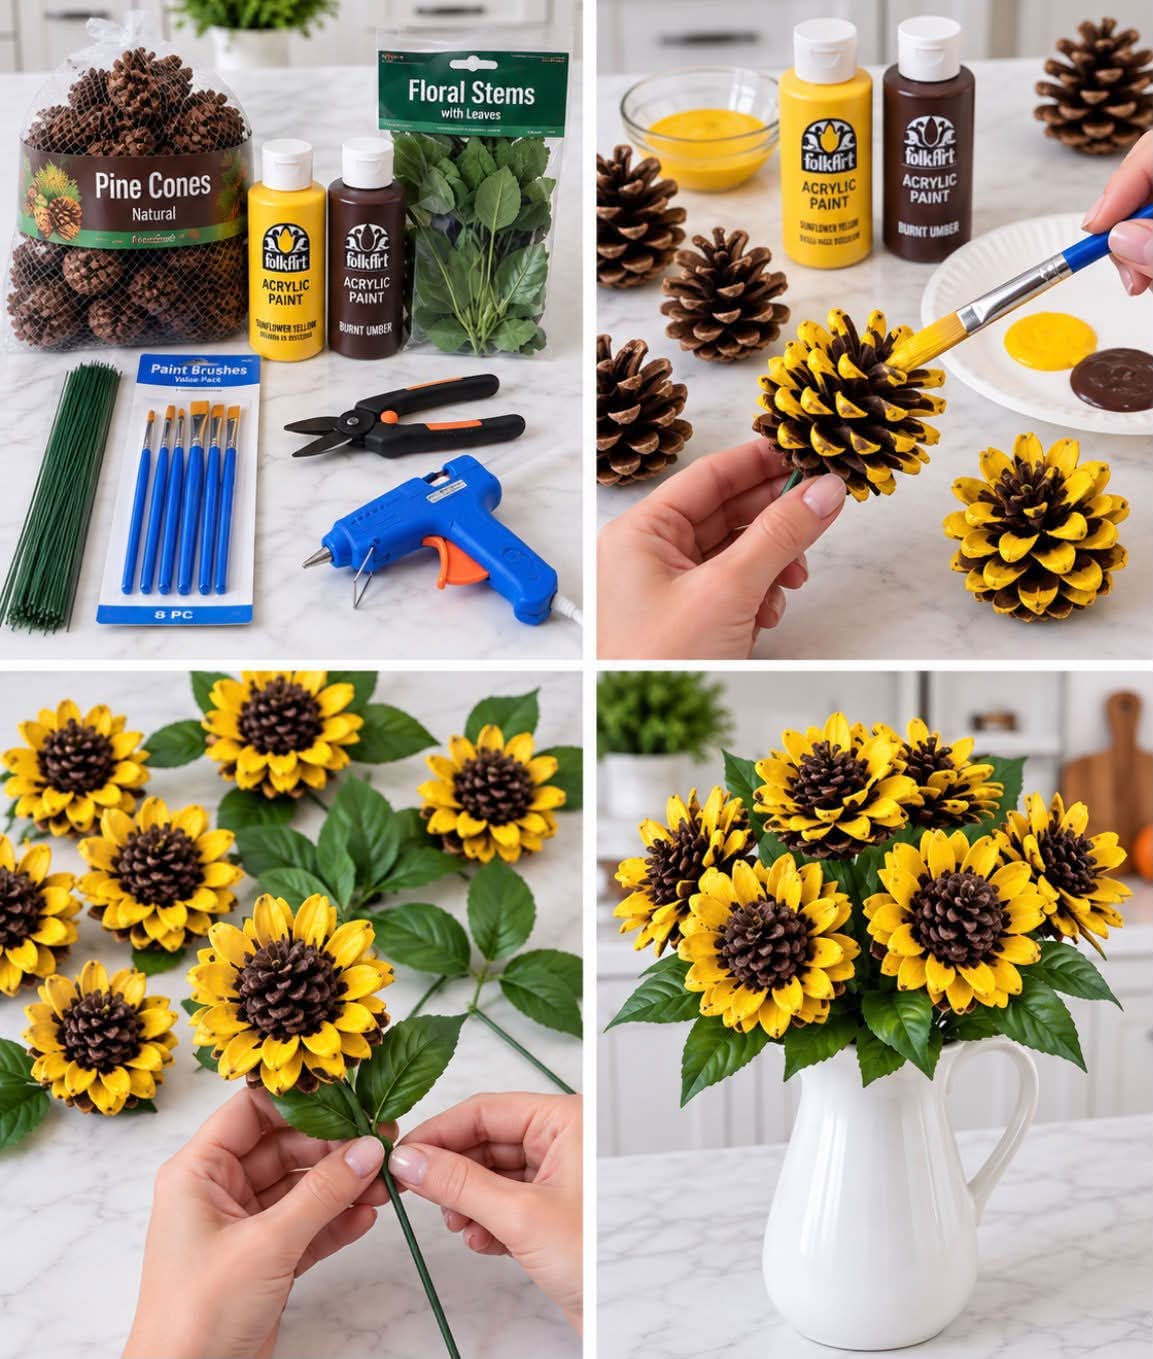
🌻 Turn Ordinary Pine Cones Into a Beautiful Forever Bouquet
Looking for a fun craft that costs very little but makes a big decorative impact?
Don’t throw those pine cones away! With a little yellow and brown acrylic paint, floral stems, and a glue gun, ordinary pine cones can be transformed into cheerful sunflower-like blooms that never wilt. 🌻
The natural layers of a pine cone’s scales already resemble flower petals, making them surprisingly perfect for this project. Similar pine-cone flower crafts are commonly made by trimming or shaping the cones, painting them, and attaching stems for bouquets and other decorations. (thegreenroomflorist.com)
And the finished arrangement in the photo is absolutely gorgeous!
🌻 What You’ll Need
- 8–12 dry pine cones
- Yellow acrylic craft paint
- Dark brown acrylic paint
- Green floral stems or floral wire
- Artificial leaves or floral leaves
- Small paintbrushes
- Pruning shears or strong wire cutters
- Hot glue gun and glue sticks
- Small hand drill and drill bit, optional
- White paper plate or disposable palette
- Newspaper, cardboard, or a craft mat to protect your work surface
- A vase or pitcher for displaying your finished flowers
Optional: clear acrylic sealer for extra protection if the flowers will be handled frequently.
🌲 Step 1: Choose and Clean Your Pine Cones
Choose pine cones that are dry, intact, and reasonably open.
If you collect them outdoors, inspect each one carefully and remove dirt, loose debris, visible mold, or insects.
Brush them thoroughly with a dry paintbrush.
If the cones are damp or tightly closed, allow them to dry completely before crafting. Some craft tutorials use gentle oven drying to help open and dry pine cones; if you do this, use a low oven, keep them supervised, and allow them to cool completely before handling. (Modern on Monticello)
✂️ Step 2: Shape the Pine Cones
This is the part that transforms the pine cone into a flower.
Depending on the shape of your pine cones, you can either use them whole or trim away part of the cone so the remaining scales resemble a flower head.
For the sunflower look shown in the photo, pruning shears can be used carefully to remove the upper portion and expose the layered scales.
Wear gloves and eye protection during cutting. Pine cones can be surprisingly tough, and the scales can be sharp.
Work slowly rather than trying to force the shears through the cone.
If you prefer not to cut them, you can also leave the pine cones intact and simply paint the individual scale tips—the result will look more like a rustic pine-cone flower. (instrupix.com)
🟡 Step 3: Paint the Petals Yellow
Pour some yellow acrylic paint onto a paper plate.
Using a small brush, paint the tips and upper surfaces of the pine-cone scales.
You don’t have to completely cover every bit of brown.
In fact, leaving some of the natural pine-cone color visible gives the flowers more depth and makes them look less artificial.
For a more dimensional sunflower effect, use two shades of yellow—a deeper golden yellow underneath and a brighter yellow on the tips.
Let the first coat dry completely before adding another coat where needed.
🤎 Step 4: Paint the Centers Brown
Once the yellow paint is dry, add dark brown paint to the center of each pine-cone flower.
The natural texture of the scales makes a wonderful imitation of the seed-filled center of a sunflower.
You can use a darker brown toward the middle and a slightly lighter brown around the outside for additional depth.
Don’t worry about making every flower identical. A little variation makes the bouquet look more natural.
🌿 Step 5: Prepare the Stems
If you’re using green floral stems, cut them to the desired length.
For a vase arrangement, varying the stem lengths is a great way to make the finished bouquet look fuller.
You can also use sturdy floral wire or wooden stems.
If using wooden skewers, paint them green and allow them to dry before assembly. Pine-cone flower tutorials commonly use floral wire, wooden stems, or skewers for this purpose. (Catholic Online)
🔨 Step 6: Attach the Stems
There are two easy ways to attach the stems.
Option 1: Hot Glue
Apply a generous amount of hot glue to the base of the pine cone.
Immediately press the top of the floral stem into the glue and hold it firmly until the glue sets.
For heavier pine cones, add another layer of glue around the connection for extra support.
Option 2: Drill a Small Hole
For a stronger attachment, carefully drill a shallow hole in the bottom center of the pine cone.
The hole only needs to be deep enough to give the stem an anchor point. One established tutorial recommends a hole only about ⅛ inch deep for securing a wooden skewer. (instrupix.com)
Add hot glue into the hole, insert the stem, and hold it until secure.
Be careful when drilling and use appropriate eye protection.
🍃 Step 7: Add the Leaves
The finished flowers in the photo look especially realistic because of the green leaves.
You can use:
- Artificial floral leaves
- Silk leaves
- Green felt leaves
- Green cardstock
- Small faux branches
Attach the leaves to the stems with a small amount of hot glue.
Try placing some leaves close to the flower head and others lower down the stem.
🌻 Step 8: Let Everything Dry
Set the completed flowers aside until all paint and glue are completely dry.
If you plan to use a clear protective spray, apply it according to the product instructions in a well-ventilated area and allow the flowers to dry completely before bringing them indoors. Some pine-cone flower projects use a clear acrylic finish for additional protection. (Catholic Online)
🏺 Step 9: Arrange Your Pine Cone Sunflowers
Now comes the fun part!
Place your finished pine-cone flowers into a vase, pitcher, mason jar, basket, or another container.
Don’t make every flower the same height.
Instead:
- Put a few taller flowers toward the back.
- Place medium-height flowers in the middle.
- Bring a few shorter flowers toward the front.
- Angle some blooms slightly outward.
- Fill gaps with extra leaves.
A simple white pitcher makes the yellow flowers really stand out, just like the arrangement shown in the photo.
🌻 Make Them Your Own
You don’t have to make sunflowers.
The same technique can create different styles of pine-cone flowers.
Try:
🌸 Pink for roses or zinnias
💜 Purple for a whimsical garden bouquet
❤️ Red for Christmas decorations
🤍 White for an elegant neutral arrangement
🧡 Orange for fall decorating
🌈 Mixed colors for a cheerful year-round bouquet
The natural texture of the pine cone remains visible beneath the paint, giving every flower its own character.
💡 Tips for Better-Looking Pine Cone Flowers
Choose Similar-Sized Cones
A collection of cones with similar proportions will make a more cohesive bouquet.
Don’t Overpaint
Leaving some natural brown between the painted scales creates beautiful depth.
Vary the Heights
A bouquet with flowers all at exactly the same height can look stiff. Different stem lengths create a much more natural arrangement.
Let Each Layer Dry
Trying to paint over wet acrylic paint can muddy the colors.
Reinforce Heavy Flowers
Large pine cones can be surprisingly heavy. Use extra glue or a sturdier floral stem for larger blooms.
❤️ A Beautiful Upcycling Project
One of the best things about this project is that the main material can often be found right outside.
Instead of throwing fallen pine cones into the yard waste, you can turn them into something you’ll enjoy for years.
There’s no watering.
No wilting.
No replacing flowers every week.
Just a little paint, some stems, and a bit of creativity.
And unlike fresh sunflowers, these cheerful little blooms will look exactly the same tomorrow.
🌻 Would You Make This?
PINE CONE SUNFLOWERS — YES OR NO? 👇
🌻 I’d make a whole bouquet!
❤️ This is adorable!
🌲 I’d use natural pine cones instead.
🎨 I’d try different colors!
