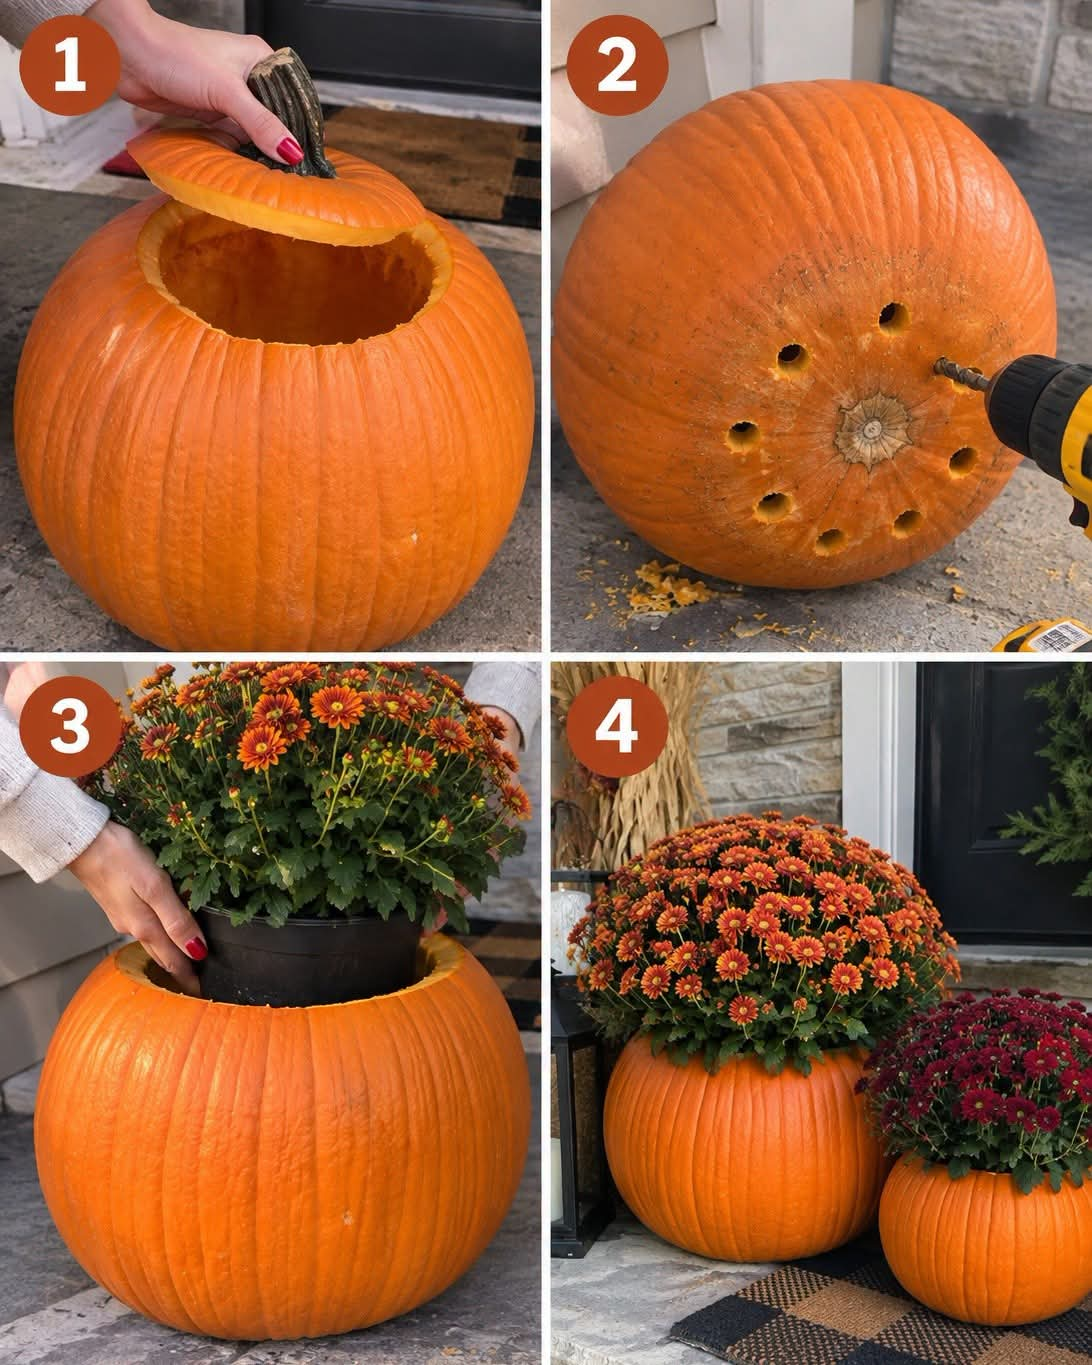
🎃🌼 Turn a Pumpkin Into the Cutest Fall Mum Planter!
Looking for an easy way to give your front porch a big dose of autumn charm? Grab a pumpkin, a beautiful mum, and a drill—and you can turn an ordinary pumpkin into a gorgeous seasonal planter! 😍🍂
This simple DIY combines two of fall’s best decorations: bright orange pumpkins and overflowing chrysanthemums. The finished look is warm, welcoming, and surprisingly easy to make.


🎃 What You’ll Need
- 1 large, sturdy pumpkin
- 1 potted mum that fits inside the pumpkin
- Sharp pumpkin-carving knife
- Large spoon or scoop
- Drill with a suitable bit
- Potting mix, if planting the mum directly
- Gardening gloves
- Optional: saucer or tray for underneath the pumpkin
Tip: Choose a pumpkin with a relatively flat bottom and no soft, damaged or moldy areas. A wider pumpkin gives you more room for a fuller mum. (The Home Depot)
1️⃣ Cut the Top Off 🎃
Start by cutting a circular opening around the top of your pumpkin.
Make the opening wide enough for the mum’s nursery pot or root ball to fit comfortably. You don’t necessarily need to cut right around the stem—you can make a smaller, neat opening depending on the size of your plant.
Lift off the top and set it aside.
2️⃣ Scoop Everything Out 🥄
Now comes the messy—and strangely satisfying—part!
Scoop out all the seeds, strings and soft pumpkin flesh from inside. Scrape the walls clean enough that there’s plenty of room for your plant.
Don’t throw those seeds away! 🎃✨ Clean them, season them and roast them for a delicious fall snack.
The cleaner and drier the inside is, the better your pumpkin planter will hold up.
3️⃣ Add Drainage Holes 💧
This step is really important if you’re putting a living plant inside.
Turn the pumpkin over and carefully drill several small holes through the bottom. These allow excess water to escape instead of collecting inside the pumpkin. Good drainage helps prevent roots from sitting in stagnant water and developing problems. (Illinois Extension)
You can make several holes around the bottom rather than relying on just one.
Safety tip: Secure the pumpkin firmly and use caution with the drill. If you’re not comfortable drilling it yourself, ask someone experienced to help.
4️⃣ Add Your Mum 🌼
Now take your potted mum and gently place it into the pumpkin.
You have two options:
🌱 Keep the Mum in Its Nursery Pot
This is the easiest option and a great choice if you want to remove the plant later.
Simply place the entire nursery pot inside the hollow pumpkin. The pumpkin becomes a decorative outer container. This approach also makes watering and removing the plant easier. (Rural Sprout)
🌱 Plant the Mum Directly
For a more permanent-looking arrangement, you can add well-draining potting mix and plant the mum directly inside the pumpkin.
Make sure the drainage holes remain open and don’t pack the soil too tightly.
🌼 5️⃣ Give It a Good Watering
Once everything is positioned, water the mum thoroughly.
The important part is making sure excess water can actually escape through the bottom. Mums prefer evenly moist soil but don’t want to sit in soggy conditions. (Better Homes & Gardens)
Check the soil regularly, especially if the planter is sitting somewhere sunny.
🍂 6️⃣ Find the Perfect Spot
Now comes the fun part—decorating!
Place your pumpkin mum planter:
🏡 Beside the front door
🪜 Along the porch steps
🍁 Beside your welcome mat
🎃 Next to smaller pumpkins
🧺 Around a fall harvest display
🪴 On a patio or balcony
Mums generally perform best with plenty of bright light, so a sunny location is a great choice. (The Home Depot)
And don’t be afraid to make two or three different sizes. A group of pumpkin planters looks even more impressive than a single one!
🧡 Make It Even More Beautiful
Want to take your pumpkin planter from cute to WOW?
Try combining different colors of mums.
🧡 Orange Mums + Orange Pumpkin
A warm, monochromatic autumn look.
💜 Burgundy Mums + Orange Pumpkin
Deep burgundy flowers make the pumpkin’s orange color really pop.
🤍 White Mums + Orange Pumpkin
A beautiful contrast that feels elegant and sophisticated.
💛 Yellow Mums + Orange Pumpkin
Bright, cheerful and perfect for a traditional fall porch.
You can also surround your planter with mini pumpkins, gourds, corn stalks, lanterns or baskets for a full autumn display.
⚠️ How Long Will a Pumpkin Planter Last?
Remember that a real pumpkin is still a natural fruit, not a permanent flowerpot.
Eventually, moisture and weather will cause the pumpkin to soften and decay. How long it lasts depends heavily on temperature, humidity, sun and how much water reaches the pumpkin itself.
That’s why keeping the mum in its original nursery pot can be particularly convenient. When the pumpkin begins to deteriorate, simply lift the mum out and move it into another container or into the garden, where appropriate. (cottage in the mitten)
Also, don’t let the pumpkin sit in a puddle of water. Good drainage underneath the planter can help keep the base from staying constantly wet.
🍁 The Easiest Fall Porch Makeover
The best thing about this project is that it doesn’t require fancy decorating skills.
Pumpkin + mums + a few drainage holes = instant fall magic. 🎃🌼🍂
It looks like something you’d see in a beautiful autumn magazine spread, but you can make it yourself in an afternoon.
And honestly, there’s something especially satisfying about watching those colorful flowers spill over the top of a bright orange pumpkin. 😍
🎃🌼 Would you make one of these pumpkin mum planters?
YES, absolutely! 🙋♀️🍂
or
I’ll stick with regular pumpkins! 😂🎃
