🪱🌱
What if your kitchen scraps could go straight back into your garden instead of into the trash?
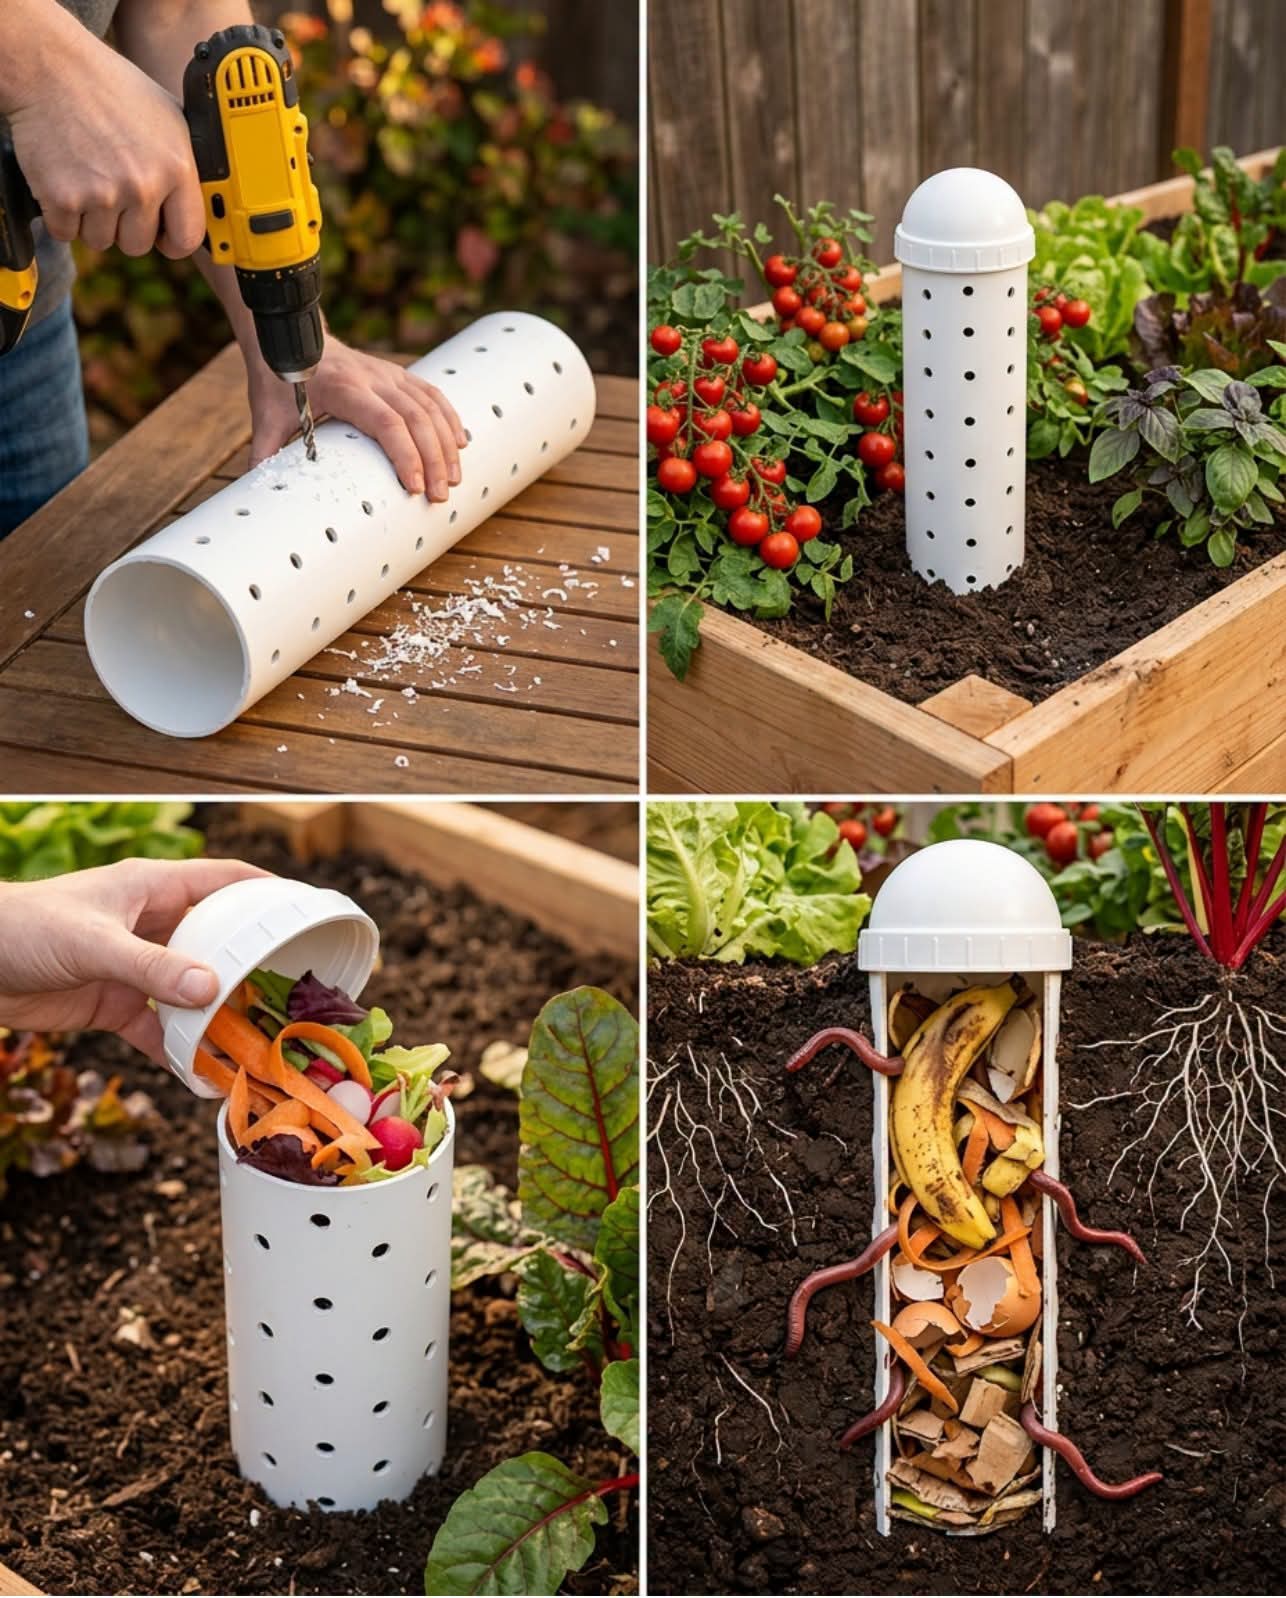
A simple perforated PVC pipe buried vertically in a raised bed can create a convenient in-ground worm-feeding station. Instead of carrying scraps to a separate compost pile, you place small amounts of suitable organic material directly into the buried tube.
Worms and other soil organisms can access the openings, break down the organic matter, and return nutrients to the surrounding soil.
It’s a clever little system for gardeners who want to reduce kitchen waste while feeding their garden at the same time.
What Is a Vertical Worm Composting Tube?
The idea is simple: take a section of PVC pipe, drill holes throughout the portion that will be underground, bury it vertically in your raised bed, and cover the top with a removable lid.
Food scraps are placed inside the pipe.
The holes allow soil organisms and worms to move between the tube and surrounding soil. As the organic material breaks down, nutrients and organic matter can become available to the nearby soil.
Unlike a traditional compost pile, you don’t need to turn a separate pile or transport scraps across the yard.
What You’ll Need
- 1 piece of PVC pipe, approximately 10 cm (4 inches) in diameter
- Approximately 40 cm (16 inches) of pipe
- A removable PVC cap or other secure cover
- Drill
- Drill bit suitable for making several small holes
- Shovel or garden trowel
- Vegetable scraps
- Coffee grounds
- Crushed eggshells
- Torn brown cardboard
- Dry leaves or other dry carbon-rich material
The exact pipe size isn’t critical. A tube around 10 cm wide and 40 cm long is a convenient size for a small raised bed.
How to Make the Vertical Worm Tube
1. Prepare the PVC Pipe
Cut your PVC pipe to approximately 40 cm (16 inches) long.
The lower portion of the pipe will be buried in the garden bed, while the top should remain accessible so you can add organic material.
2. Drill Drainage and Access Holes
Drill multiple small holes around the section of pipe that will be underground.
Space the holes around the pipe rather than concentrating them in one area.
These openings allow worms, insects, microorganisms, moisture, and nutrients to move between the pipe and the surrounding soil.
Avoid making the holes so large that large amounts of food scraps can easily fall through.
3. Choose the Location
Select a spot in your raised bed where the tube won’t interfere with plant roots or regular gardening activities.
Dig a hole deep enough to bury most of the pipe while leaving the top accessible above the soil surface.
4. Bury the Tube
Place the perforated pipe vertically into the hole.
Firmly pack the soil around it so the tube stays upright and stable.
Leave several centimeters of the top above the soil so you can easily add scraps and remove the lid.
5. Add the Lid
Cover the top with a removable cap or lid.
The cover helps keep rain, pests, and unwanted debris out while still allowing you to access the tube when it’s time to add scraps.
A snug-fitting lid is preferable, but the system should not be completely airtight.
What Can You Put Inside?
Think of this tube as a small, controlled food-scrap station rather than a place to dump every type of kitchen waste.
Good Choices
🥕 Vegetable peels and trimmings
🥬 Lettuce and leafy vegetable scraps
🥒 Cucumber ends
🥦 Broccoli and cauliflower stems
🍎 Small amounts of fruit scraps
☕ Used coffee grounds
🥚 Finely crushed eggshells
📦 Torn plain brown cardboard
🍂 Dry leaves
Cut larger pieces into smaller pieces whenever possible. Smaller pieces break down more quickly.
What Should You Avoid?
For a simple in-ground worm-feeding tube, it’s best to avoid materials that are likely to attract pests, create strong odors, or break down poorly.
❌ Meat
❌ Fish
❌ Bones
❌ Dairy products
❌ Greasy or oily foods
❌ Large amounts of cooked leftovers
❌ Pet waste
Citrus deserves a little nuance: small amounts of citrus aren’t inherently poisonous to compost organisms, but large quantities can be slow to break down and may make the system overly acidic. If you’re trying to keep this setup simple and worm-friendly, use citrus sparingly.
Don’t Forget the Browns 🍂
One of the easiest ways to keep a food-scrap system balanced is to add a little dry, carbon-rich material along with moist kitchen scraps.
After adding vegetable scraps, add a small handful of:
- Shredded cardboard
- Dry leaves
- Untreated paper
- Other suitable dry plant material
This helps absorb excess moisture and provides carbon-rich material for decomposition.
How Often Should You Add Scraps?
Less is more.
Add small amounts at a time rather than filling the tube with a huge quantity of food.
If you’re adding scraps faster than they are breaking down, simply wait.
The goal is to give the worms and microorganisms enough time to process the material.
You can gently mix the upper contents occasionally if needed, but there is no need to constantly disturb the tube.
Will It Smell?
A properly managed tube should have little to no unpleasant odor.
Strong smells usually indicate that the system is receiving too much food, too much moisture, or unsuitable material.
If you notice an unpleasant smell:
- Stop adding food temporarily.
- Add dry shredded cardboard or dry leaves.
- Make sure the drainage holes aren’t blocked.
- Remove any obviously spoiled or unsuitable material.
- Allow the contents to break down before adding more.
A healthy composting system should smell earthy rather than rotten.
What Happens Underground?
This is where the magic happens. 🪱
Worms and microorganisms are attracted to the organic material. They feed on decomposing material and help break it down.
As decomposition continues, nutrients and organic matter become part of the surrounding soil ecosystem.
The roots of nearby plants can benefit from the improved soil environment, although this shouldn’t be thought of as a direct fertilizer dispenser delivering nutrients immediately to individual roots.
It’s really a small localized composting ecosystem right inside your garden bed.
What About Winter?
As temperatures fall, worm and microbial activity will slow down.
During freezing weather, decomposition may become very slow or temporarily stop.
You can reduce or stop feeding the tube during hard freezes and resume when temperatures become suitable again.
A layer of mulch around the garden bed can also help protect the soil from temperature extremes.
A Few Important Tips
Keep Food Below the Lid
Don’t allow scraps to pile above the opening. Keeping everything inside the tube helps discourage flies and other unwanted visitors.
Chop Scraps Small
Smaller pieces have more surface area and generally decompose faster.
Don’t Overfill
The tube isn’t designed to hold a week’s worth of kitchen scraps at once. Add modest quantities and let the organisms catch up.
Keep It Moist, Not Waterlogged
The system should have enough moisture for decomposition, but standing water and poor drainage can create anaerobic conditions and unpleasant odors.
Be Careful With PVC
If you’re growing food, consider using a pipe specifically intended and labeled for the intended application rather than assuming that every type of reclaimed PVC is suitable for contact with soil or food scraps.
Can You Add Worms Yourself?
You can allow naturally occurring earthworms and other decomposers to find the tube on their own.
If you specifically want a vermicomposting system using composting worms such as red wigglers, remember that those worms have particular temperature and moisture requirements and may not thrive year-round in every outdoor raised bed.
For many gardeners, simply creating a small in-ground composting station and allowing the local soil ecosystem to colonize it is easier.
Why Gardeners Love the Idea 🌱
A vertical composting tube can:
- Reduce the amount of vegetable waste going into the trash
- Return organic material to the garden
- Reduce the need to carry scraps to a distant compost pile
- Make use of a small amount of otherwise wasted space
- Encourage soil organisms
- Fit neatly into a raised-bed garden
- Require very little equipment
And perhaps the best part is the simplicity.
Instead of collecting every vegetable peel and carrying it across the yard, you can put appropriate scraps directly into your garden’s little underground recycling station.
Final Thoughts
A perforated vertical tube isn’t a magical fertilizer machine, and it isn’t completely maintenance-free—but it can be a wonderfully simple way to compost small amounts of kitchen scraps directly in or beside a garden bed.
Give it suitable scraps, keep the system balanced with dry material, avoid overfilling it, and let the worms and microorganisms do what they naturally do best.
A little piece of discarded material goes into the tube.
Over time, it becomes part of the living soil.
Would you try a vertical worm composting tube in your raised garden bed? 🪱🌱
YES, I WOULD! ❤️
OR
I’LL STICK WITH A TRADITIONAL COMPOST BIN! 🍂
