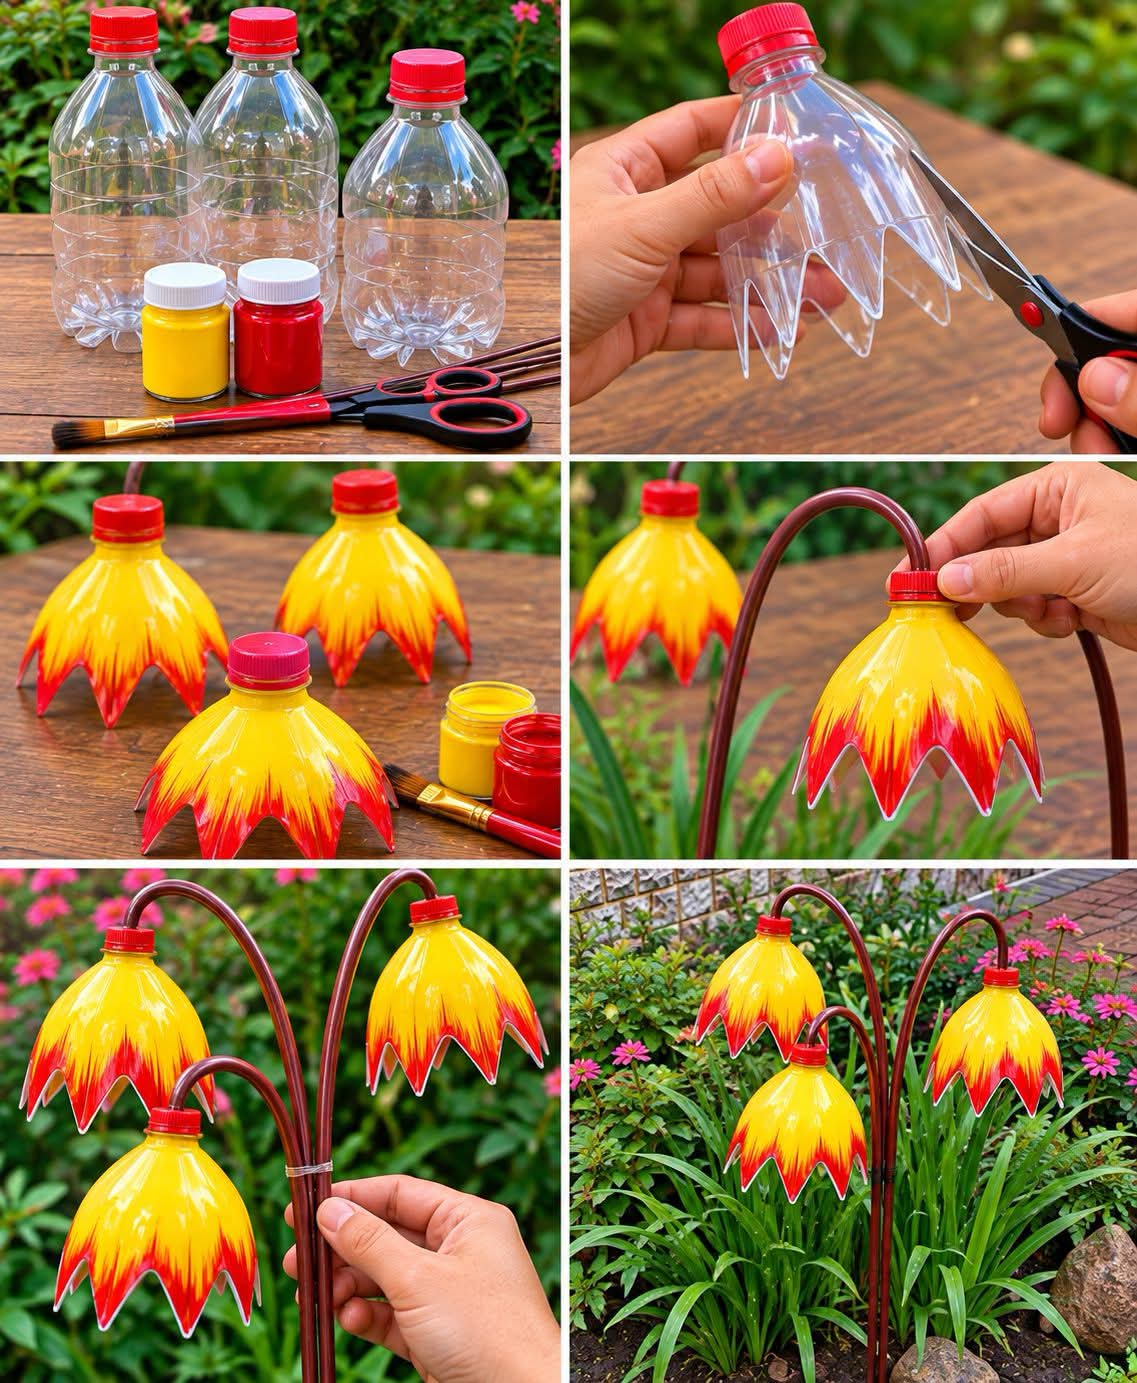
Turn Empty Bottles Into Beautiful Garden Decorations 🎨🌸♻️
Check out this beautiful garden decoration made from bottles and acrylic paint! 🌿✨
Before you throw another empty plastic bottle into the recycling bin, take a second look at it. With a little imagination, some acrylic paint, and a few simple craft supplies, an ordinary bottle can become a colorful piece of garden art.
Upcycling bottles into garden decorations is an inexpensive way to add personality to a yard, patio, balcony, or porch while giving something that might otherwise become waste a second life. Plastic bottles have been used for everything from painted flowers and hanging decorations to planters and whimsical garden characters. (Greenery Simplicity)
And the best part?
You don’t have to be an expert crafter to make something beautiful.
🌸 Why Make Garden Decorations From Bottles?
There are plenty of reasons to try this project.
♻️ It’s a great way to reuse plastic
Instead of immediately discarding an empty bottle, you can transform it into something decorative and useful.
💰 It’s budget-friendly
The main material is something you may already have at home. All you really need is a clean bottle, paint, and a little creativity.
🎨 You can customize everything
Choose your favorite colors, paint flowers, butterflies, ladybugs, mushrooms, birds, faces, patterns, or anything else that fits your garden.
🌿 It’s perfect for small spaces
You don’t need a huge backyard. Painted bottle decorations can brighten a balcony, patio, fence, porch, or even a small container garden.
🛠️ What You’ll Need
For a simple painted-bottle garden decoration, gather:
- Clean, empty plastic bottles
- Acrylic paint
- Paintbrushes
- Permanent marker or pencil
- Scissors
- Craft knife, if needed
- Strong string, twine, or wire
- Hot glue or suitable outdoor adhesive, optional
- Clear outdoor-compatible sealant, optional
- Decorative items such as beads, buttons, ribbon, or recycled plastic, optional
If you’re turning bottles into planters, you’ll also need:
- Potting soil
- Small plants or flowers
- A way to create drainage holes
Craft guides for recycled bottle projects commonly recommend cleaning and drying the bottles thoroughly before painting, and several thin coats can work better than one heavy coat. (Jardins Botaniques Mackay Régional)
🌼 Step 1: Clean the Bottles
Start with completely empty bottles.
Wash them thoroughly with warm, soapy water to remove any leftover drink or residue.
Remove the labels and adhesive as much as possible.
Then rinse and allow the bottles to dry completely.
Don’t rush this step.
Paint adheres much better to a clean, dry surface.
✂️ Step 2: Decide What You’re Making
This is where the fun begins.
Before cutting anything, look at the shape of your bottle and decide what it could become.
You could make:
- 🌸 Flowers
- 🦋 Butterflies
- 🐞 Ladybugs
- 🐝 Bees
- 🐸 Frogs
- 🐦 Birds
- 🍄 Mushrooms
- 🌈 Colorful hanging ornaments
- 🪴 Small planters
- 🌻 Garden stakes
- 🎨 Decorative bottles
- 💕 Whimsical garden characters
Different bottle shapes can inspire completely different projects.
Large bottles can make excellent planters, while bottle bottoms can be transformed into flower shapes or hanging decorations.
🎨 Step 3: Paint Your Base
Acrylic paint is commonly used for bottle crafts because it comes in a huge range of colors and can be applied with brushes or sponges. (Bricoleurs Enthousiastes)
For stronger color, consider applying two or more thin coats instead of one thick coat.
Allow each layer to dry before adding another.
For example, you might paint a bottle:
White → let dry → second white coat → let dry → decorative details
A white base can also make brighter colors stand out.
🌺 Step 4: Add Your Design
Once the base coat is dry, bring your decoration to life.
Use a small brush to paint flowers, leaves, dots, stripes, hearts, stars, or other details.
Don’t worry about making everything perfect.
Some of the most charming garden decorations are intentionally playful and handmade.
Try these combinations:
Yellow + black: Bees 🐝
Red + black: Ladybugs 🐞
White + orange: Mushrooms 🍄
Blue + white: Flowers or butterflies 🦋
Green + pink: Garden flowers 🌸
You can even create an entire little garden family using different bottles.
🪴 Turn a Bottle Into a Planter
One of the most useful versions of this project is a recycled bottle planter.
Carefully cut the bottle into the shape you want.
If you’re making a planter, create several small drainage holes in the bottom so excess water can escape. Recycled bottle planter instructions commonly recommend several drainage holes rather than leaving the container completely sealed. (Natural Schooling)
Then:
- Wash and dry the bottle.
- Mark where you want to cut.
- Carefully cut the plastic.
- Smooth or protect any sharp edges.
- Add drainage holes.
- Paint the outside.
- Let it dry completely.
- Add potting mix.
- Plant a small flower or herb.
- Place it somewhere suitable for the plant.
A row of colorful bottle planters can make an otherwise boring fence or wall much more interesting.
🌿 Make a Hanging Garden
Want to take the idea one step further?
Turn several bottles into hanging planters.
After preparing and painting the bottles, make secure holes for the hanging cord and use strong, weather-resistant string or twine.
Hang several at different heights to create a simple vertical garden.
This is especially useful when ground space is limited.
You can even paint each bottle a different color to create a cheerful rainbow effect.
🌸 Make Bottle Flowers
Another fun option is to use the bottom portion of a plastic bottle.
Depending on the bottle’s shape, the molded sections can sometimes resemble petals.
Carefully cut around the bottom, paint it, and add additional details.
You can attach the finished flower to a garden stake, fence, branch, or another support.
Recycled bottle craft guides have demonstrated similar ideas using cut bottle pieces and acrylic paint. (Jardins Botaniques Mackay Régional)
Imagine having a whole bed of colorful handmade flowers that never need watering!
🐝 Make a Pollinator-Themed Garden
If you love attracting pollinators, why not decorate your garden with painted bees and butterflies?
Paint bottles yellow and black for bees, or use bright colors for butterflies.
You can add painted wings, antennae, spots, and other details.
Just remember that these decorations are decorations—not replacements for real pollinator habitat.
If you want to help bees and butterflies, combine your bottle art with real flowers that provide nectar and pollen.
That way, your garden can be beautiful and genuinely useful to wildlife.
✨ How to Make Your Paint Last Outdoors
Outdoor decorations have to deal with sun, rain, temperature changes, and wind.
Acrylic paint can work well for craft projects, but an outdoor piece may need additional protection.
Once your paint is completely dry, consider applying a clear sealant designed for outdoor use, following the product’s instructions.
This can help protect the painted surface and extend the life of your decoration.
One recycled-bottle craft source specifically recommends a clear sealant to provide additional protection for painted outdoor pieces. (Bricoleurs Enthousiastes)
Even with a sealant, expect outdoor decorations to eventually need touch-ups.
That’s part of the fun!
⚠️ A Few Safety Tips
If you’re cutting plastic bottles, take your time.
Cut plastic can leave surprisingly sharp edges, so use appropriate scissors or a craft knife carefully. Craft instructions from Crayola and other educational sources specifically recommend adult assistance for bottle-cutting projects. (Crayola)
Also:
- Work on a stable surface.
- Keep fingers away from the cutting path.
- Wear gloves if appropriate.
- Smooth sharp edges before handling.
- Use extra caution with hot glue guns.
- Don’t burn or melt plastic to shape it.
- If using spray products, follow the label’s ventilation instructions.
And if children are helping, let them handle the painting and decorating while an adult handles cutting and other potentially hazardous steps.
💚 Give Your Garden a Personality
The beauty of recycled garden art is that there really aren’t many rules.
You can make your decorations elegant and simple—or completely silly and colorful.
Paint little faces on bottles.
Create a row of flowers.
Make colorful mushrooms.
Turn bottles into hanging planters.
Create butterflies around a flower bed.
Make a cheerful collection of garden creatures.
Or simply paint bottles in your favorite colors and arrange them around your plants.
The goal isn’t to make something perfect.
The goal is to make something that’s yours.
♻️ One Bottle Can Become Something Beautiful
There is something satisfying about taking an object that was headed for the trash and turning it into something you actually want to display.
A bottle that once held a drink can become a flower.
A container can become a planter.
A piece of discarded plastic can become a colorful garden ornament.
And you don’t need expensive supplies or advanced crafting skills to get started.
Sometimes all it takes is:
An empty bottle + a paintbrush + some acrylic paint + a little imagination. 🎨🌿
So before you throw those bottles away, ask yourself:
“What could I turn this into?”
You might be surprised by what you can create. 🌸♻️
🌷 What Would You Make?
If you had a basket full of empty bottles and a set of acrylic paints, what would you create?
🌸 A. Colorful flowers
🐝 B. Bees and butterflies
🪴 C. Hanging planters
🐞 D. Cute garden animals
🌈 E. A whole colorful garden display
Tell us your idea in the comments! 👇🎨♻️
